Dill Pickles and I go way back. I don’t just have a love for them…I am self-confessed ADDICT! It definitely runs in my mother’s side of the family because I don’t know anyone in the English clan that doesn’t love them as much as I do! I passed this fascination onto my own daughter, Ashleigh, who discovered a new twist on dill pickles after moving to Denver…Dill Pickle Infused Vodka!
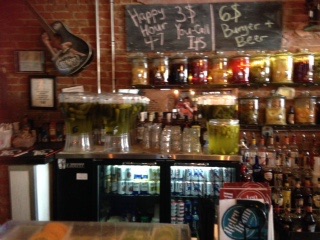
The Retro Pub with various typed of Infused Vodkas
It was a tiny little dive bar called the Retro Pub and she knew immediately that when I came to visit, I was going to have to try this and would be very pleased. She was right…I loved it! Now I am not really a hard liquor kind of person…I prefer just to sip on my Chardonnay but when they served that light green juicy vodka over the rocks, I knew I would never think of Vodka in the same way. I was hooked!
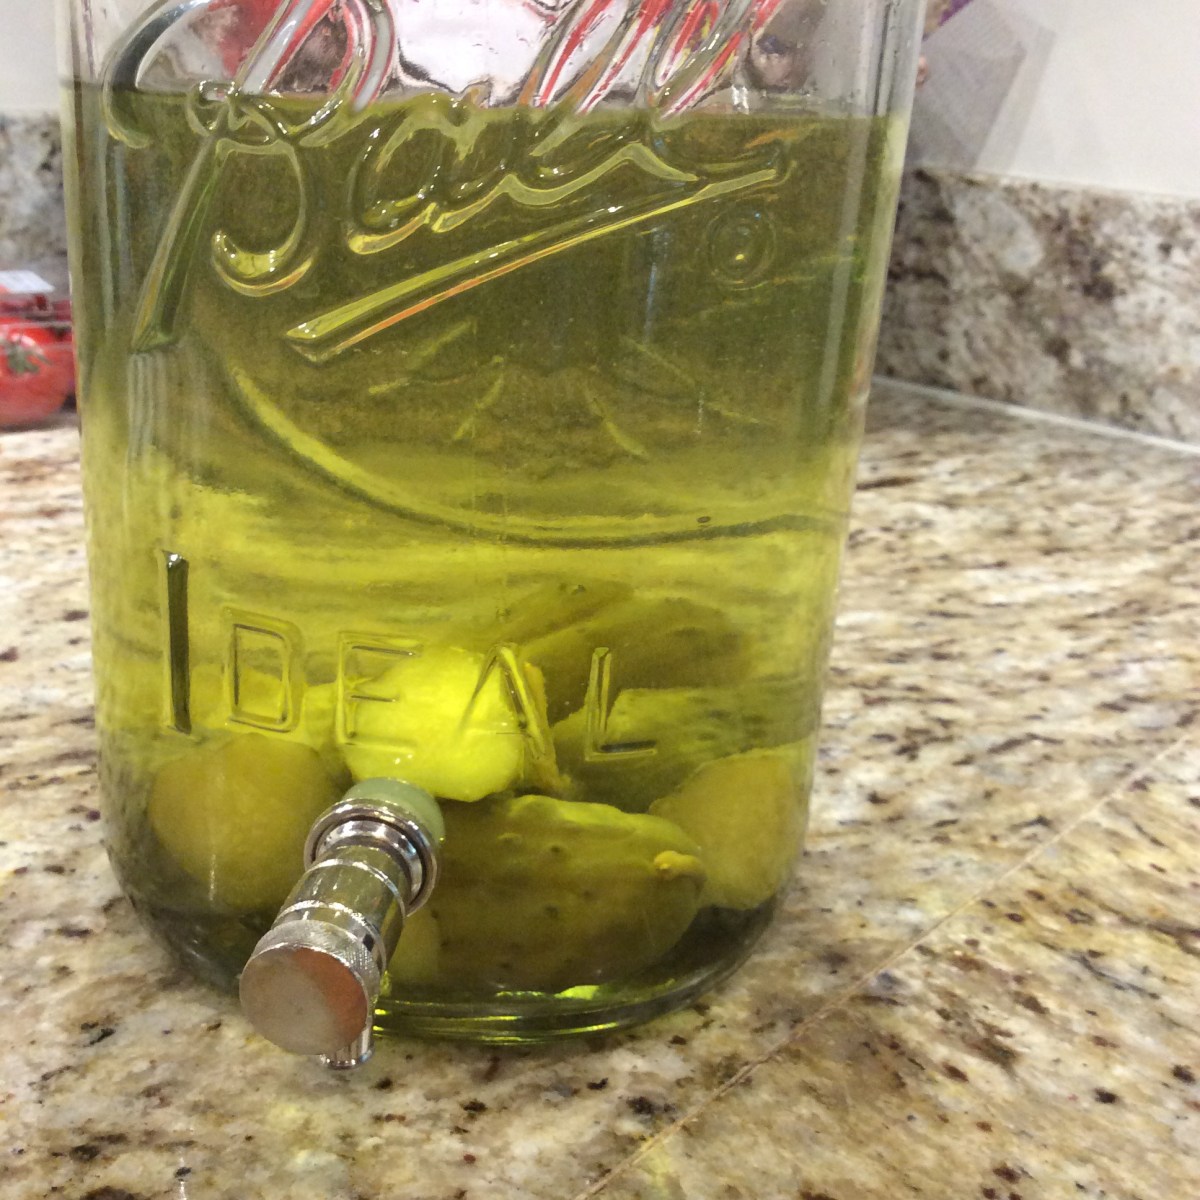
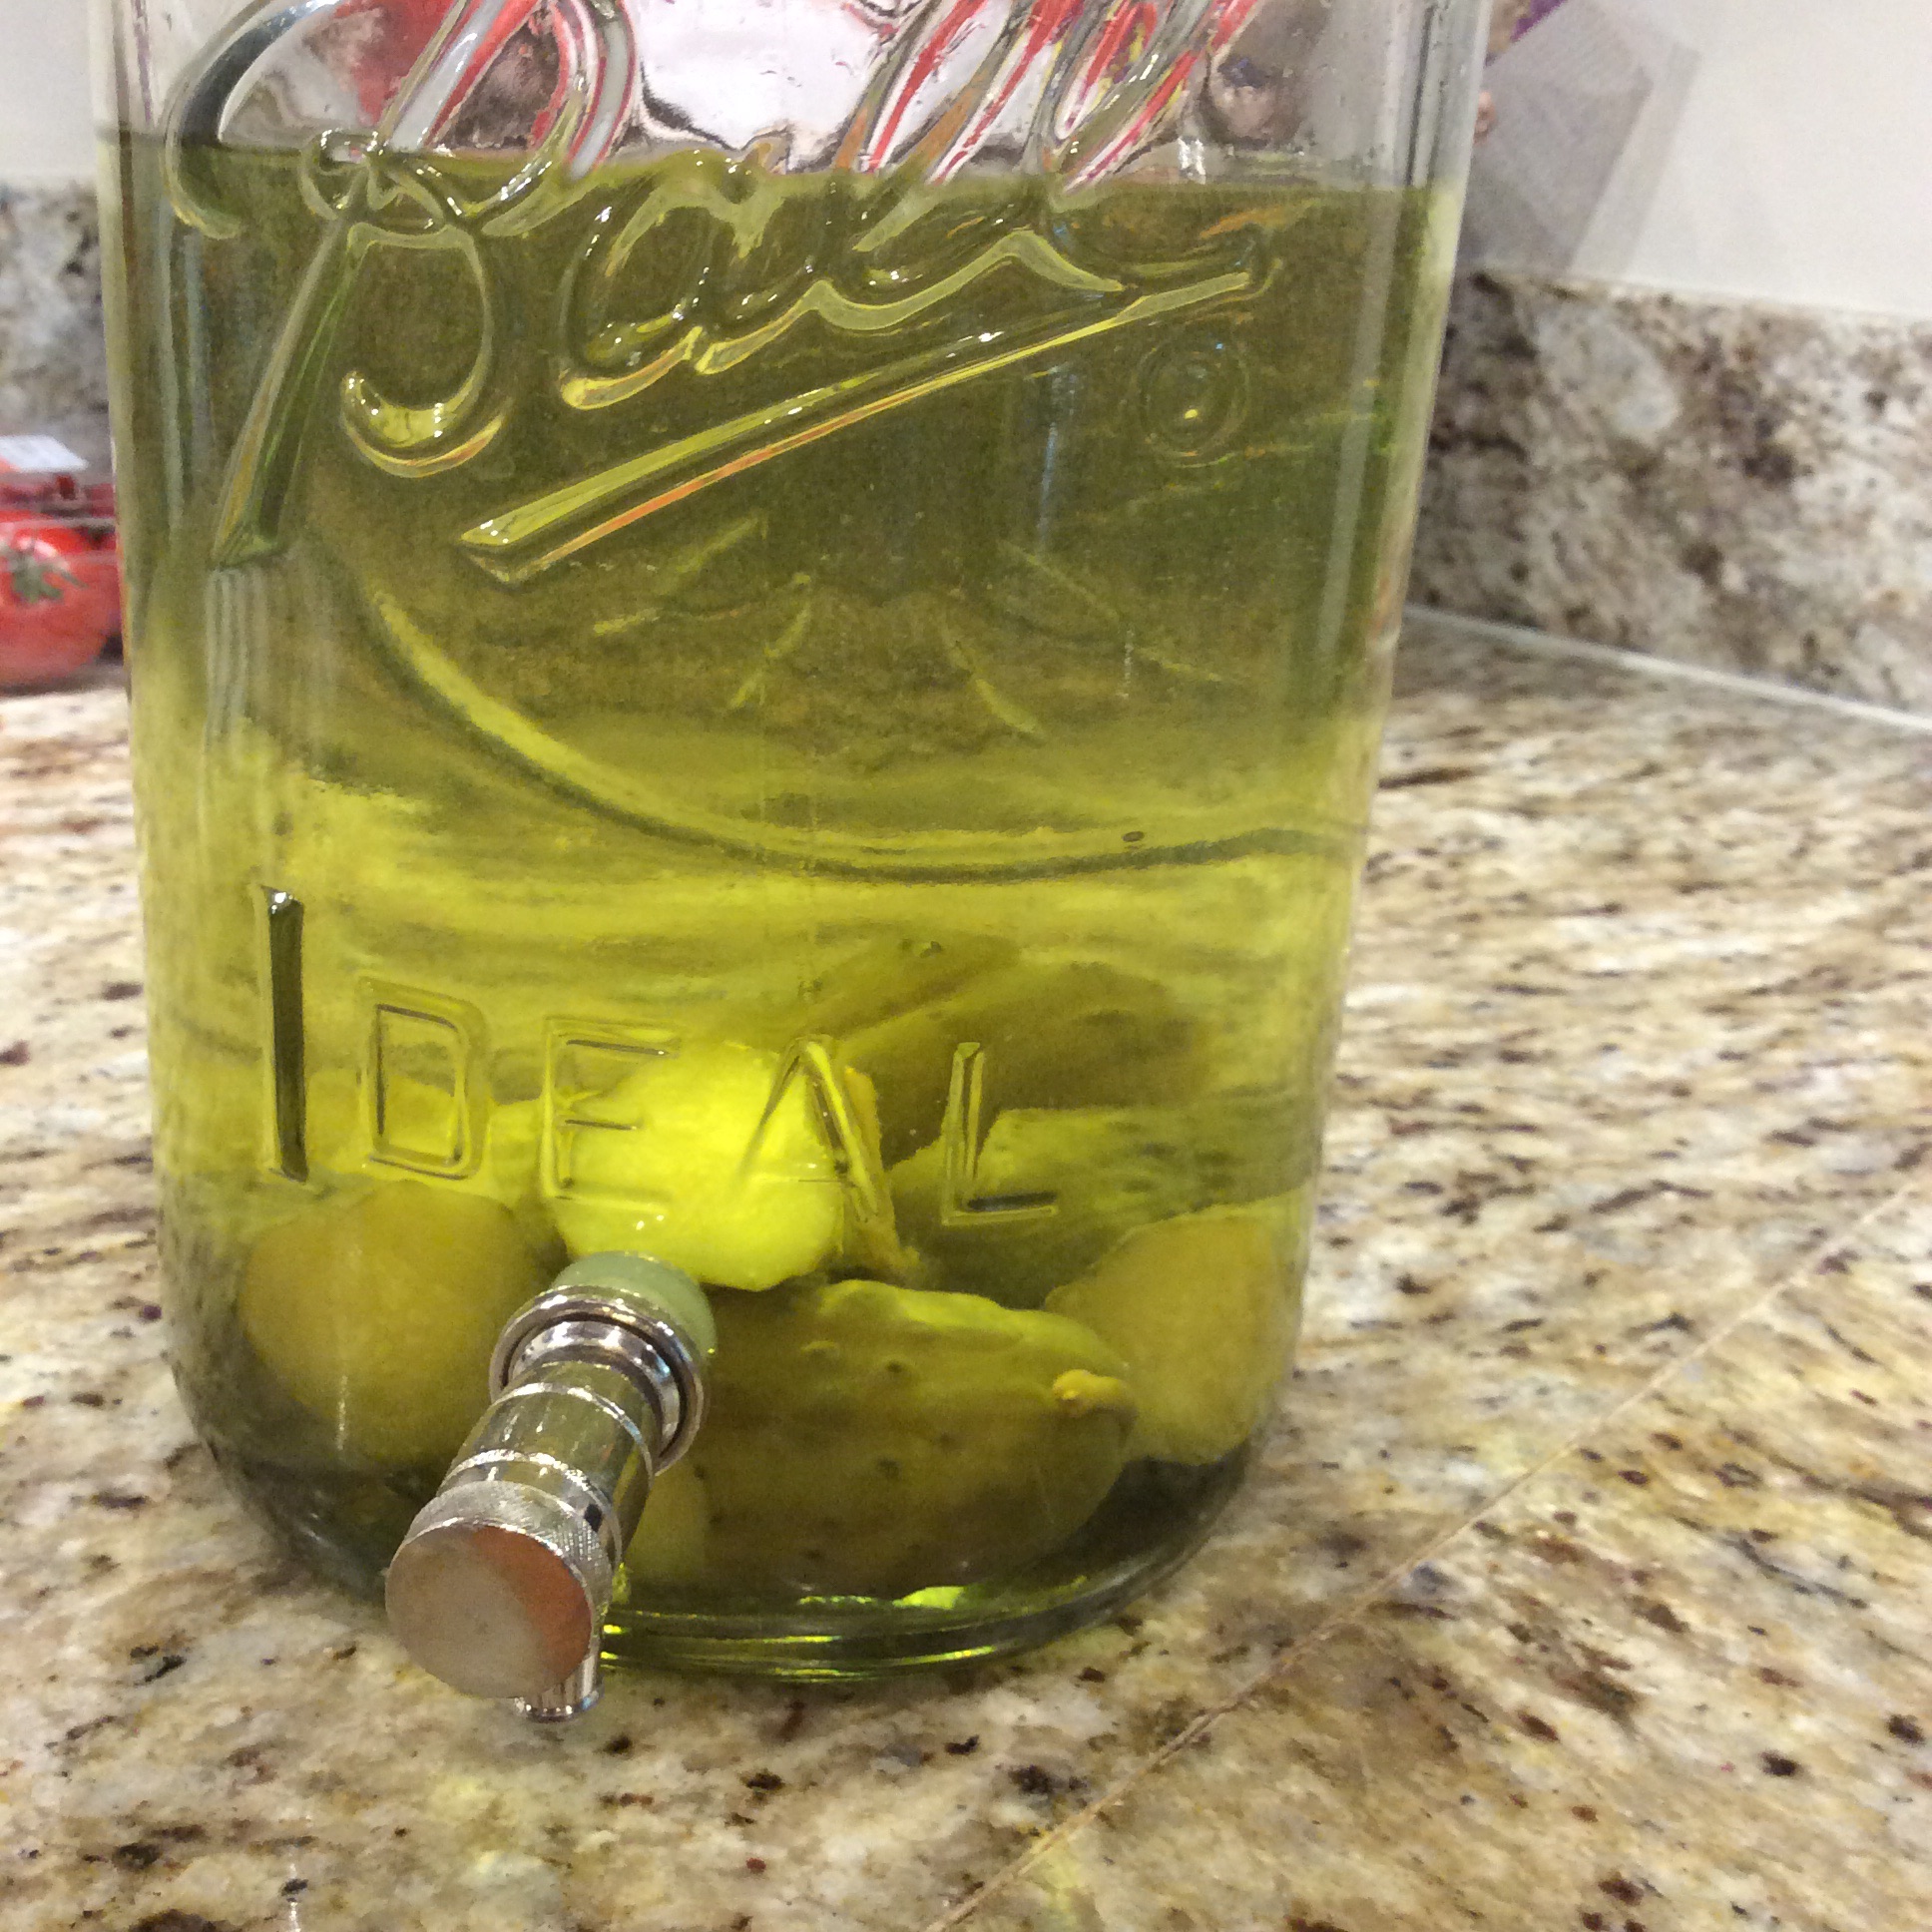
After returning home to Knoxville, I knew that this was something I had to try so I went online to search for recipes for Dill Pickle Infused Vodka. They were all pretty much the same…2 parts vodka to 1 part pickle juice. Using an oversized mason jar with a spicket, I mixed this concoction together cutting up a few pickles to make it look even more appealing. Most of the recipes said to allow it to sit at room temperature for 2-5 days…I decided I would go with 5 days before I would try it.
Homemade Dill Pickle Infused Vodka
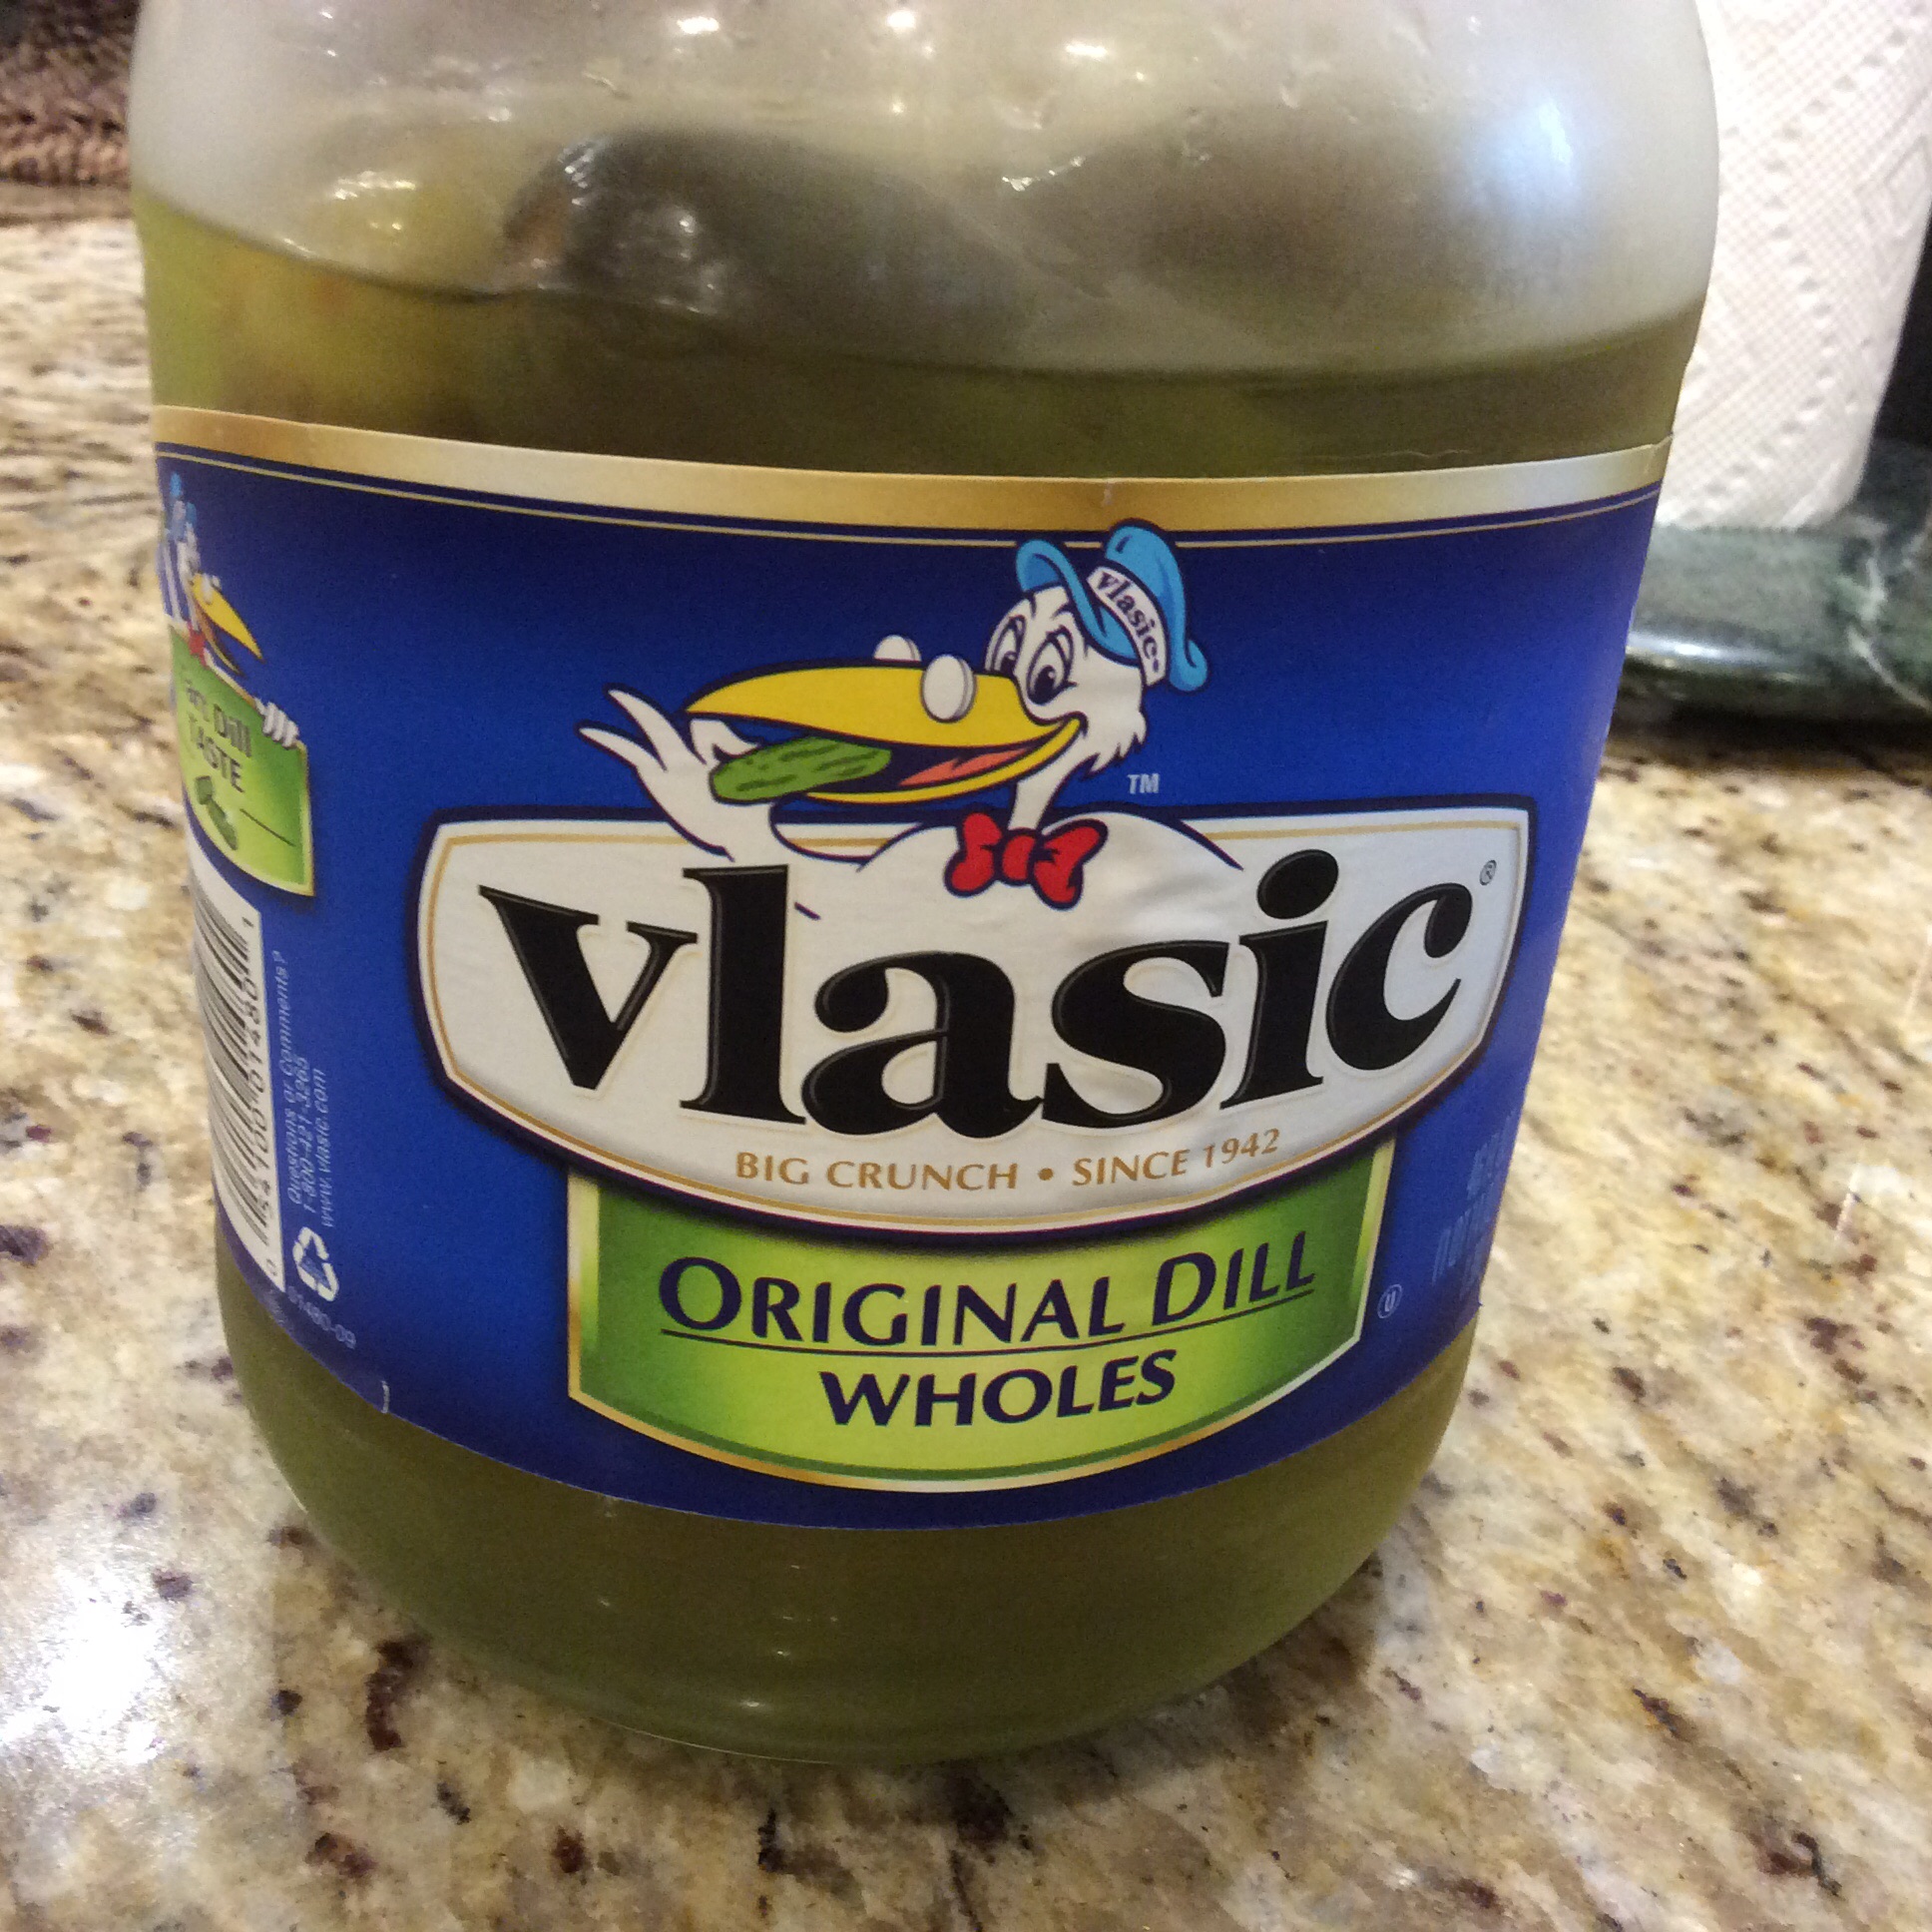
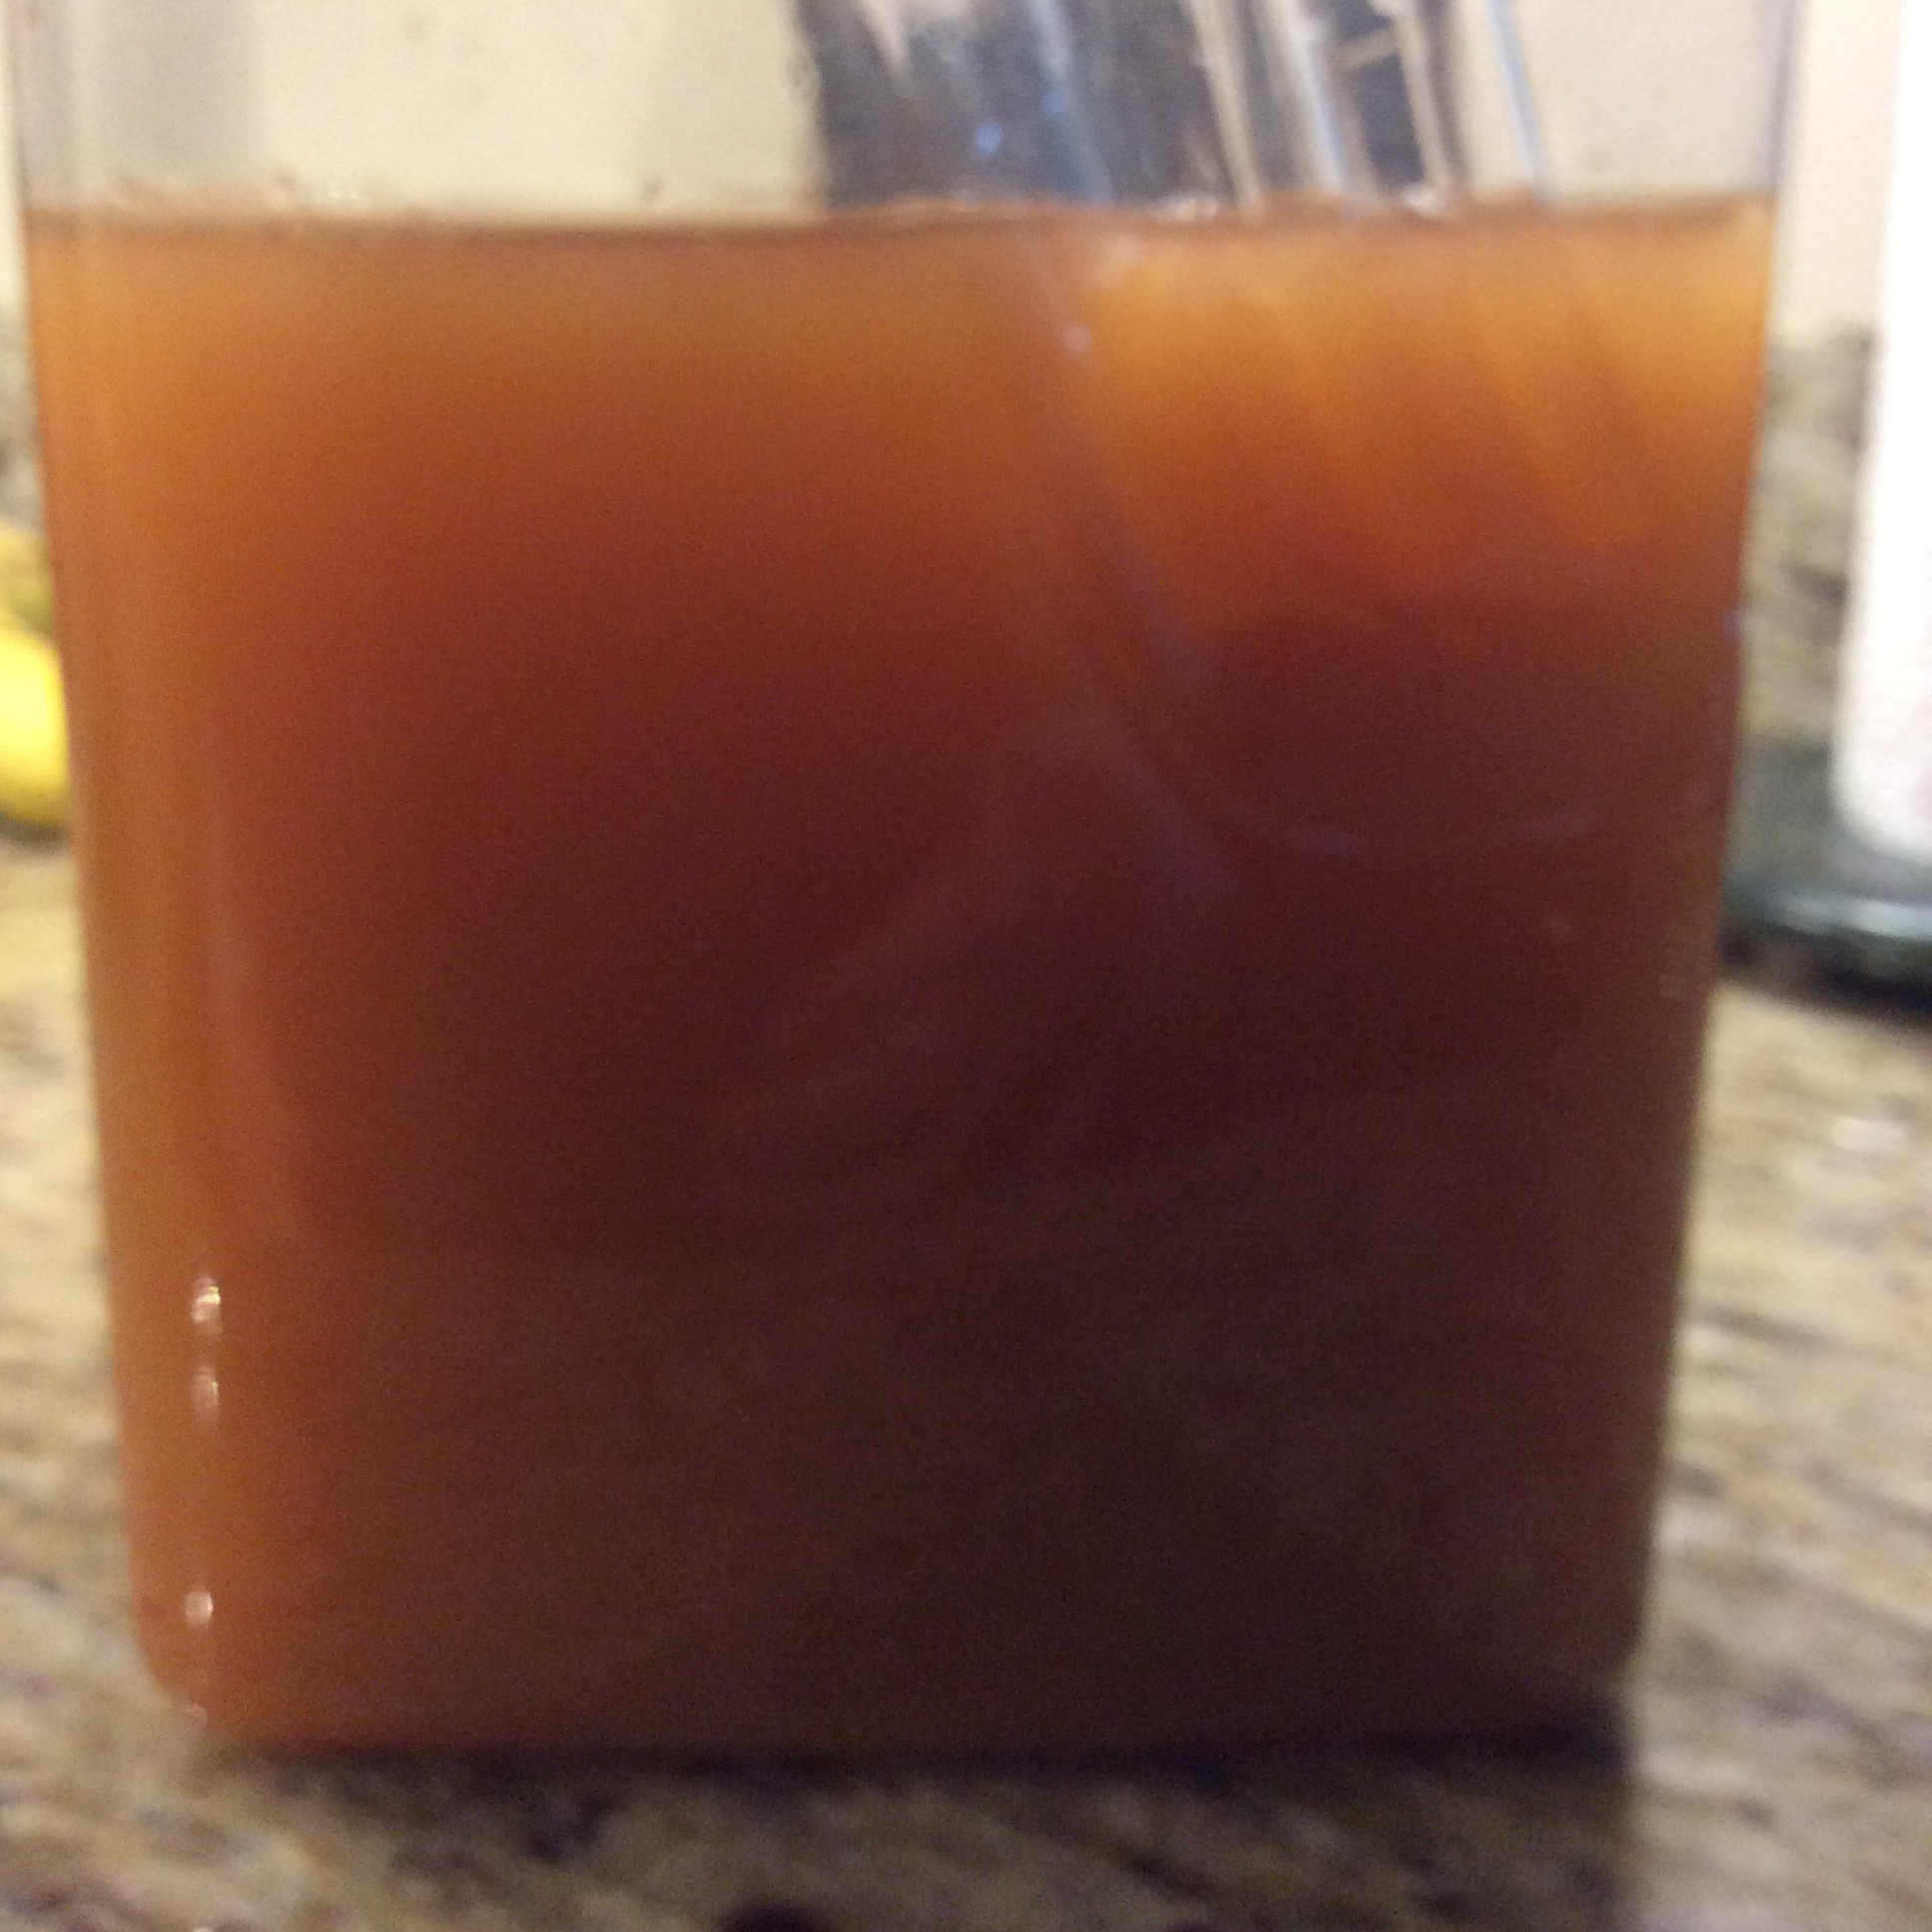
I used a good brand of vodka (you really wouldn’t want to go with cheap stuff if you are drinking it straight) and Vlasic Dill Pickles…one of my favorites.
Time to test….I took one of my husband’s bourbon tumblers and filled it with ice and poured my new creation into the glass. It didn’t taste anything at all like what I had at the Retro Pub. It knew exactly what it needed….more pickle juice! I added 1 part more of pickle juice and waited another 5 days to test again.
I kept it on the counter on the kitchen and my taste buds salivated every time I looked at it. I was so hopeful that this time it would taste close to what I had in Denver.
It was perfect!
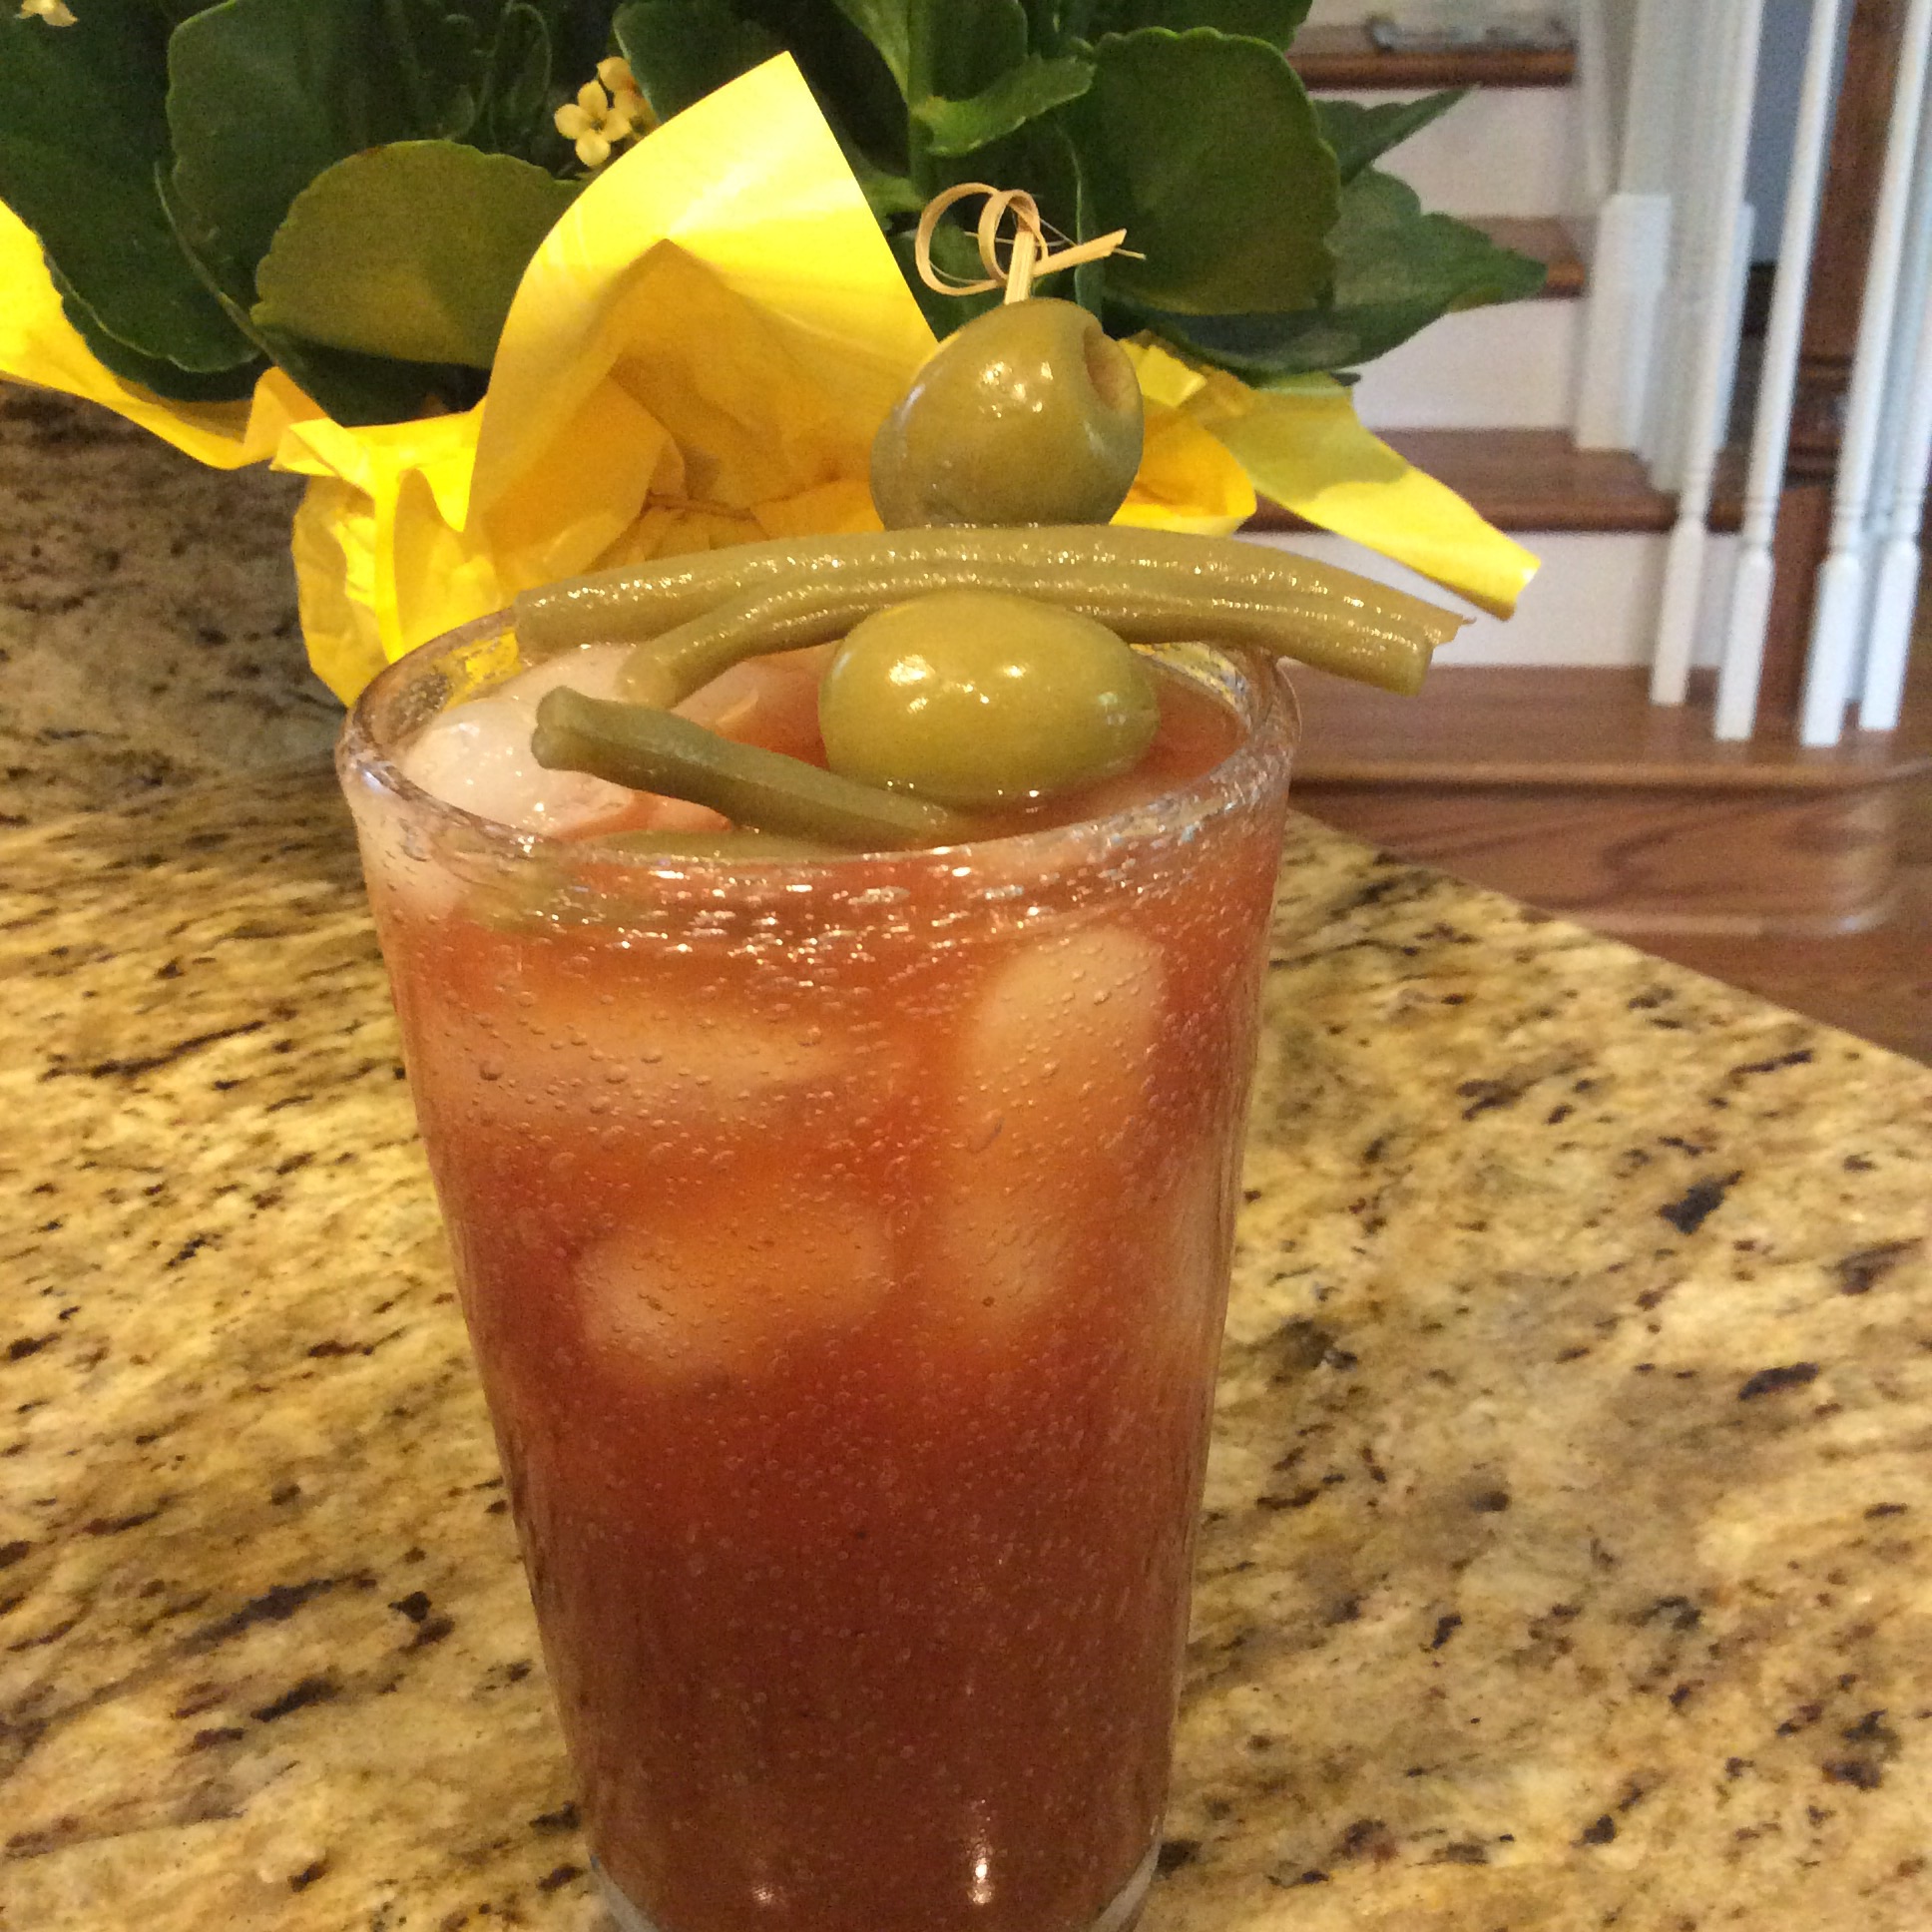
Dill Pickle Infused Vodka…on the rocks!
The following weekend, I decided to try it with another English family favorite….The Bloody Mary. I turned it into a Pickle Mary and let me just say……Yummy to the “nth” degree!
My Pickle Mary!
From now on, I will always have some homemade dill pickle infused vodka on hand. My sister, Kelli, is coming to visit next weekend…She is going to love this!
So grab a jar of your favorite dill pickle and a good vodka and remember 1 part vodka to one part pickle juice and you will have yourself a unique tasty spirit! Next time, I may add some hot peppers to it….So many possibilities! If you are a dill pickle lover, this recipe is for you!
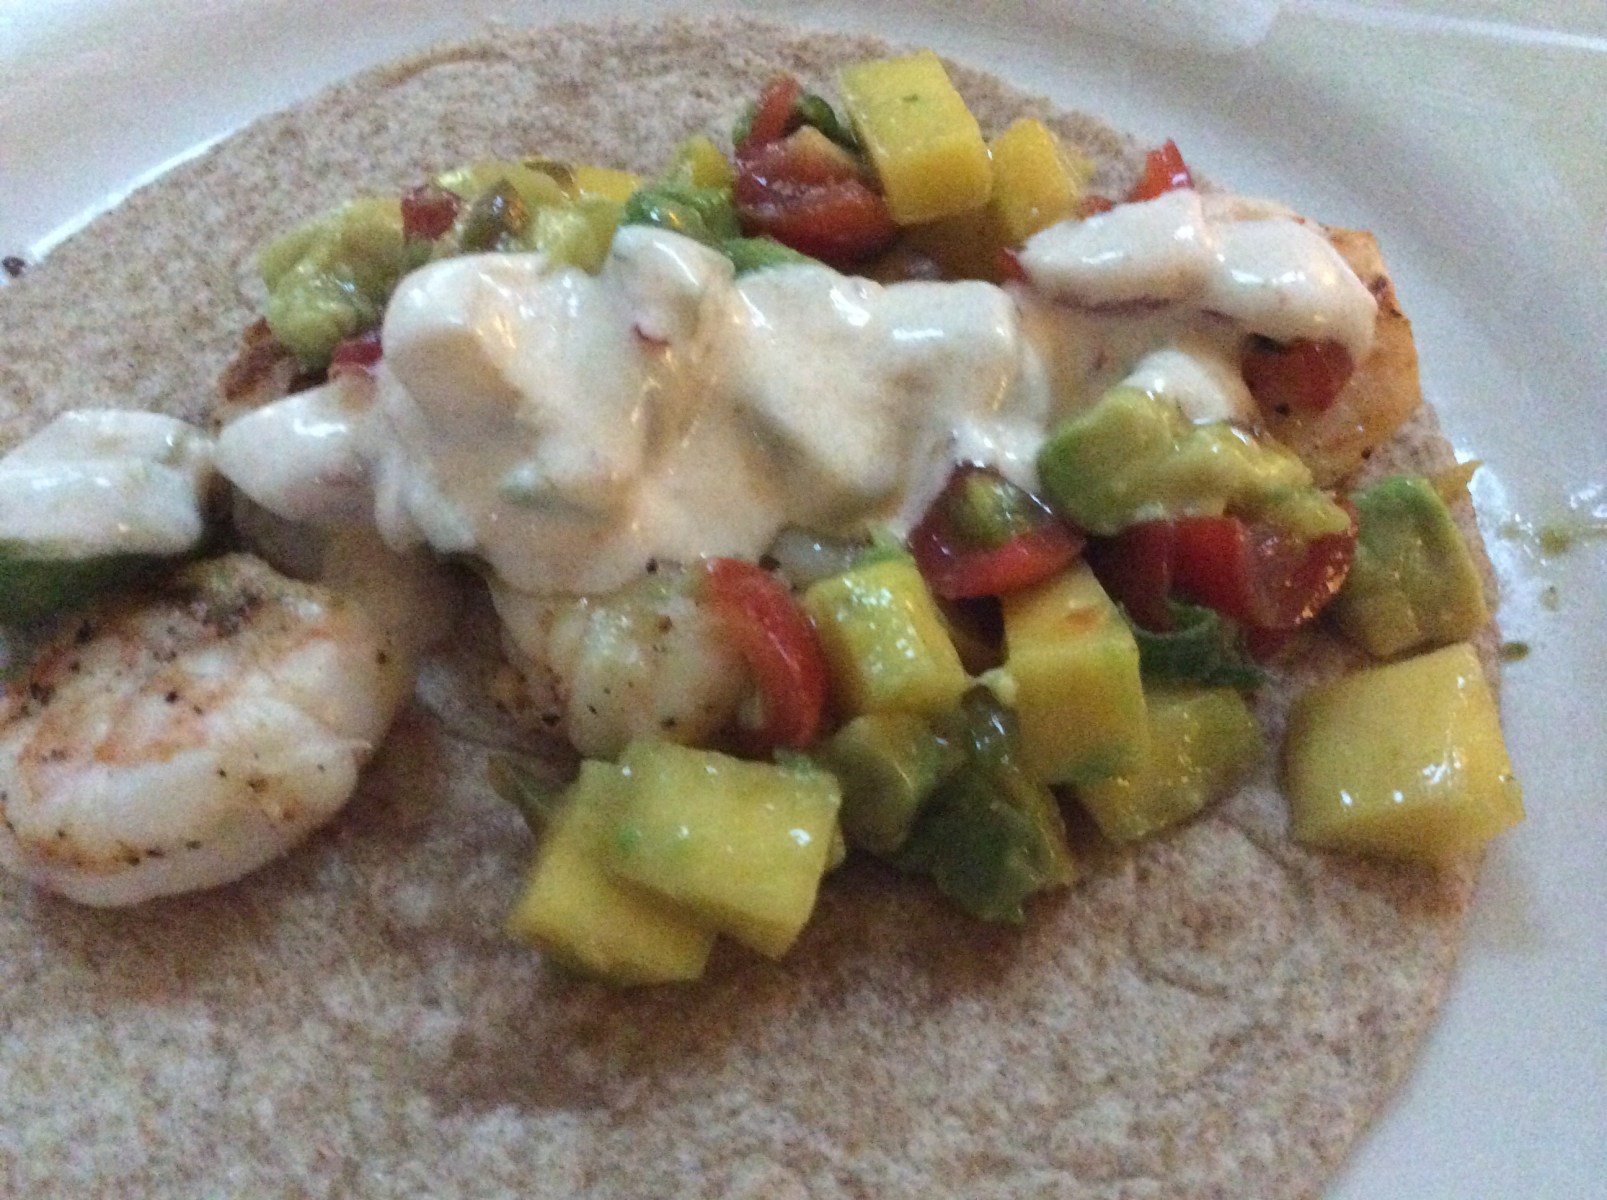
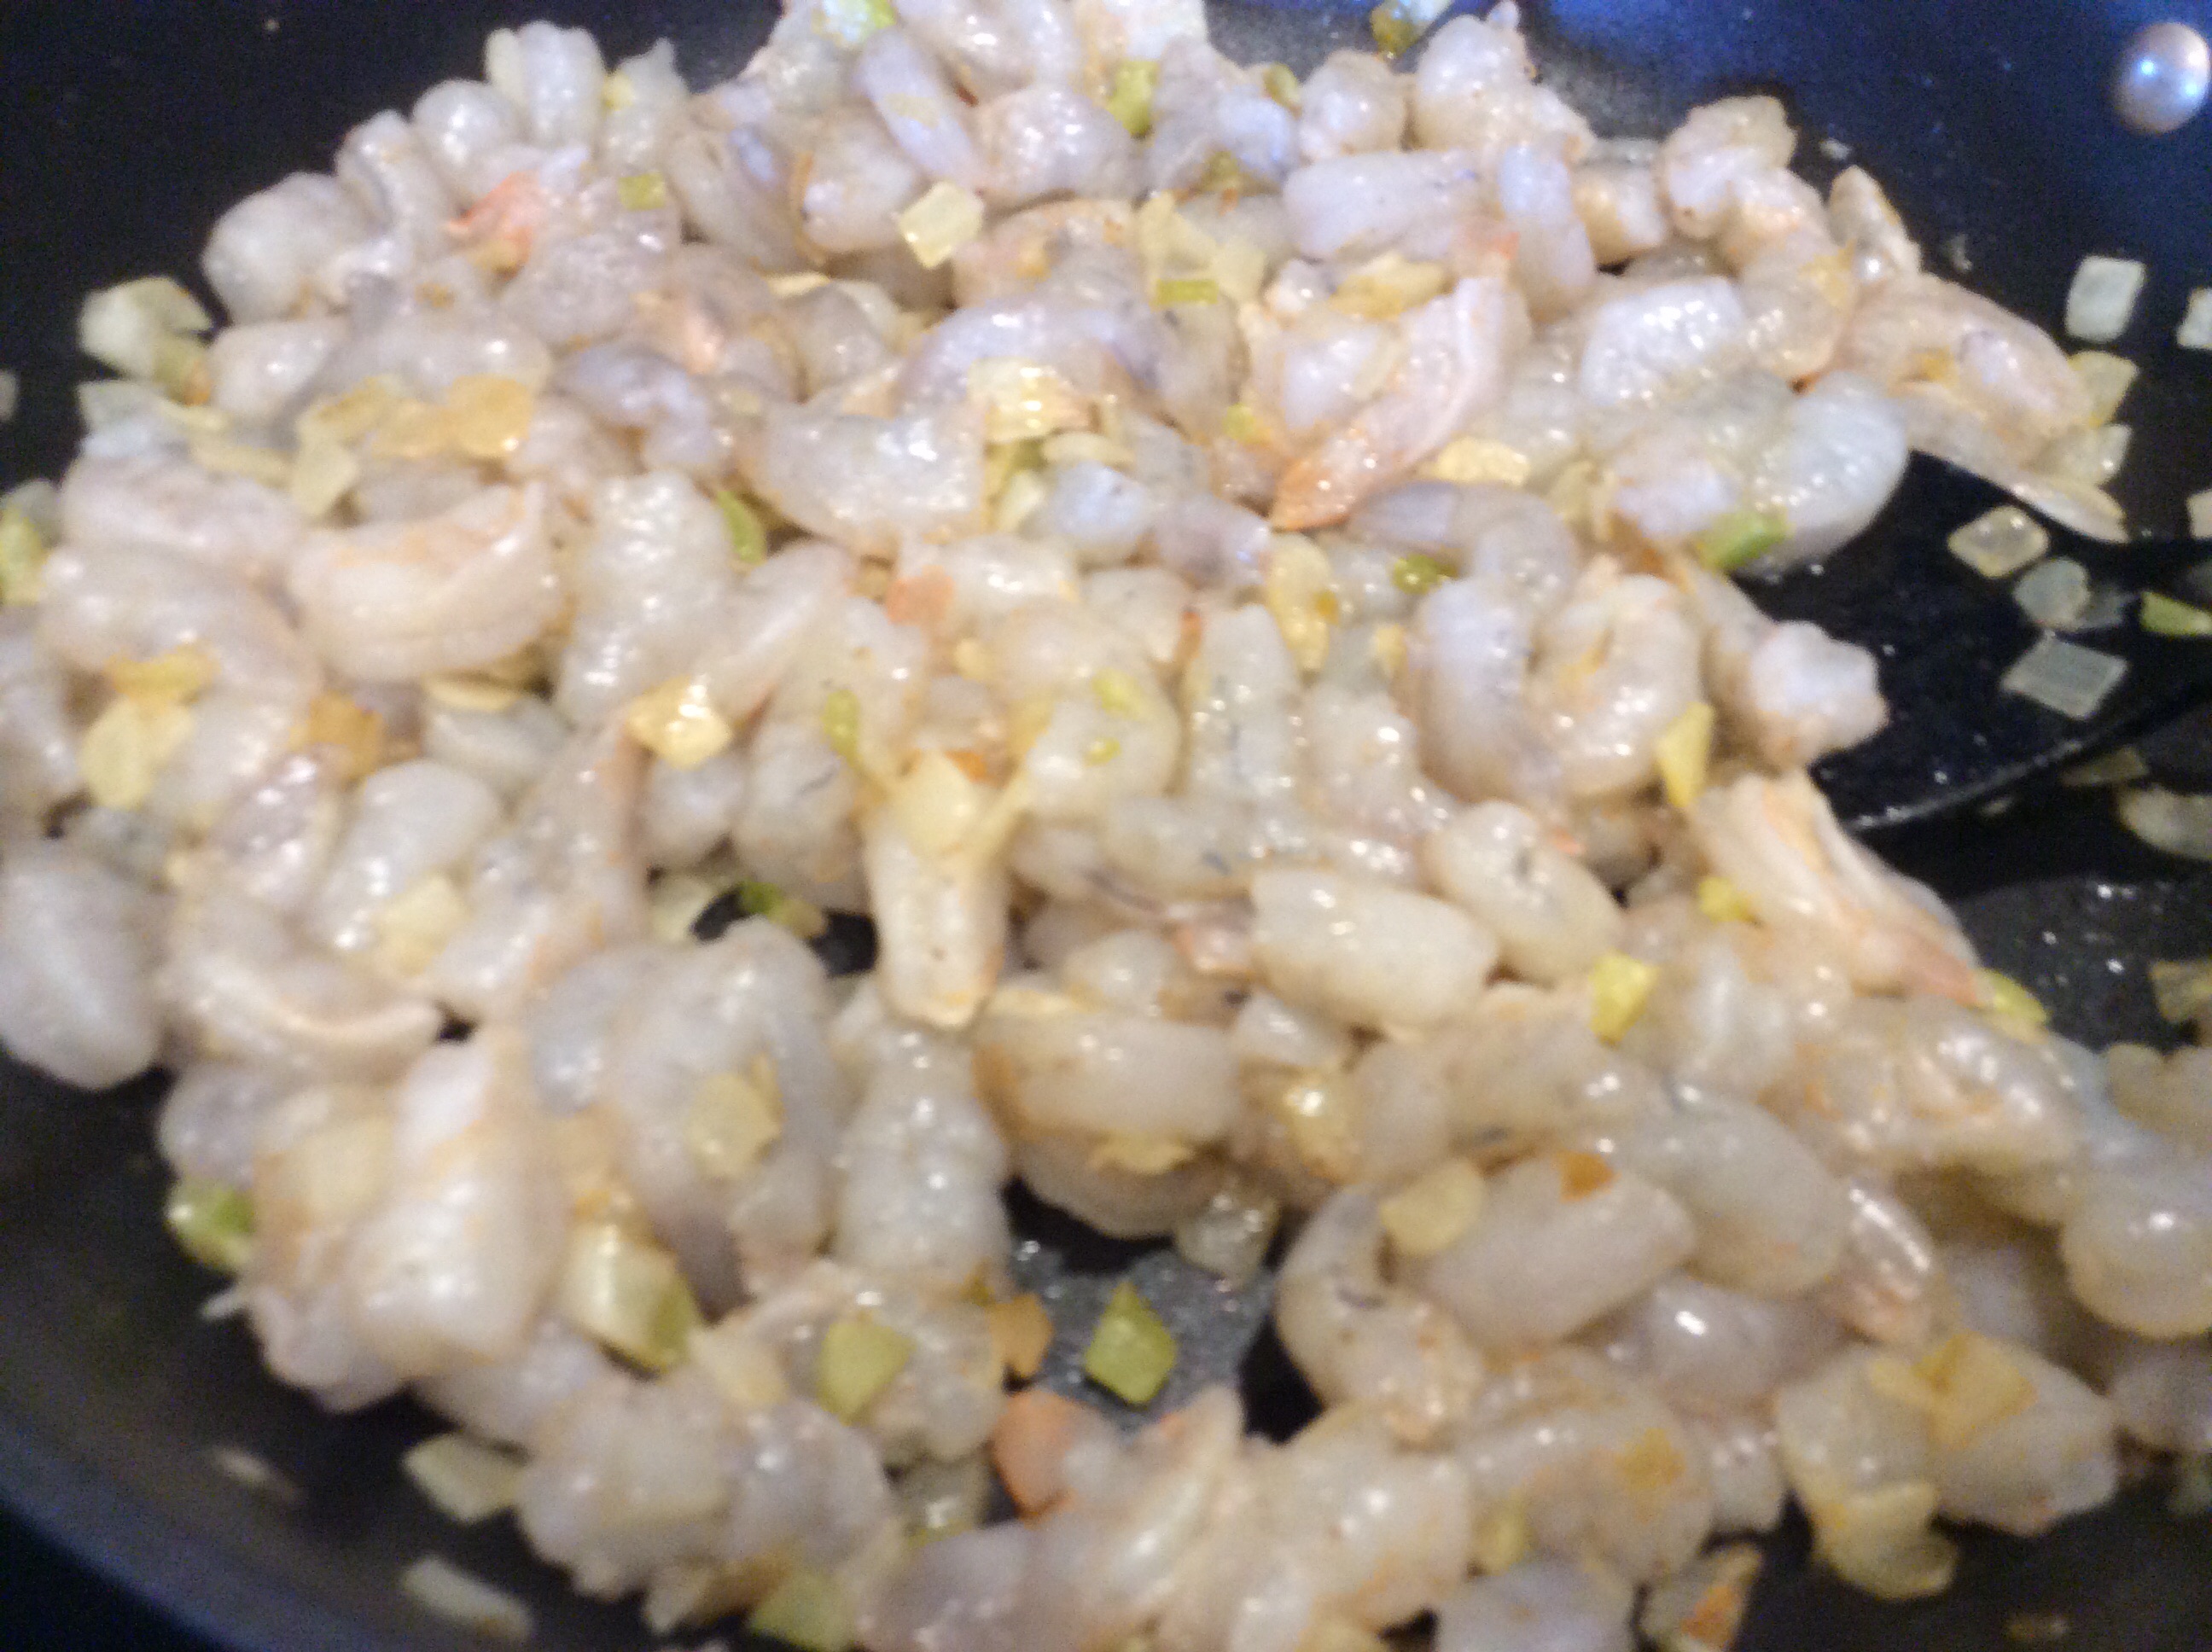
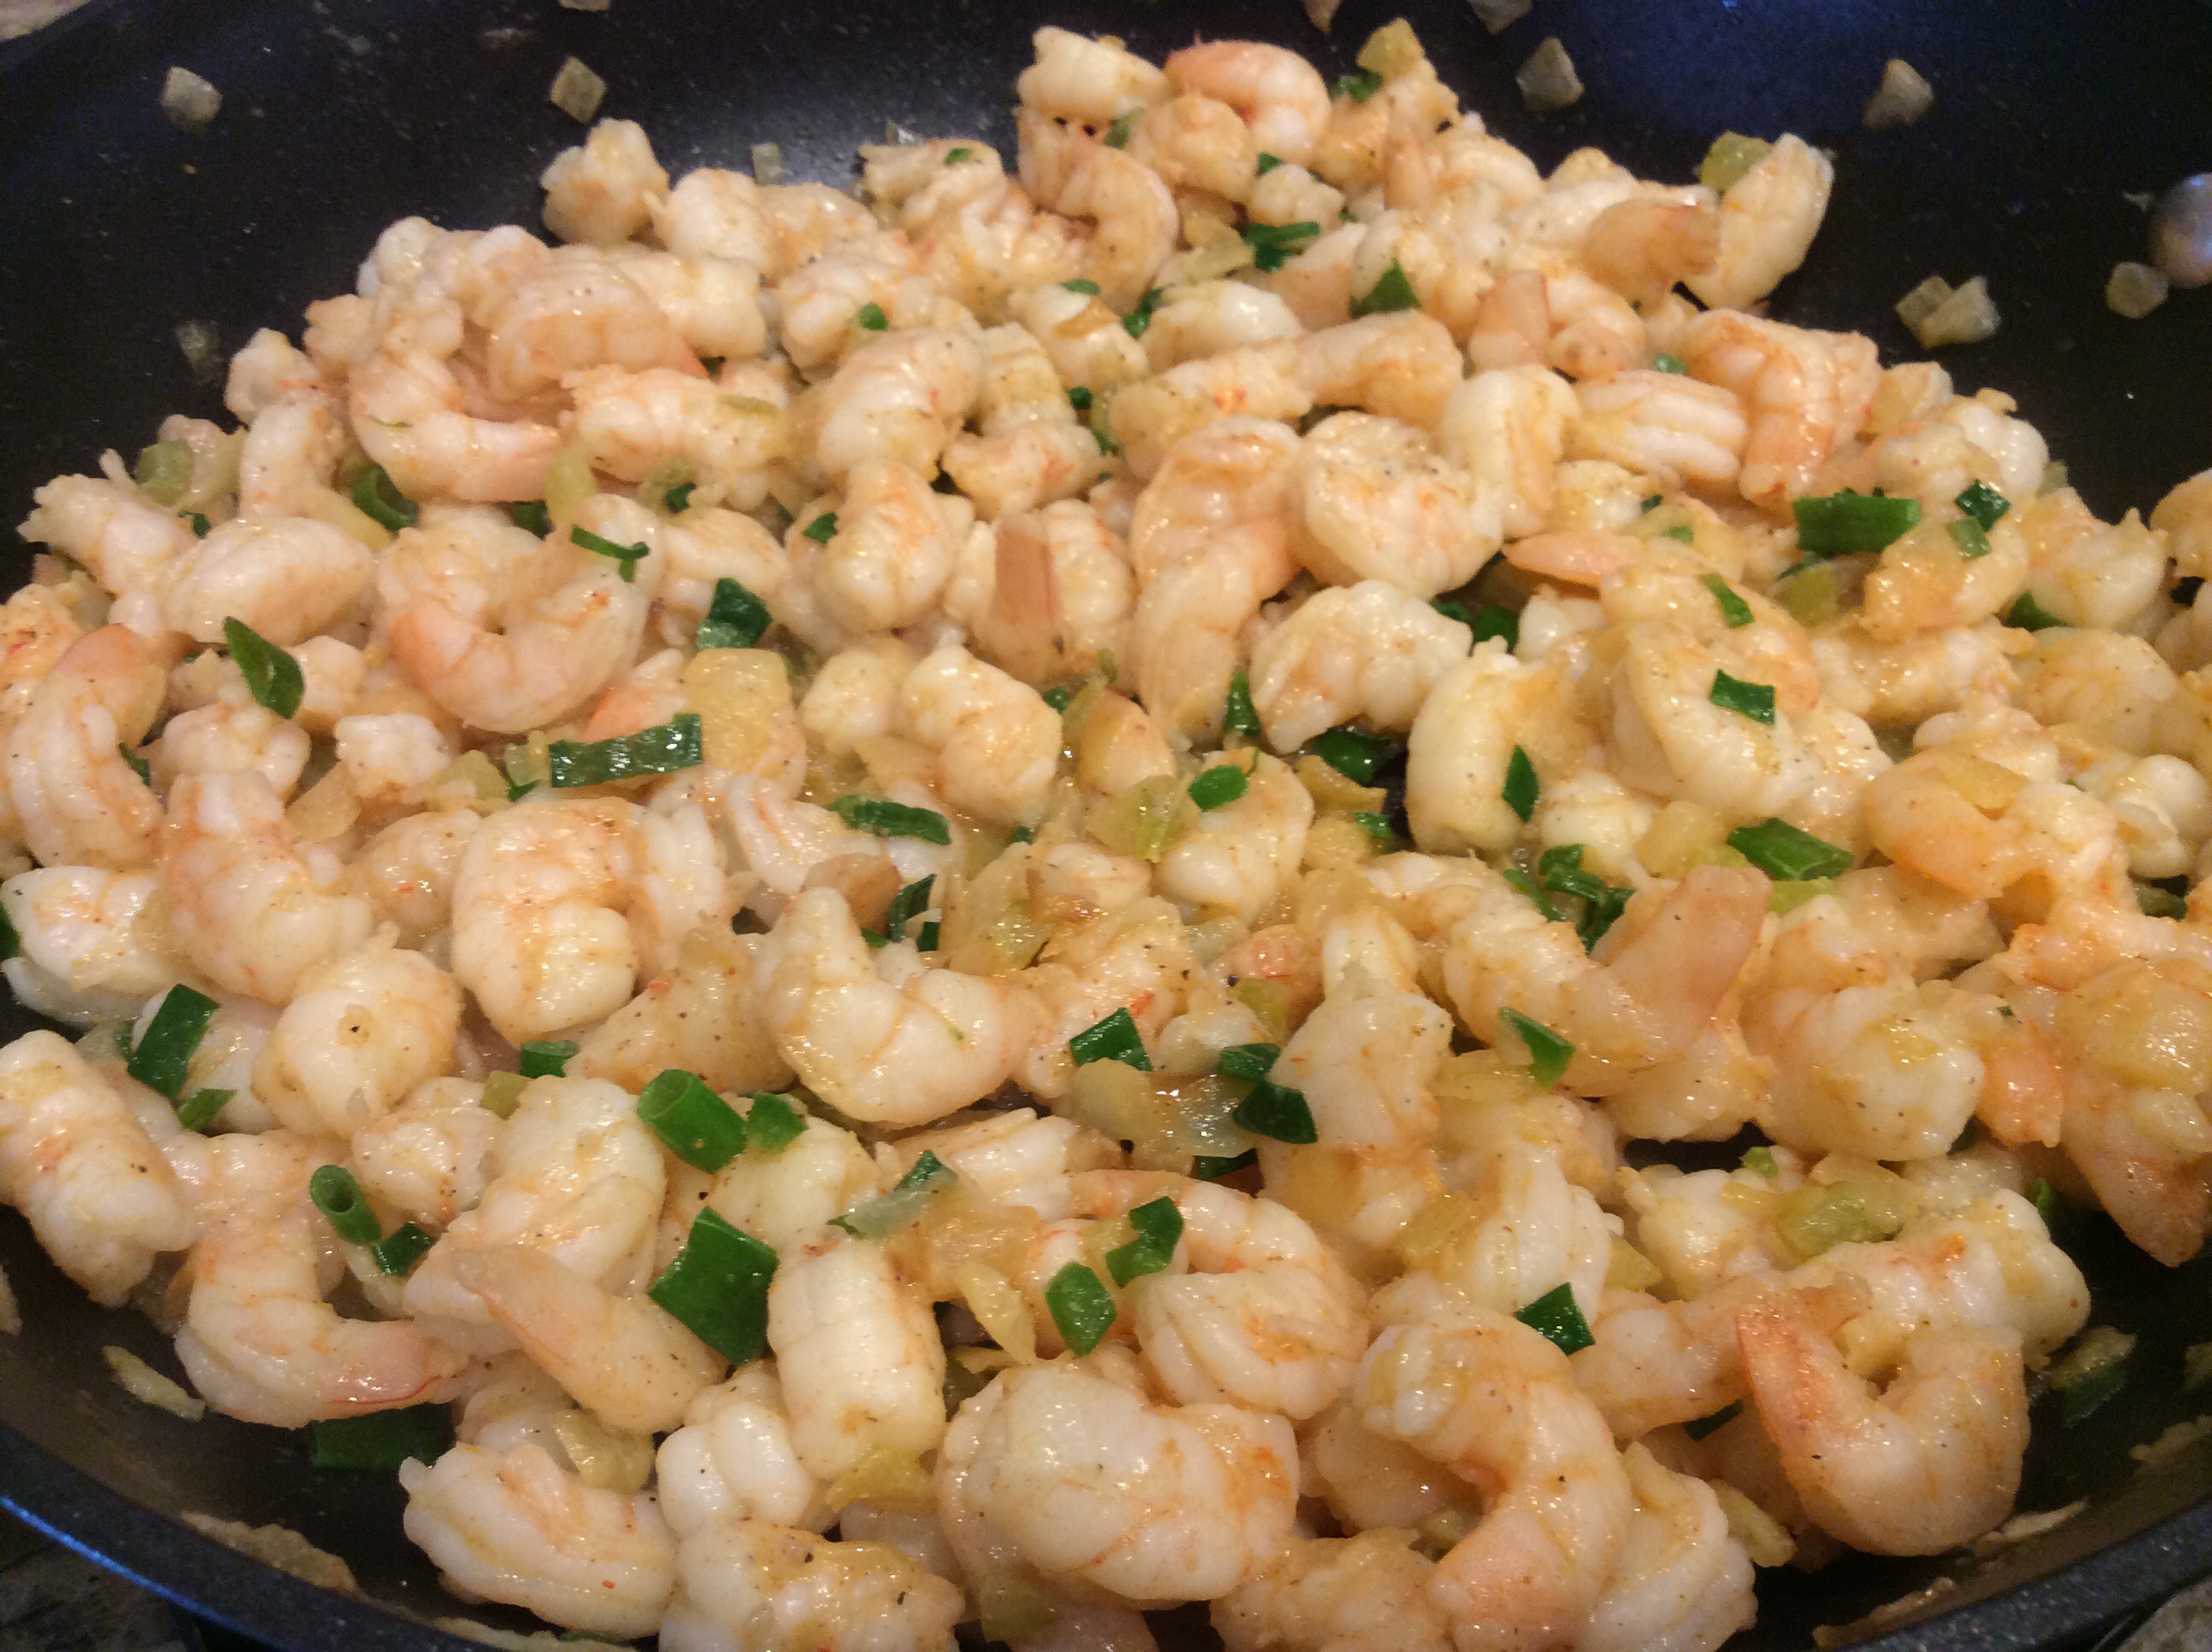
Shrimp Tacos topped with Tropical Guacamole Salad and a Creamy Lime Sauce…wow, doesn’t that sound delicious! This is my personal creation made in my kitchen this week and it embodies all the “fresh flavors” that I have always wanted to include in my food. Fresh Flavors….Those two words were my inspiration a couple of years ago when I began dabbling in the personal chef business….aka fresh flavors byfrankiewas born. Today, I am a part-time personal chef/food blogger and I always try to keep those two words in my mind when I am in my art studio: My Kitchen!
Shrimp Tacos topped with Guacamole/Mango Salsa and a Creamy Lime Sauce
Shrimp and Mexican were my obvious cravings when I began developing this recipe and I wanted to keep it on the light side so adding avocados and tropical fruit such as mango and pineapple seemed to…
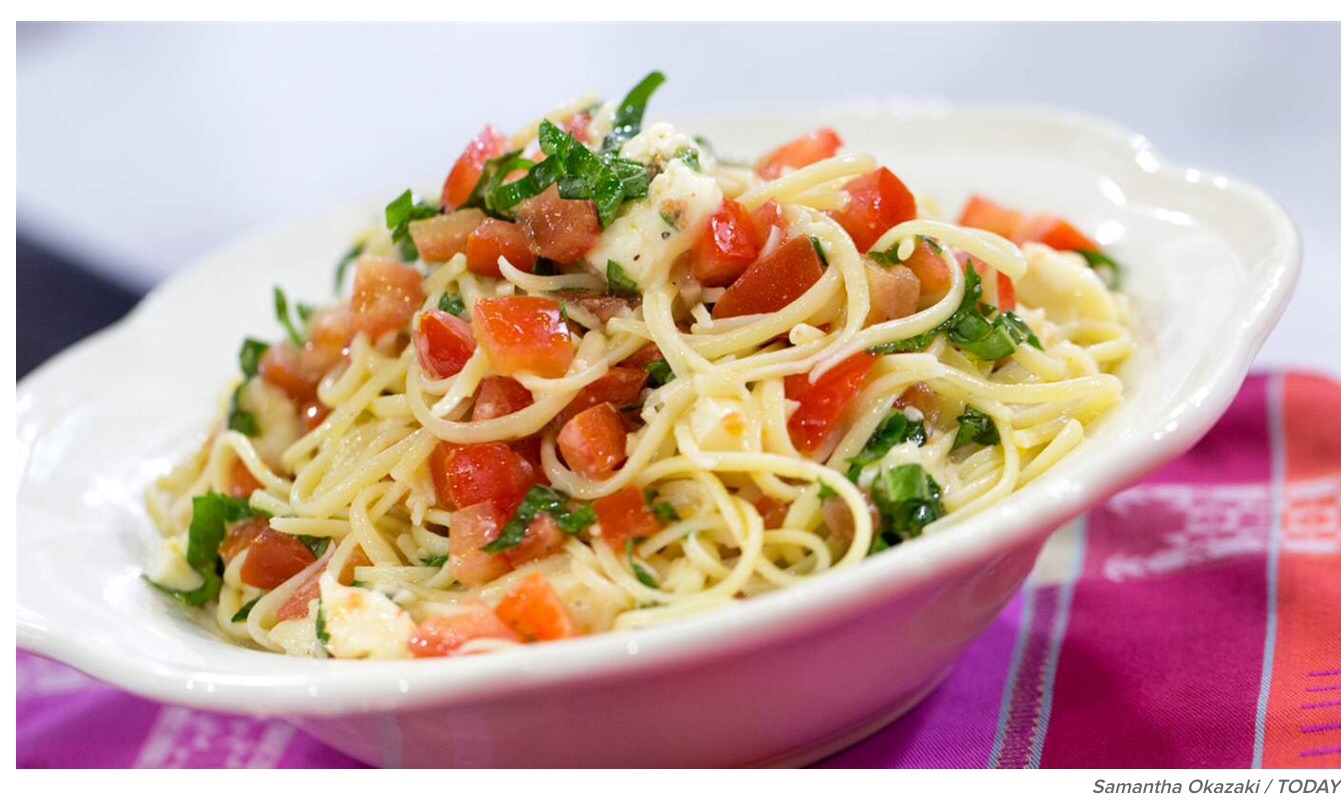
Yesterday morning, in anticipation of a busy day, I was trying to figure out what to have for dinner. I needed something quick and easy because I was going to be out and about until later in the day but I didn’t want to just order a pizza or do take out. I had almost decided on just grilling some hot dogs, when I saw Katherine Heigl making her favorite summer pasta on Kathy Lee and Hoda (3rd hour of the Today Show)
Katherine Heigl’s Brie Tomato Pasta
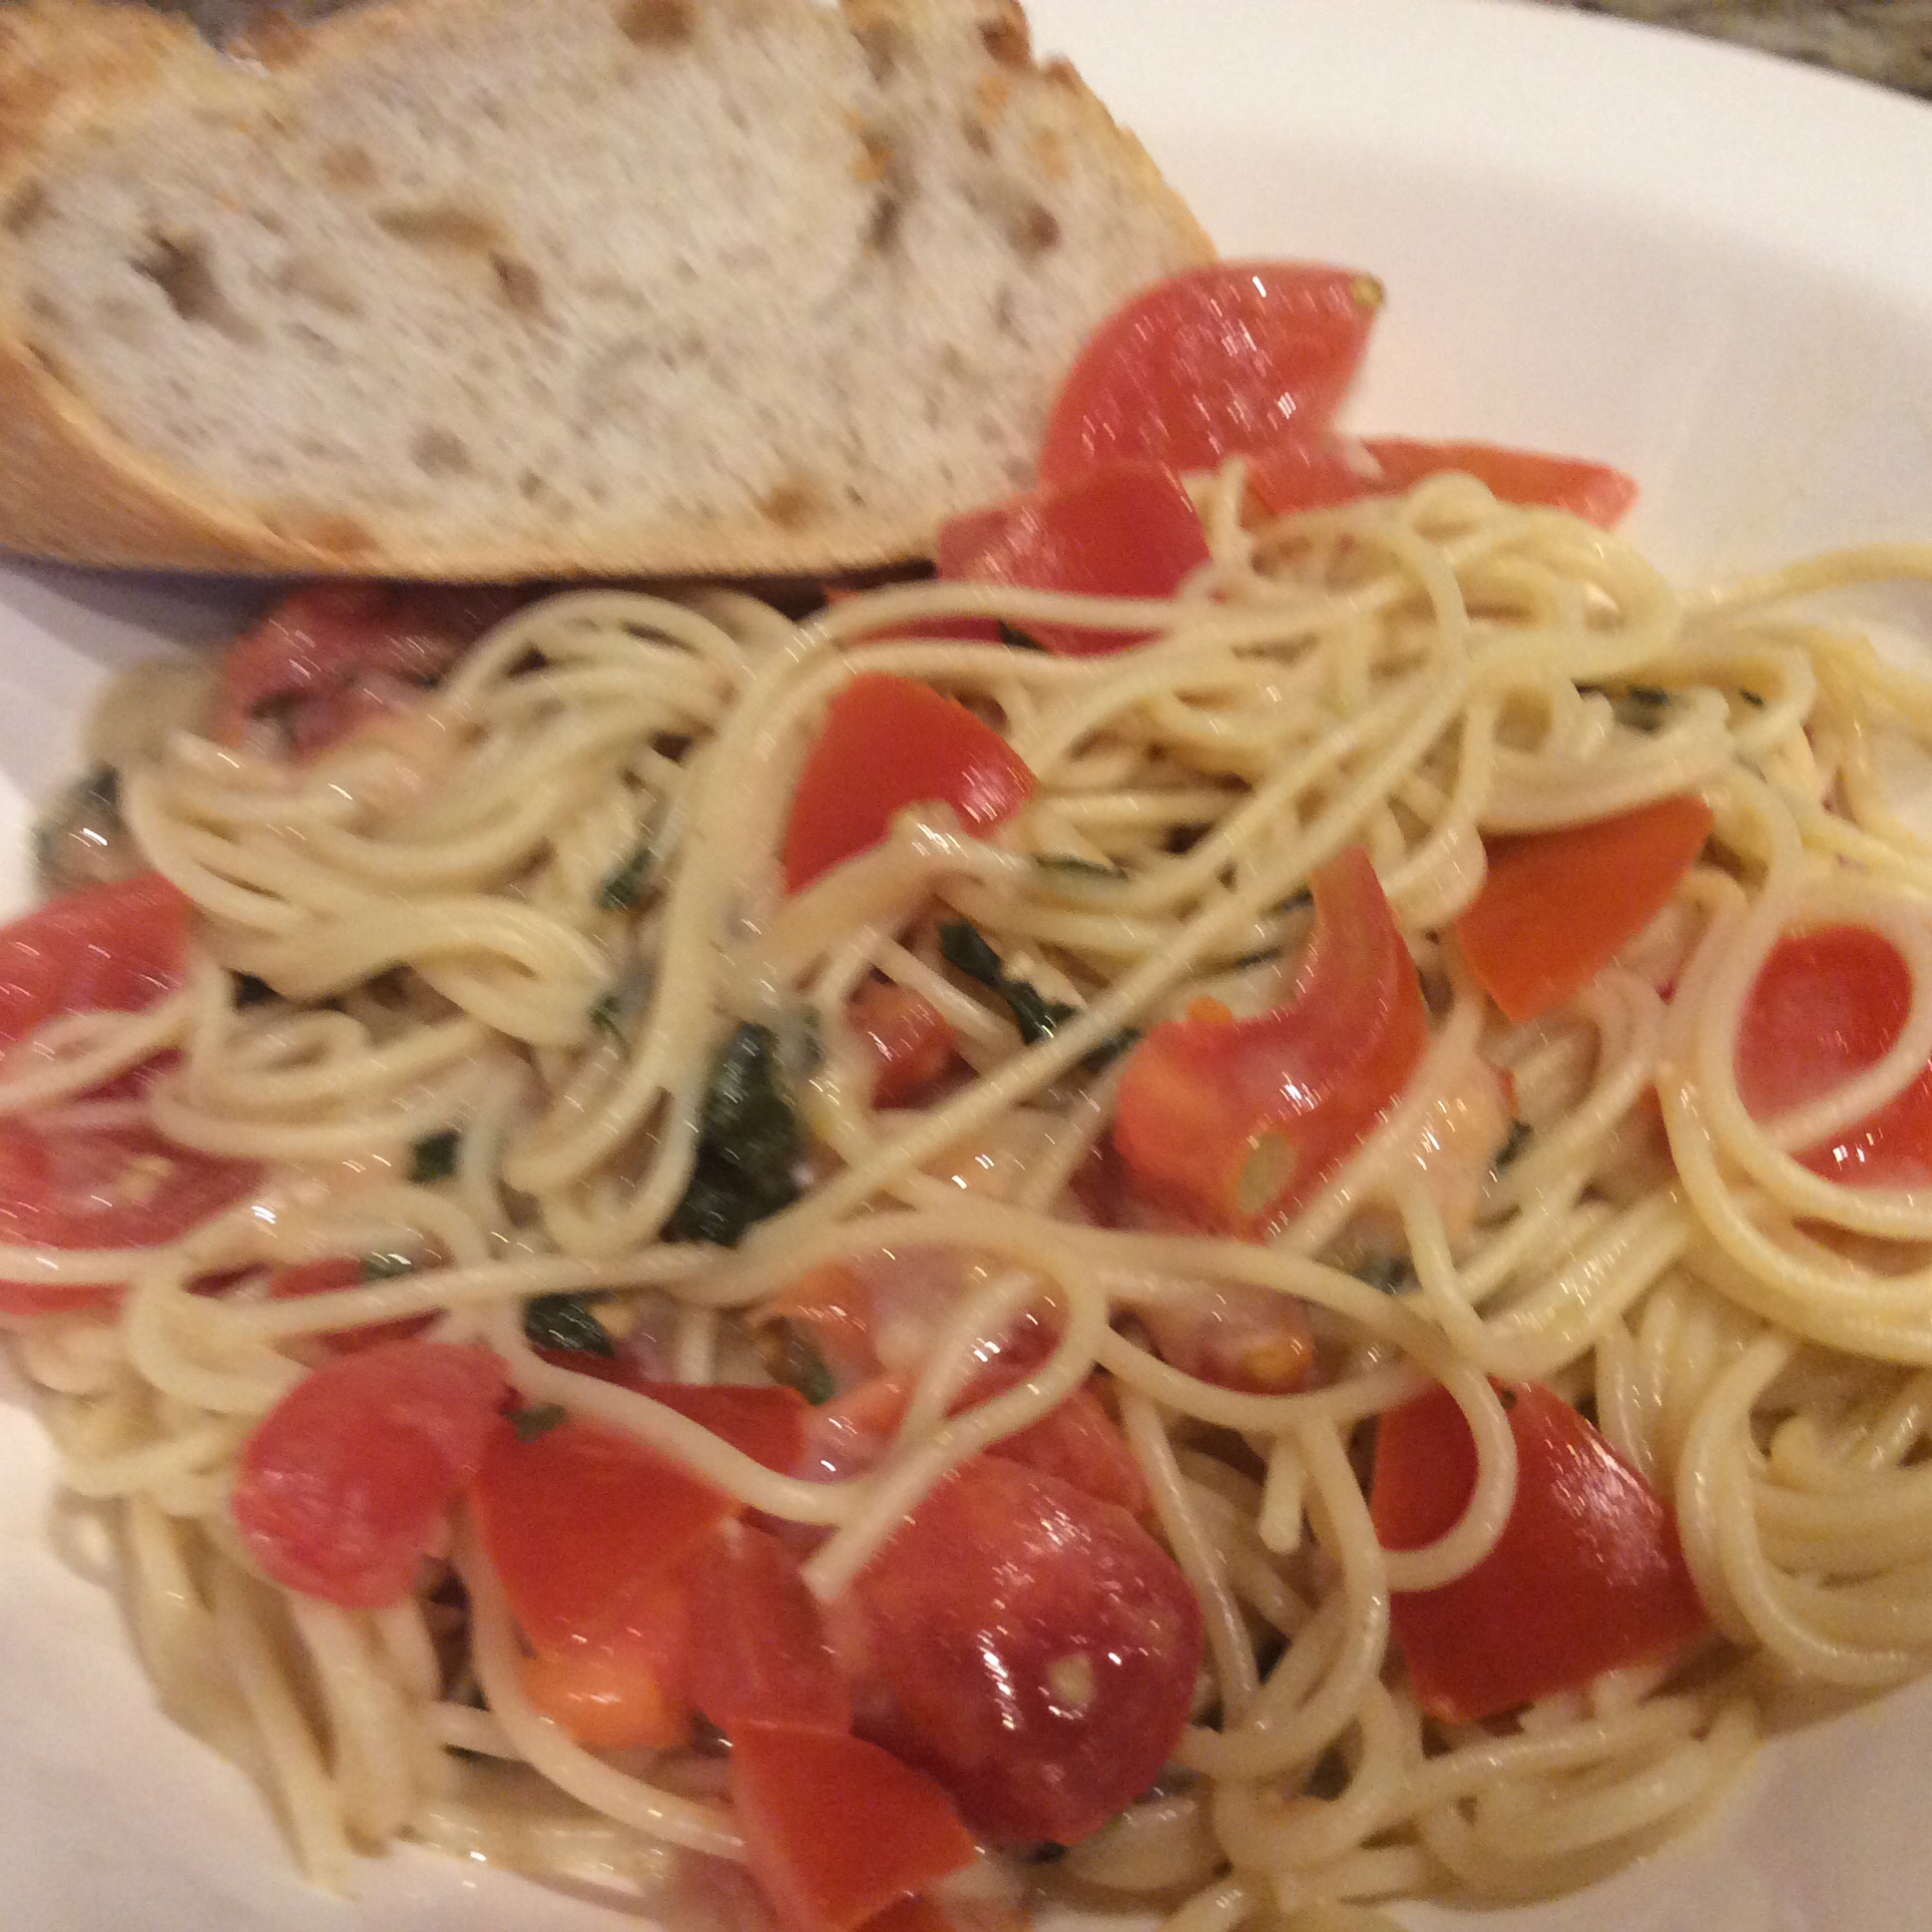
This “Brie Tomato Pasta” is what she considers her favorite pasta and it has a long tradition in her family. It looked delicious and included all the things that I especially love such as tomato, basil, garlic, and cheese. Even better, it seemed very easy to make! However, as I always wonder when trying a new recipe…”will it come out as good as I had hoped?”. Read on to find out!
Brie Tomato Pasta
Ingredients
4 ripe tomatoes cut into ½-inch cubes (can also use 1 28-ounce can of peeled tomatoes, drained and chopped)
1 pound brie cheese (rind removed), cut into pieces
1 cup fresh basil leaves cut into strips
3 garlic cloves peeled and finely minced
1 cup good quality olive oil
Salt and pepper, to taste
1 1/2 pounds linguine, spaghetti, or any pasta you prefer
Put the brie in the freezer for about 20 minutes. (Note: I skipped this step and just scooped cheese away from rind and it came out easily.)This makes it easier to remove the rind and cut up.
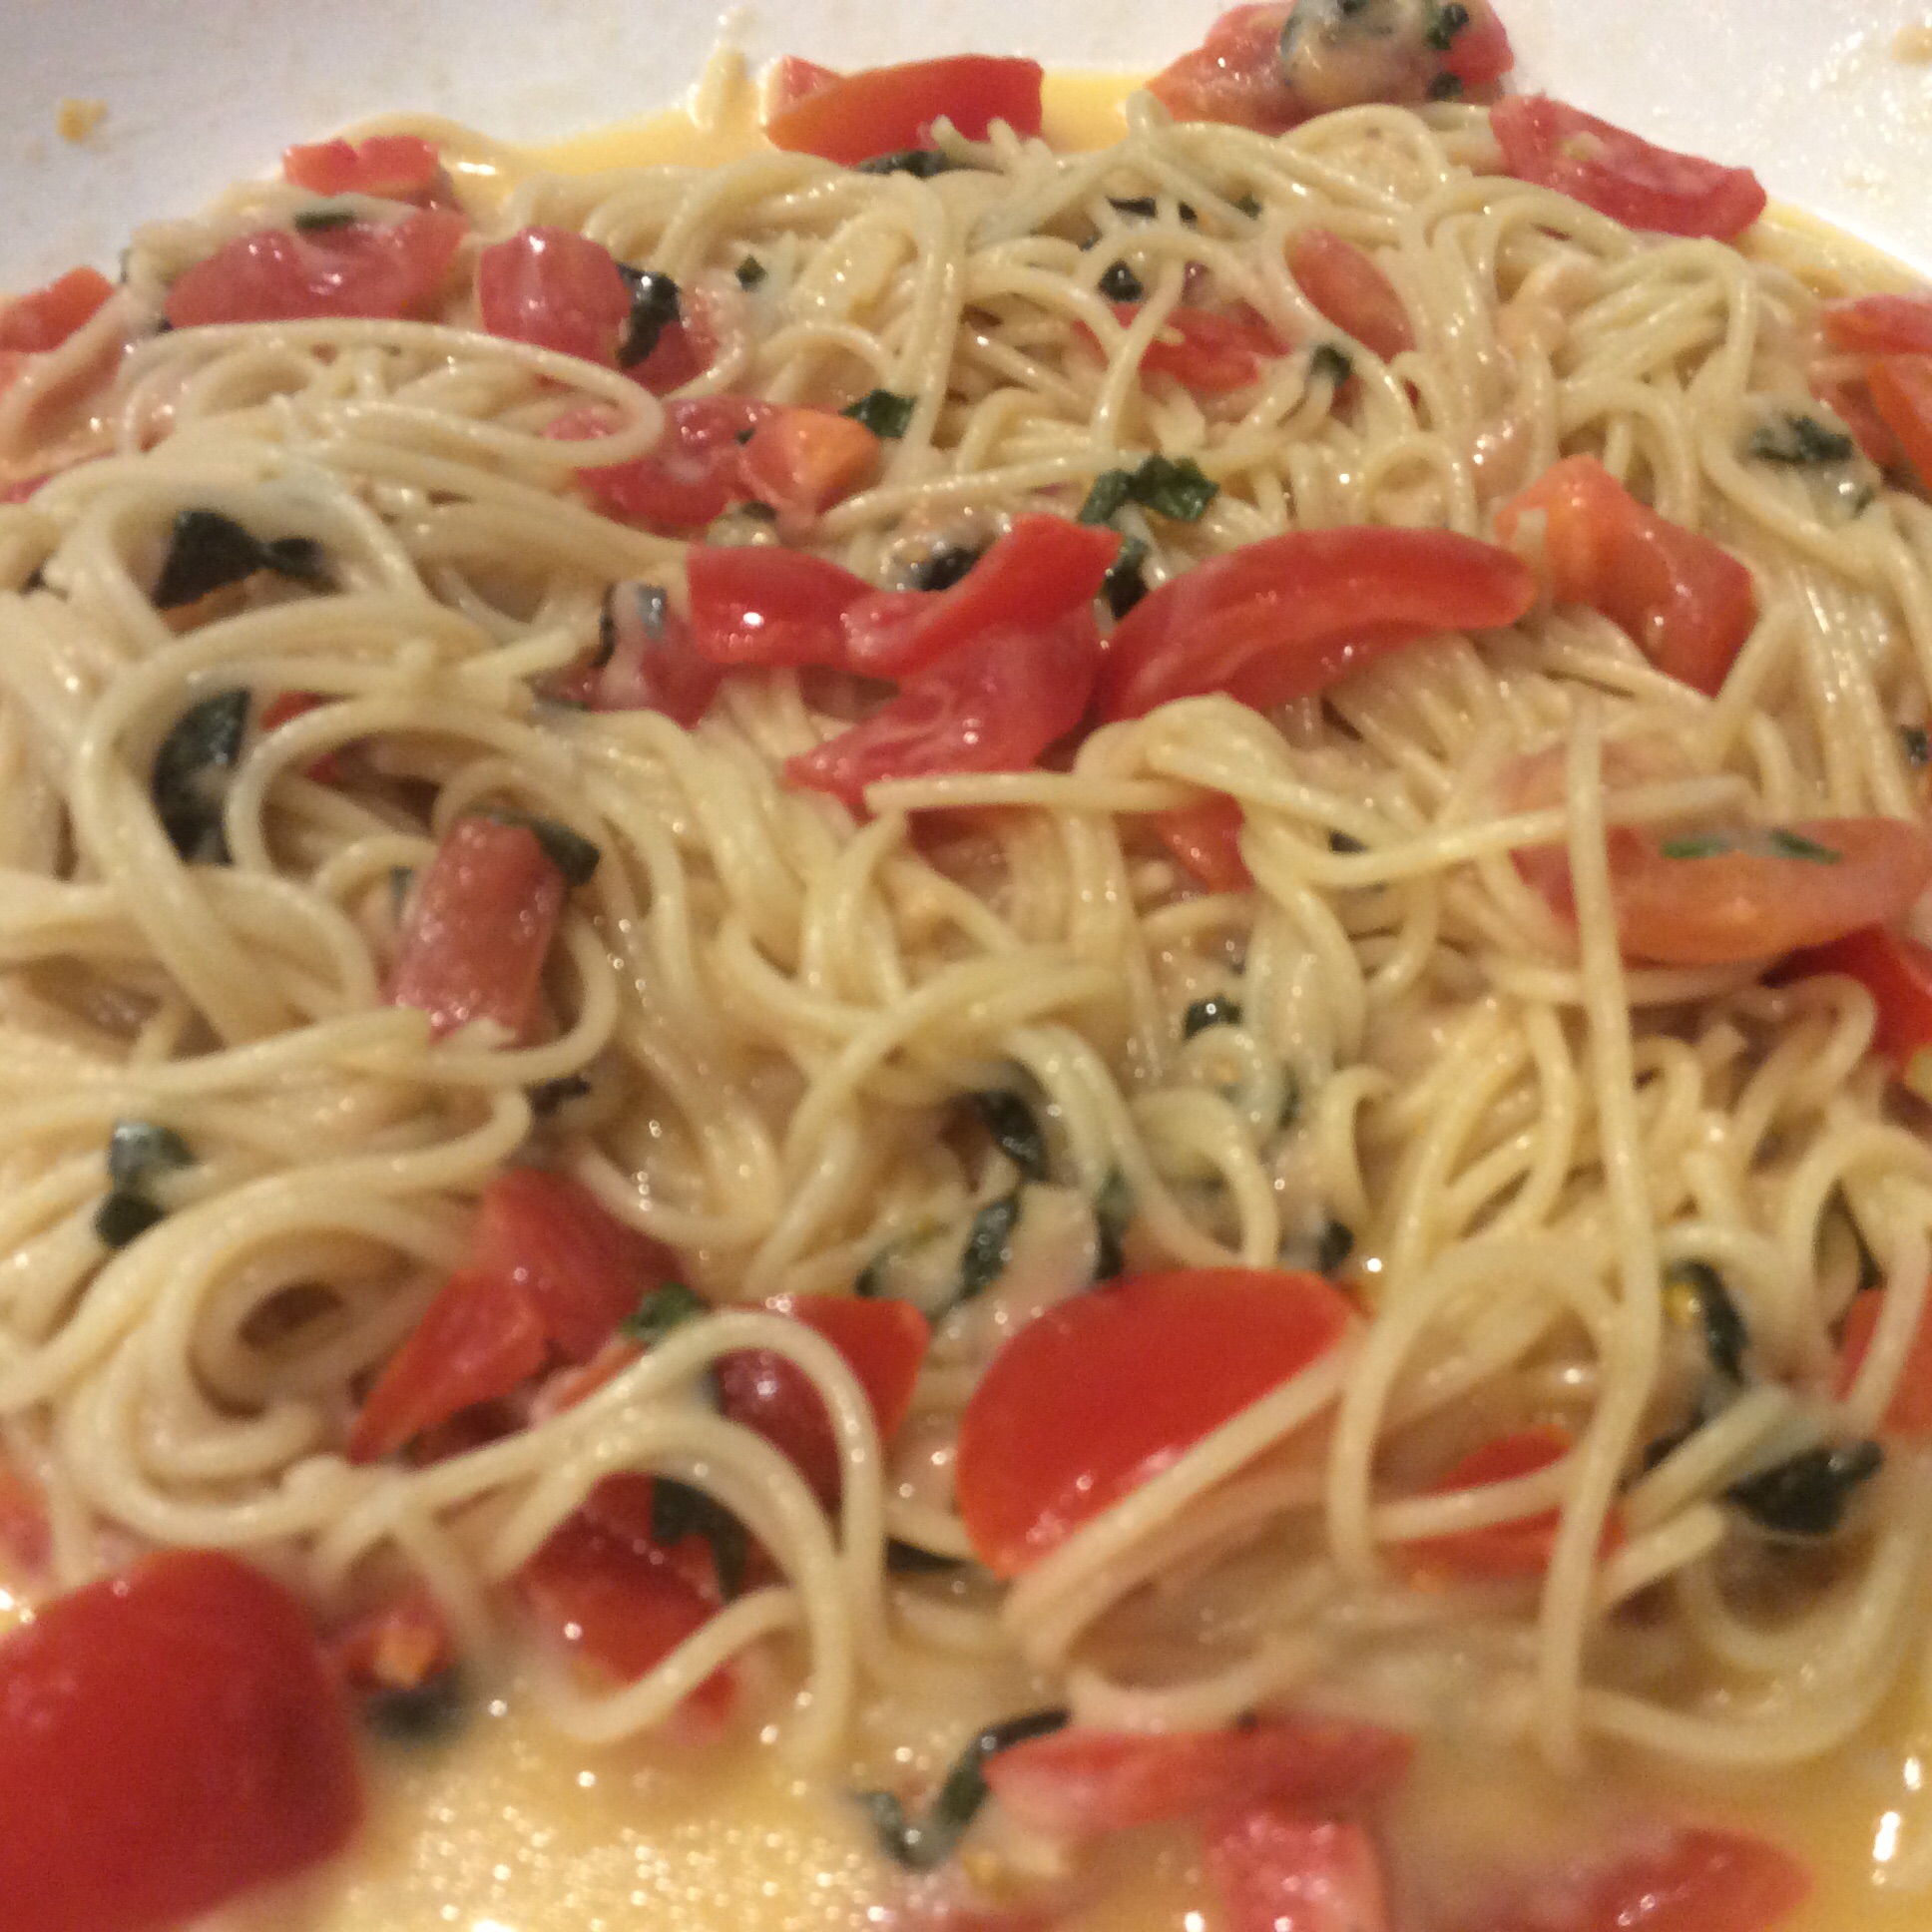
Combine tomatoes, brie, basil, garlic, olive oil and salt and pepper in a large bowl. Let sit at least 2 hours and up to 8 hours at room temperature.
Ingredients marrying their flavors together
Cook pasta to just al dente. Strain and toss into brie tomato bowl. Fold everything together until well combined and the brie has begun to melt. (Make sure to add the pasta while it is hot to help melt the cheese.)
Fold in the hot pasta to the fresh ingredients
Serve immediately.
Served in a bowl to capture all the yummy juices alongside a crusty piece of Italian Bread
Bottom Line: I loved this recipe! It was delicious and sooooo easy! As noted above, I think only a pound of pasta is necessary to truly let the fresh ingredients shine through. I tried it heated as leftovers today for lunch and I liked that as well! One note….Many comments on the actual recipe post suggests using Feta instead of the Brie. I think that would be fine but it would be a completely different dish in that the Feta won’t melt and make a sauce like the Brie. You should definitely try this recipe in your home! Thank you, Katherine Heighl…this recipe will become a staple in my kitchen. I am Chef Frankie and Always in the Kitchen Cooking with “Wild Abandon”!
In February of this year, my beautiful 24 year-old daughter, Ashleigh, moved from Knoxville, Tennessee to Denver, Colorado to start a new chapter in her life and to be closer to her incredible boyfriend, Hunter. If you know anything about our family, you know that we are extremely close and this was going to be a hard transition for not just me but my husband, Jeff, and my son, Jarrod, as well. However, we knew that no matter what the distance there was between us, we would always keep that bond and what better way to do than a birthday trip to Denver!
Ashleigh and Frankie
Our little adventure started off a little bumpy with the plane having mechanical problems so we had an hour delay. After losing about 20 more minutes to avoid a thunderstorm, we landed in Denver at approximately 9:45 Mountain Time…a little late but we were so excited to see our baby girl! (I might have shed a few tears when I saw her at the airport…ha, ha.) Ashleigh, very much like me in this way, is a planner so she already had our first stop mapped out!
Everyone was hungry and being that it was so late and on a Thursday night, we didn’t have a lot of options to get a quick bite but Ashleigh had that all figured out. After checking into our hotel, The Grand Hyatt Downtown Denver, we walked to a beautiful outdoor mall on 16th street and went to a very lively restaurant/bar called Appaloosa Grill. The bar menu was our only option and primarily Mexican but it was perfect for a late night bite!
Ashleigh and I had the Roasted Poblano Quesadillas (I added chicken to mine) delish!Jeff got the Carne AdobadaAnd Hunter had the most unique dish…Buffalo Empanadas
On Friday morning, my 49th birthday, we awoke to start our culinary quest! First, we walked a few blocks to Union Station. This was one of the coolest places I have ever seen! It was an actual real operational train station full of the most incredible restaurants and shops set in the most beautiful historical building…It was the perfect place to start our day!
Union Station
Ashleigh’s plan for us was to have breakfast at a popular spot called Snooze. It was obviously very popular because there was about a 45 minute wait so after going on a stroll to an old bookstore in the station, we settled in at a little restaurant bar called Mercantile Dining and Provisions. Jeff and I had Bloody Mary’s that included a locally made hot sauce called “Bliss” and pickled vegetables. It was much lighter than most Bloody Mary’s and was so delicious!
Bloody Mary’s at Mercantile Dining and Provisions
Finally, we got our notice that our table was ready at Snooze. It was a sunny day and the temperature was a perfect 65 degrees so we had a nice little table on the outside patio. First, came the drink menu and it was quite different than most in that it actually featured a Bloody Mary called “Pickled Green Tomato Bloody Mary”. This I had to try…ummm, as much as I love pickles, this wasn’t my favorite but it was pretty!
Pickled Bloody Mary at Snooze
Breakfast isn’t usually my favorite meal of the day but the menu at Snooze was incredible and everyone got something different. We were all pleased and if you are ever in Denver, this is a must stop!
My spinach, swiss, and tomato omelet..perfectly cookedAshleigh’s Bella! Bella! Benny with prosciutto and Taleggio cheese with poached eggsHunter’s Benedict of 2: Ham Benedict and Chile Verde BenedictJeff’s B.E.A.T Sandwich with Pork Belly Bacon, Fried Egg, on Ciabatta Bread with bacon-tomato aioli
Needless to say, we were stuffed after such a huge breakfast so we headed on foot to see Ashleigh and Hunter’s new place about half a mile from Union Station. Along the way, we passed Coors Field where the Colorado Rockies play…it was such a beautiful building!
Coor’s Field
Their apartment was amazing and reflected each of their personalities so well! It was a very “industrial” look with concrete walls, open beamed ceilings, and a very open floor plan. The best part about it was that it was all theirs and the love that was put into decorating it was very evident.
Afterwards we headed back to explore Denver’s 16th Street Mall and had a little light pub fare…it was the perfect day!
Denver’s 16th Street Outdoor Mall
We ended what I would call a perfect birthday at The Vesta Dipping Grill for dinner. The atmosphere was so welcoming with its low lighting and exposed kitchen grill…very much like a “gathering place” for family and friends. The menu focuses on grilled meats served with served alongside several varieties of sauces. You can go with their “suggested sauces” to compliment the meat you have chosen or you can just wing it and choose a couple of your favorites. We started out with a tray of cured meats and cheeses…Ashleigh and Jeff’s favorite appetizer of all! The picture isn’t that great because they couldn’t keep their hands off of it before I could get the shot!
Cured meats and cheese tray with a sauce sampler
The rest of our menu choices…
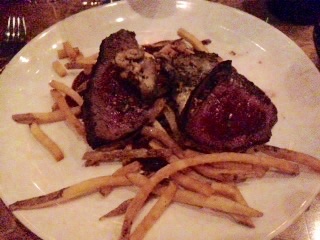
Jeff and Hunter got the Madras Grilled VenisonAshleigh had the Garlic Grilled ScallopsFinally, I had the Grilled Beef Tenderloin. It came with caramelized onion mashed potatoes, with roasted tomatoes and sautéed mushroom. The sauce next to the steak is a veal demi glas
If you thought the food was good on Friday, Saturday took it to a whole new level with a late brunch on Larimer Square. Larimer Square an shopping and dining district that is listed on the National Register of Historic Places. It is one of the oldest blocks in Denver and now utilizes the historic buildings for distinctive shopping and dining. It is supposedly even more beautiful at night lit up by strings of tiny lights going back and forth across the street.
Our brunch was at a restaurant called Tamayo which serves modern style Mexican dishes “tapas” style. I love Tapas because you get to try so many things on the menu and share them! They were incredible tasty and the presentation was simple and elegant. These are the dishes that we tried (and loved)…there were more but I was too busy eating to remember to take pictures..ha, ha!
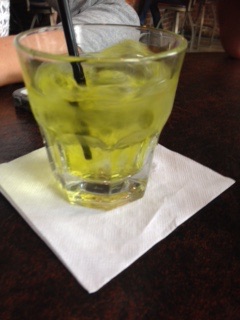
After a visit to Denver’s Botanical Gardens (It was stunning and I can’t wait to go back), it was time to head to a place that Ashleigh could not wait for me to visit…The Retro Room! Apparently, they serve Dill Pickle Infused Vodka and Ashleigh had recently had it and LOVED it! Now, I will admit…I do love my dill pickles and I love to drink pickle juice straight but I’m not a huge vodka fan (I prefer my light Chardonnay) but Ashleigh convinced me I had to try it.
The Retro Pub with various typed of Infused Vodkas
So as I stated, I’m not a huge Vodka fan but especially not of straight Vodka on the rocks and that is basically what this was…One part pickle juice to two parts vodka. It was one of the best things that I have ever put in my mouth…Ummm, I had 3! As soon as I got home, I got the recipe and have some brewing as we speak…blog coming soon! I can’t wait to try it in a Bloody Mary! Jeff had Jalapeno Infused Tequila and that was good, too! This is a must visit place when you come to Denver (good for people watching, too!).
Dill Pickle Infused Vodka
Finally, it was time to head back to the shower and get ready for our final Denver meal. We headed back to Union Station to a very unique and innovative seafood restaurant called Stoic and Genuine. A note on this…reservations can be difficult to come by but somehow Jeff, knowing how bad I wanted to go there, got American Express Concierge service to get us the perfect table for 4 in a quaint corner at prime time dinner hour…What an awesome husband!
Outside Stoic and Genuine waiting for our table…Ashleigh, Hunter, and Jeff
We started off with a Fresh Uni Dish per Jeff’s request (not my favorite but a must try at some point in your life)
Fresh Uni with miso-cured and charred fatty beef, kimchi granita with a shiso emulsion!
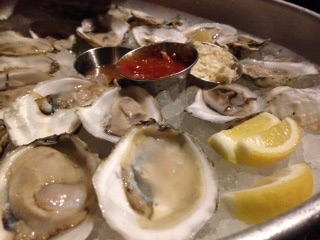
and 2 Dozen oysters that Ashleigh took out pretty quickly…(they were amazing)
Oysters on the Half Shell
For our entrees, we all chose different things; Once again, however, Ashleigh chose the most unique dish, Crispy Whole Haddock.
Ashleigh’s Crispy Whole Haddock
The rest of us stayed pretty basic…
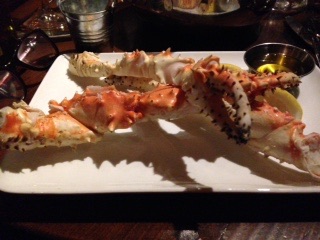
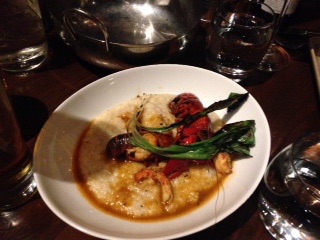
Jeff’s Fried Oyster SandwichHunter’s Paella…Stoic and General styleI had Crab Legswith a side of Crawdads and Grits…so yummy!
Denver is a great place to visit and if you are looking for a true culinary adventure, this is your place. I’m going back this summer so stay tuned for Part 2!
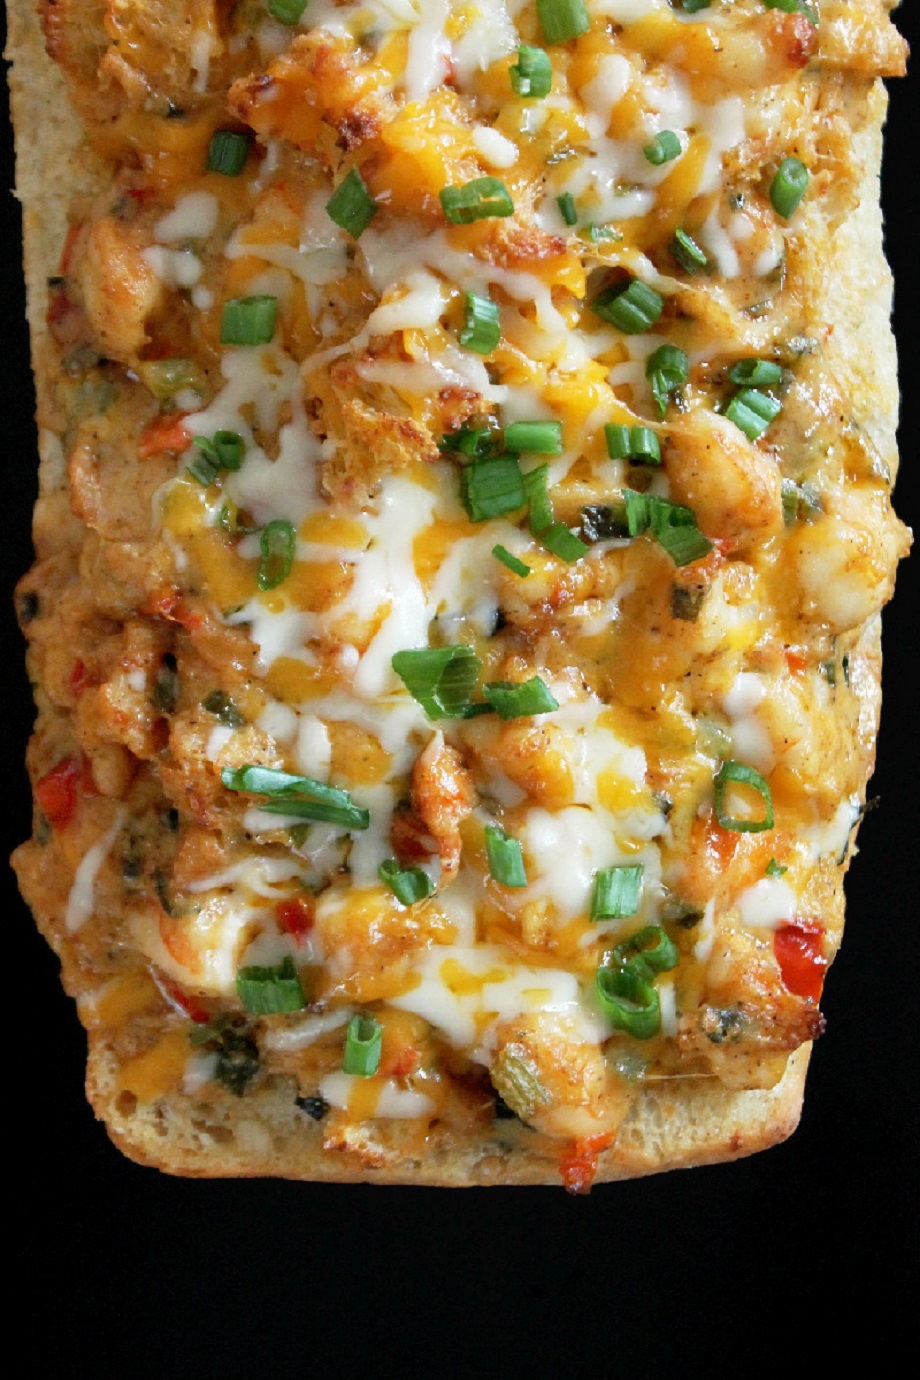
Sometimes you come across a dish that you know immediately is a “Must-Try”! For me, those kind of recipes are small plates that usually involve some type of gooey cheese and of course, can be paired with a crisp Chardonnay. Add in some freshly baked bread and seafood? Well, then you take it to a completely different level! That is exactly what food blogger, “Creole Contessa”, created with her Stuffed Shrimp Bread…
Creole Contessa’s Stuffed Shrimp Bread
As you know, I am a part-time personal chef for a local family and when I mentioned this recipe to them, they wanted to try it, too! Since they don’t eat bell peppers, I did leave those out but next time if I make it just for me, I will make sure to put them back in. Actually, I will probably try jalapenos to add a little heat, YUM!
The other change I made was to use mini Ciabatta loaves. These are perfect little squares and I just thought they would look prettier on the plate (I was right but if you can’t find the mini ones, the whole loaf will do just fine!) Note: The pictures will reflect doubling the recipe since I was making it for two different families.
Stuffed Shrimp Bread
Ingredients
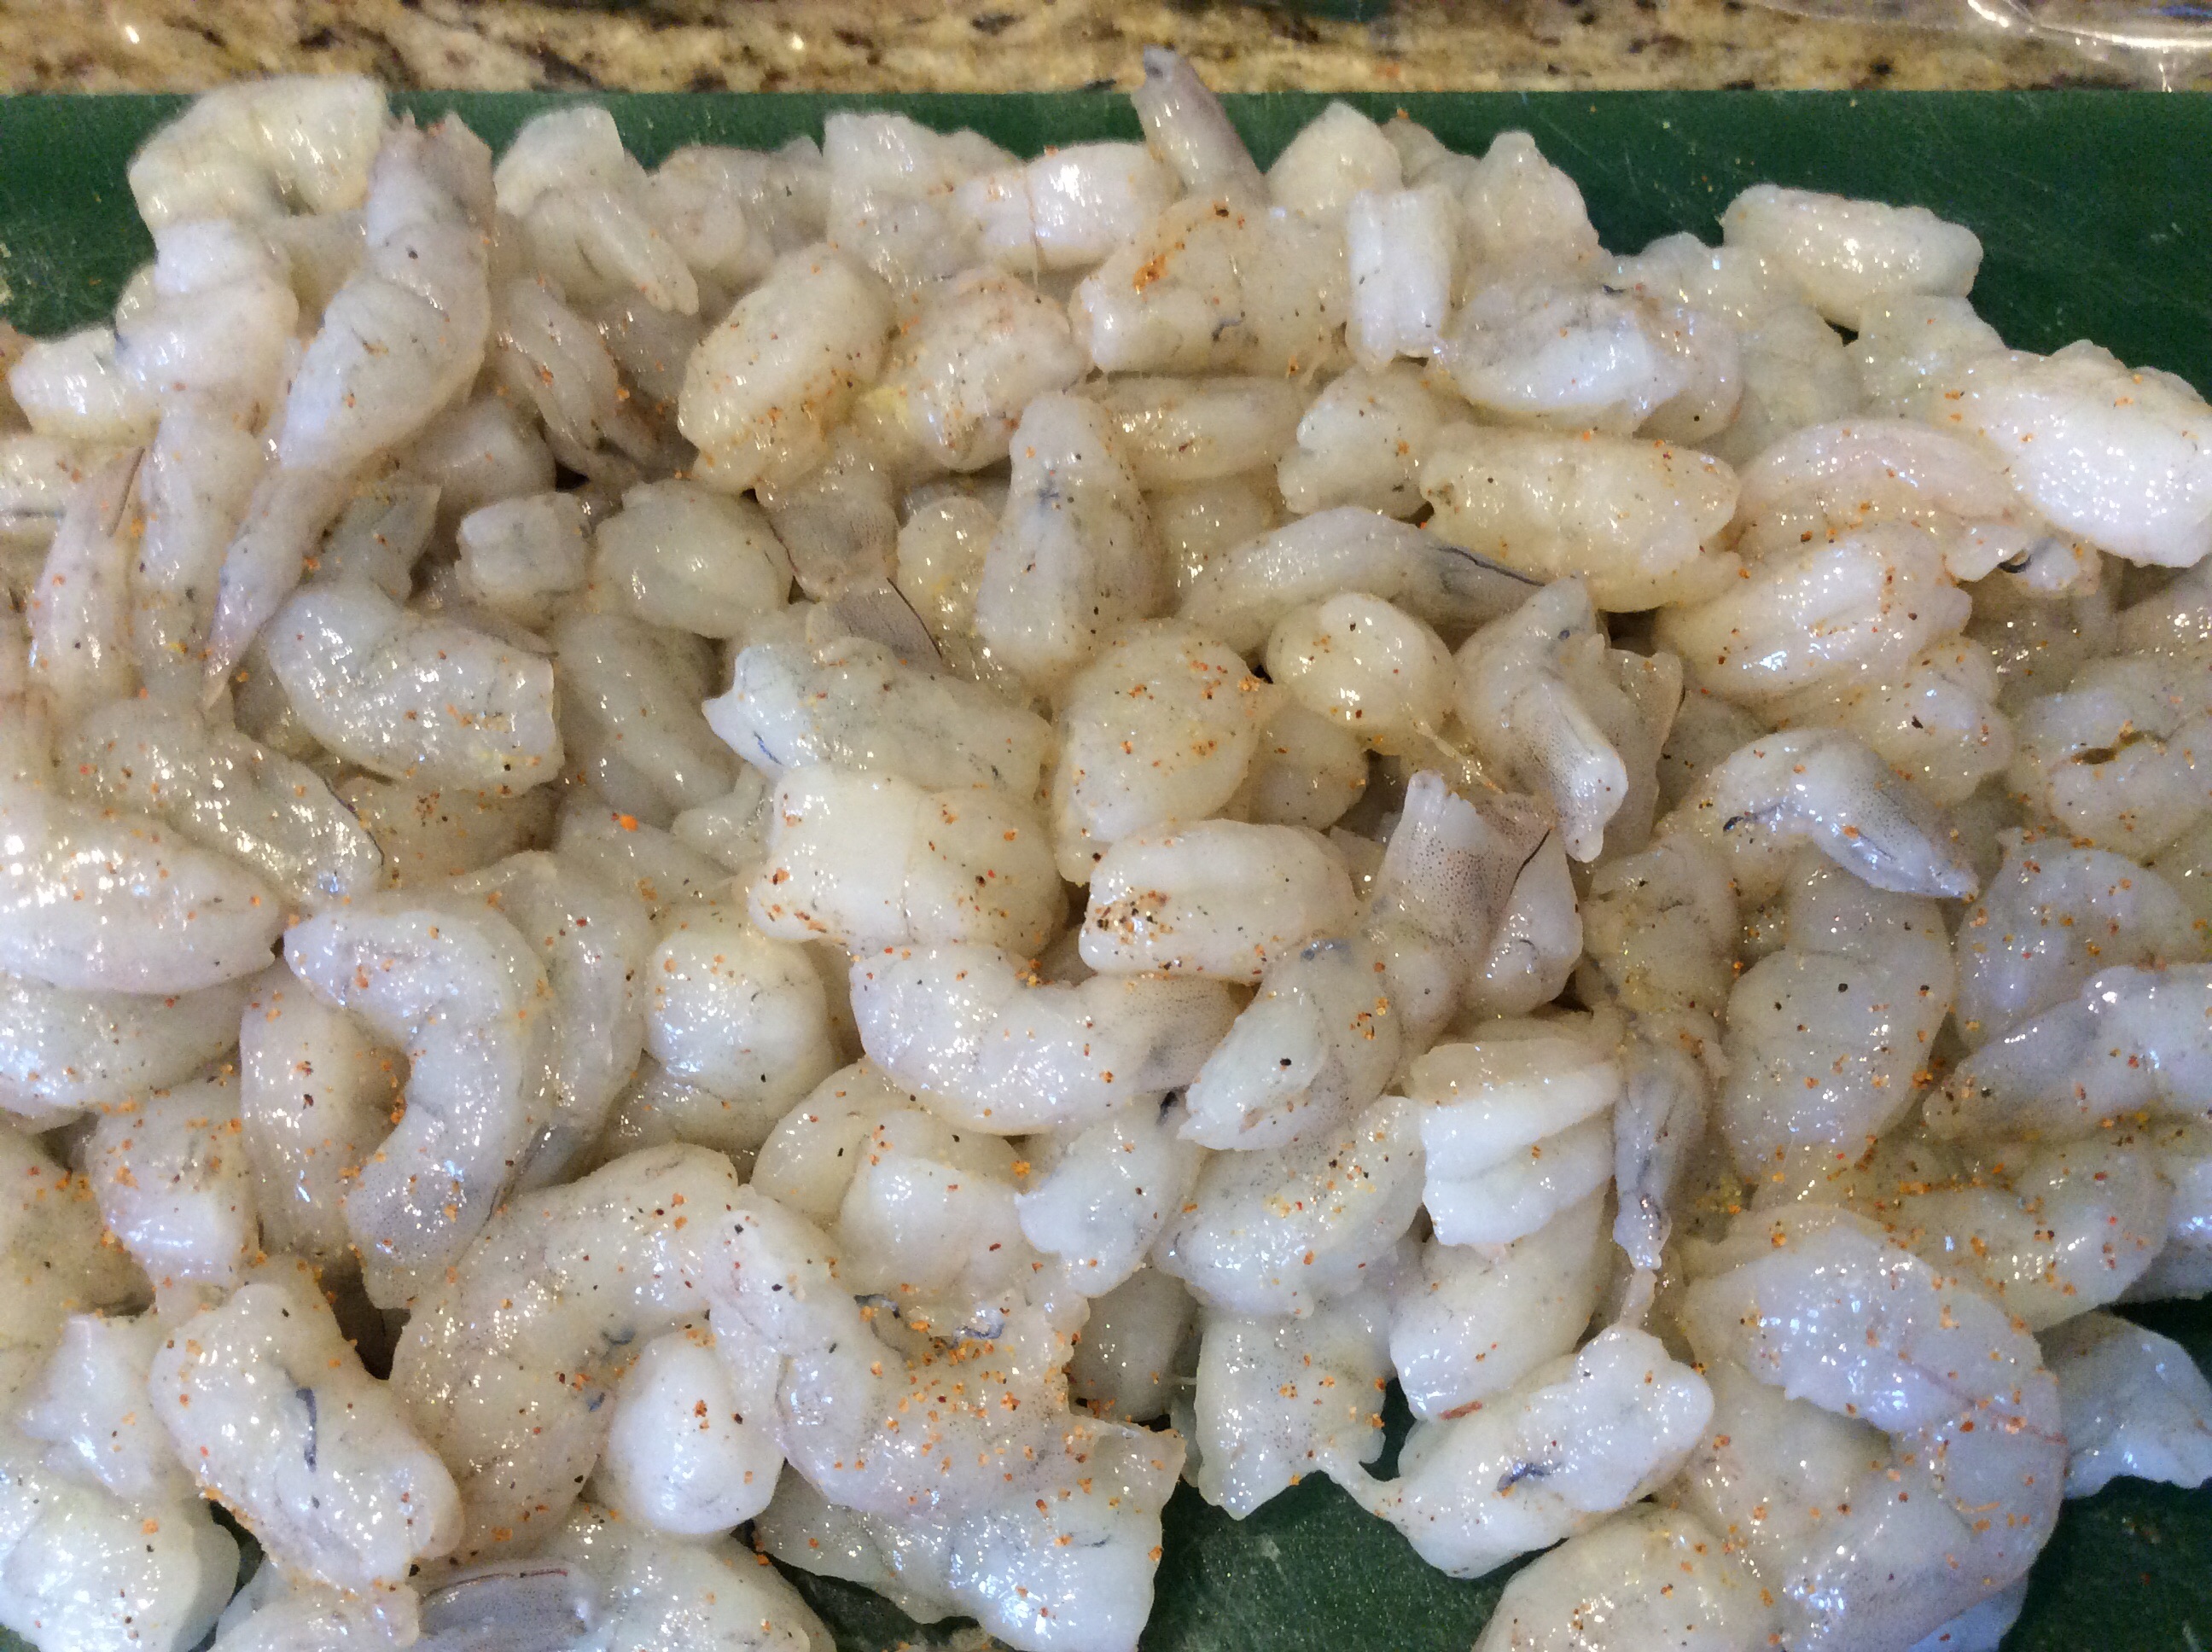
1 1/2 lbs large shrimp, peeled, deveined, diced into 1/2 inch chunks
1 loaf Ciabatta bread
2 tablespoons butter, unsalted
2 tablespoons extra virgin olive oil
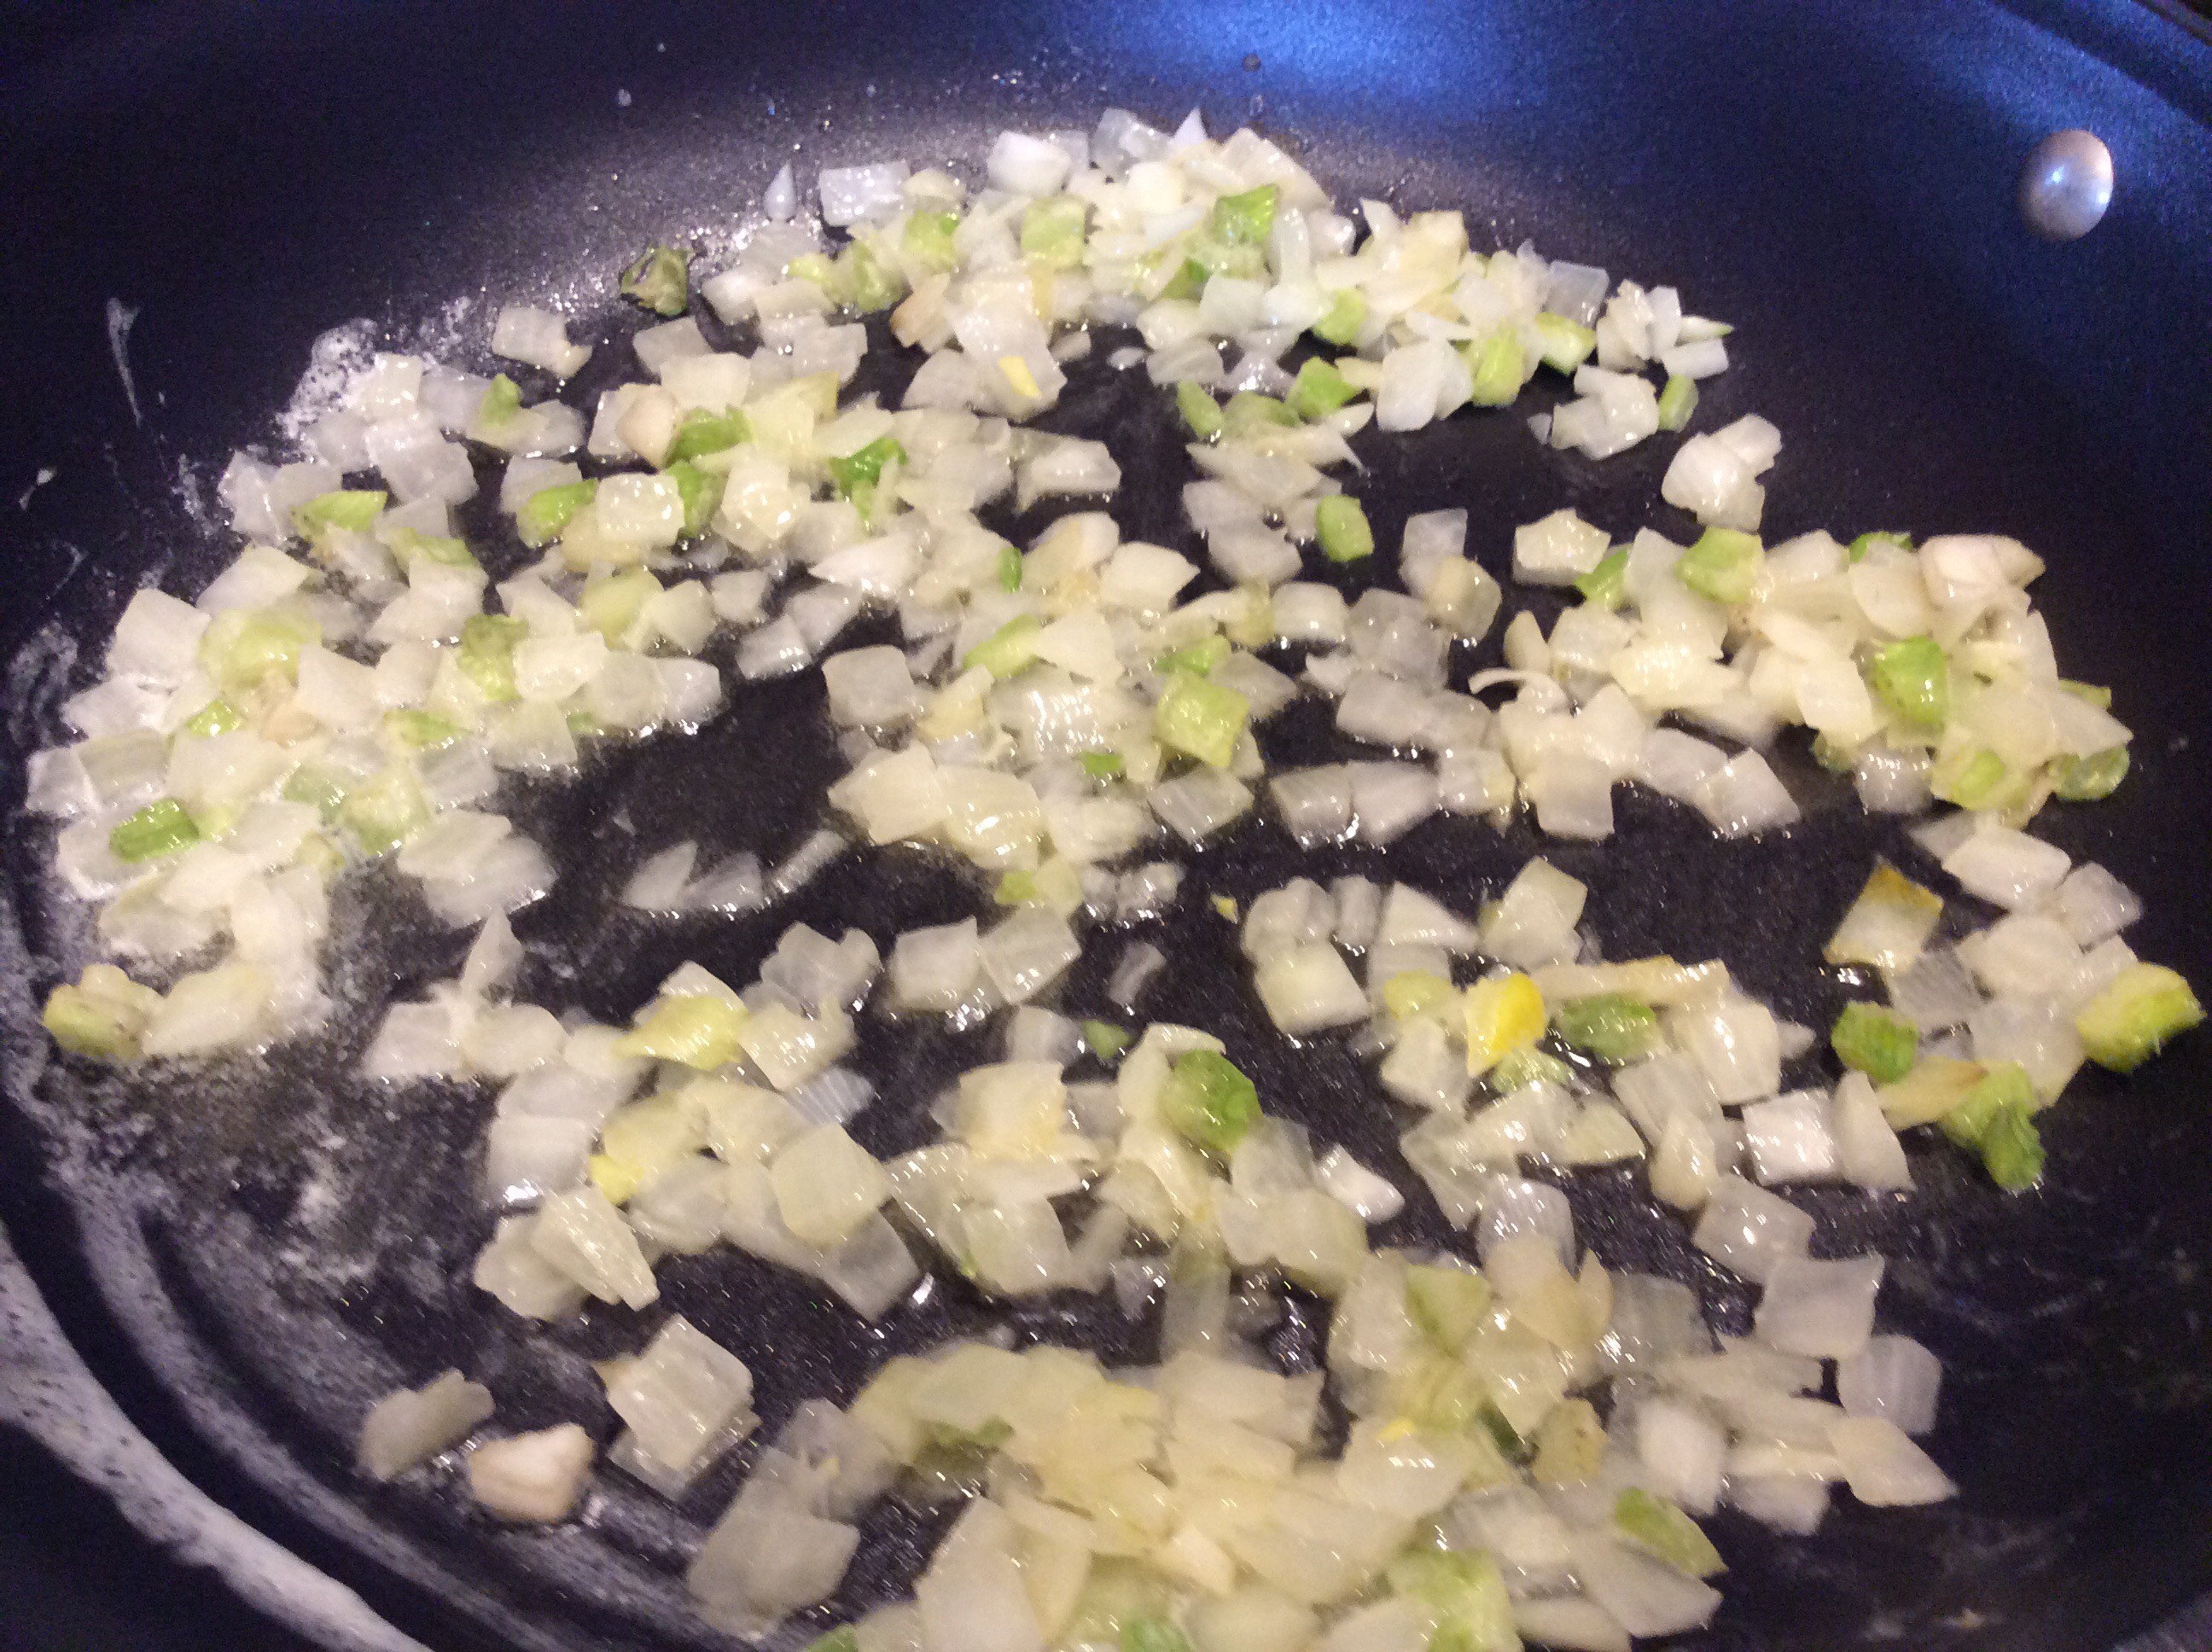
1/2 cup onions, chopped
1/2 cup celery, chopped
1/2 cup green bell pepper, chopped
2 cloves garlic, minced
1 teaspoon creole seasoning (I ended up using 2 teaspoons)
1 teaspoon garlic powder
1 teaspoon onion powder
1 teaspoon black pepper
1 teaspoon dry mustard
1/4 cup mayonnaise
1/4 cup sour cream
3/4 cup jack cheese, grated
3/4 cup sharp cheddar cheese, grated
green onions to garnish
Instructions
Preheat oven to 350 degrees.
Cut Ciabatta bread in half or slice of top of bread.
Scoop out less than half a inch out of bread and set aside.
Mix seasonings and set aside.
Season shrimp with half of seasonings and set aside.
In a large skillet, melt butter olive oil and cook onions, celery, bell pepper, for 5 minutes add garlic, season with remaining spices cook 1 minute more. Note: Again, I didn’t include bell pepper but it would add a great flavor so I encourage you to do this if you aren’t surrounded by pepper haters…ha, ha!
Add shrimp cook for 5 minutes.
I added in some green onion in the last minute of cooking to compensate for the lack of bell pepper
Turn off heat.
Add dry mustard, sour cream and mayonnaise to shrimp mixture, mix well.
Add cheese and blend until melted.
Stuff Ciabatta with mixture.
Bake at 350°F oven for about 20-30 minutes until golden brown on top.
Garnish with green onions.
Cut into slices and serve.
Bottom Line: This recipe is delicious and can be tweaked to fit your tastes. For example, my husband loves creamy dishes so he thought it was perfect. I am not a huge cream fan, so I might reduce the sour cream and mayo for me and add in some hot sauce for some extra heat. I definitely think diced jalapenos would be a fantastic addition and you can easily switch this recipe up with crab as well (or lobster….oooohh)!
You will be a hit to family and friends if you make this easy dish that could be served in appetizer portions, brunch, or a satisfyingly, easy dinner! Please try this in your kitchen and let me know if you came up with your own tasty twist. I am Chef Frankie, always in the kitchen and always cooking with “love and wild abandon”!
Spring has been a long time coming here in East Tennessee. In fact, we are still struggling to get away from Winter’s chilly grasp but the fresh flavors that we all love about this time of the year, are readily available in our local markets. One of my favorite ethnicities in food comes from the Mediterranean and not only is it delicious but it is a healthy food lifestyle to follow as well. The flavors are so uniquely tasty that the variety of cooking options are endless.
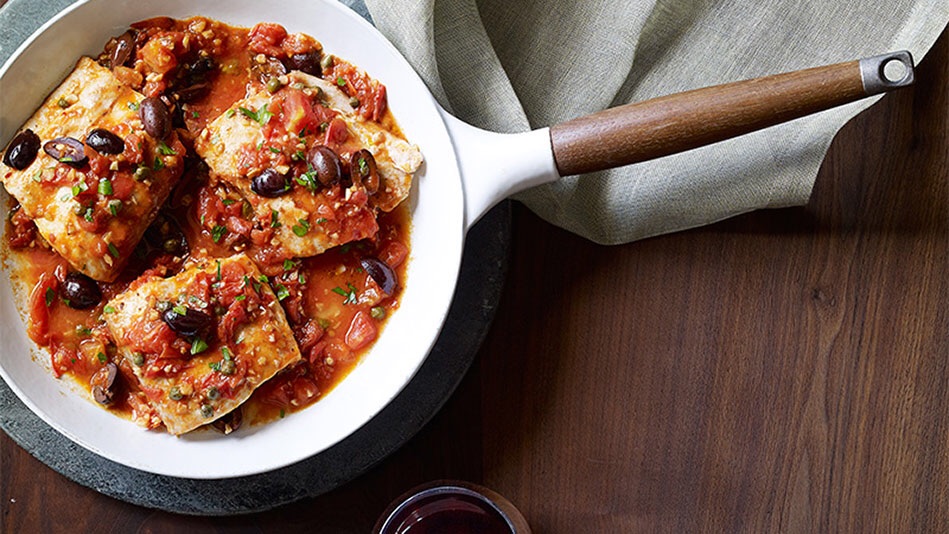
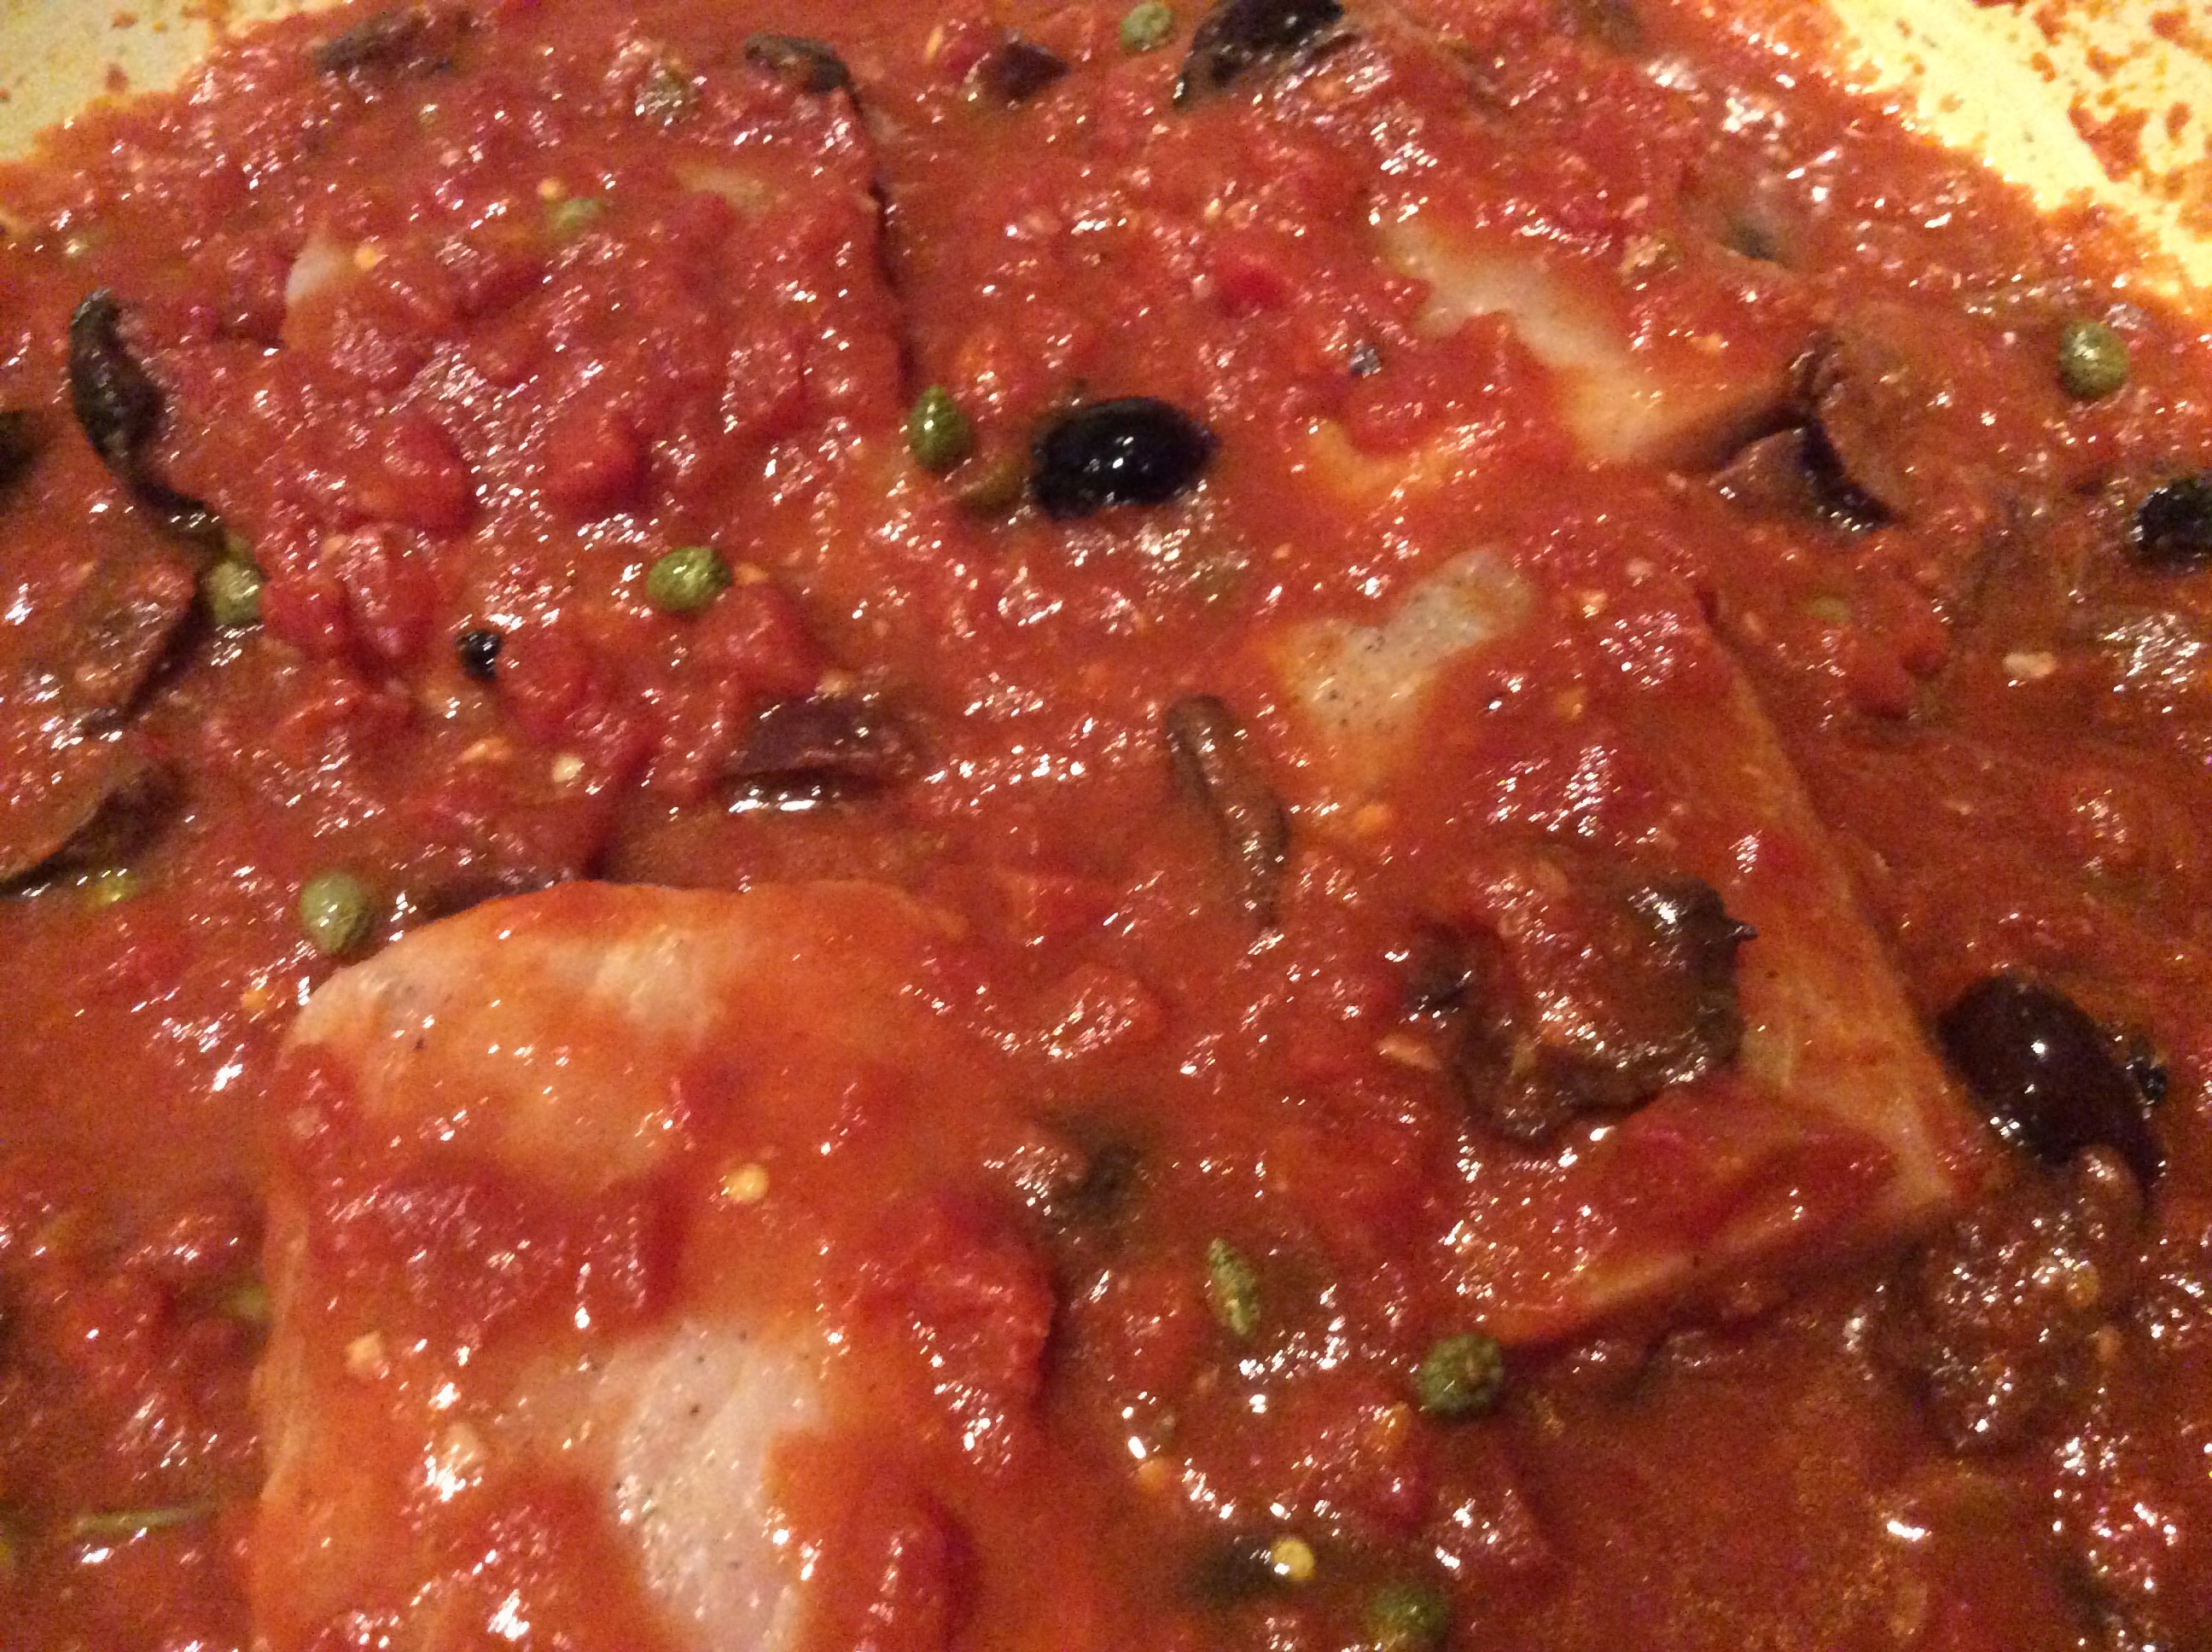
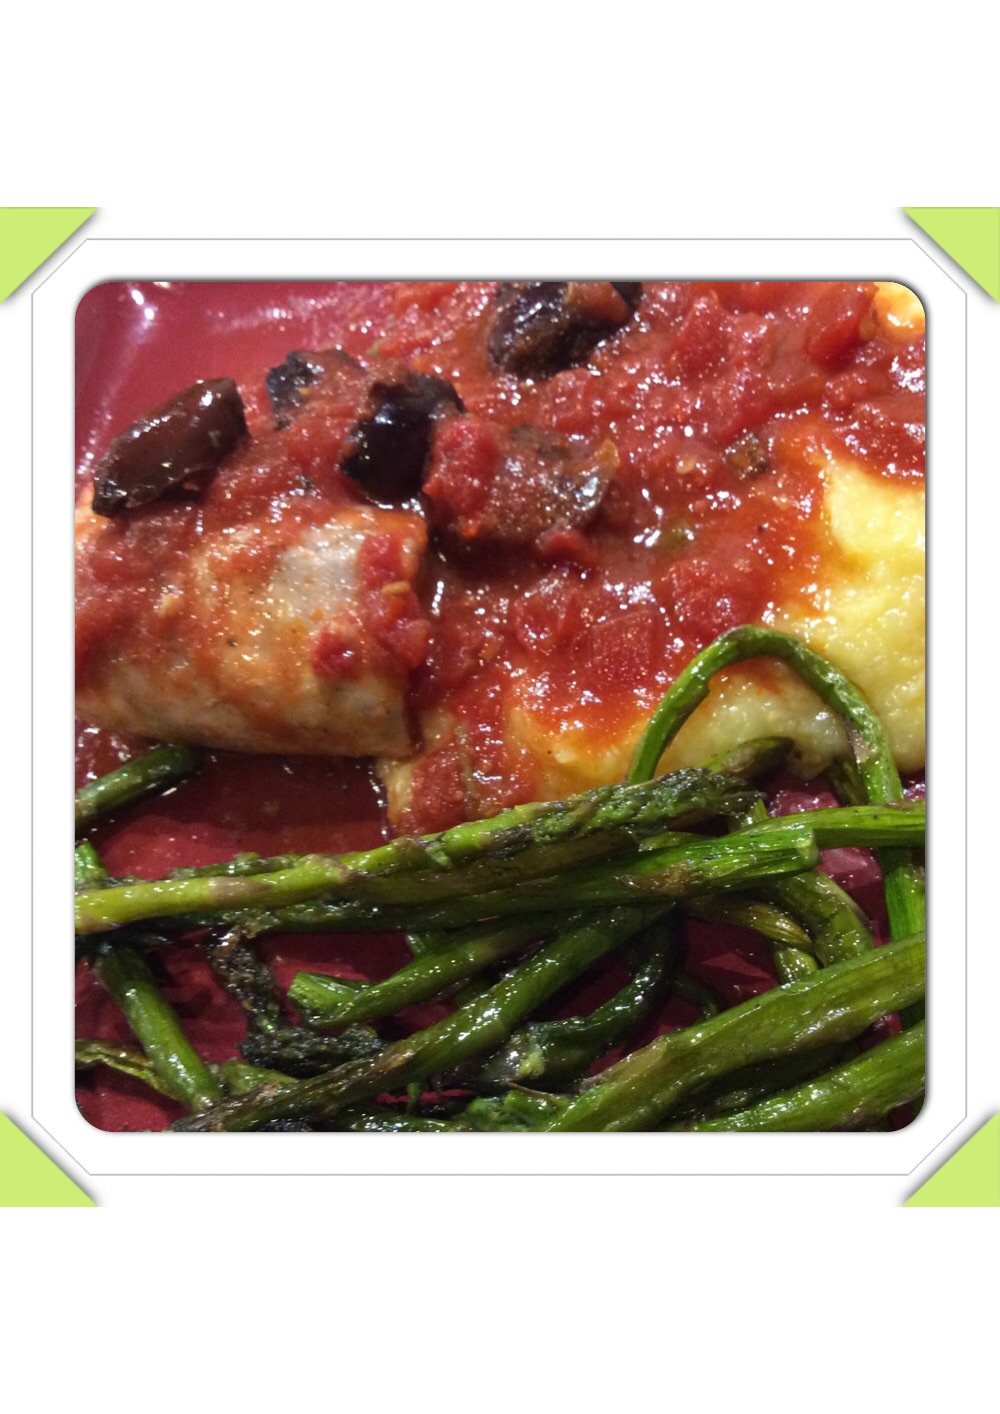
I have always loved to combine the tastes of the Mediterranean with the mild, sweet flavor of mahi mahi. This lean yet firm fish is often confused with being in the dolphin family but they are not related in any way. It is wonderful either grilled or baked but I was intrigued by Chef Curtis Stone’s version which cooks it on the stovetop with a classic Puttanesca Sauce….Braised Mahi Mahi Puttanesca!
Curtis Stone’s Braised Mahi Mahi
Puttanesca Sauce originated in Italy and is made from tomatoes, black olives, capers, anchovies, and herbs. There are many variations but one special note I want to add: DO NOT SKIP THE ANCHOVIES! Even if you don’t like them, they are cooked down so much they are used as only a flavor enhancer and if not included, your dish will not have the tasty and fragrant profile of a true Puttanesca Sauce. Step outside the box and give this “shunned ingredient” a try…you will be glad you did!
Not only is this a simple recipe to prepare but the best part is it is made all in one pan for easy clean up. It is the perfect dish to serve on a busy weeknight or an evening with your favorite guests. They will think you slaved all day! My favorite way to serve is this is over a creamy polenta with Roasted Baby Asparagus on the side. Check it out…..
Braised Mahi Mahi Puttanesca
Ingredients
4 Tbsp. extra-virgin olive oil, divided
4 cloves garlic, finely chopped
3 anchovy fillets, chopped
1/2 tsp. crushed red pepper flakes ( I prefer a little more since I like it a little spicy)
1 1/2 pounds tomatoes, chopped (If you can’t find good fresh tomatoes, a 1 1/2 pound of petite diced tomatoes will work as well)
1/3 cup dry white wine
1/2 cup Kalamata olives, pitted and halved
2 Tbsp. capers, drained
Kosher salt
4 skinless mahimahi or sea bass fillets (6 ounces each)
2 tsp. finely chopped flat-leaf parsley
In a large, heavy skillet, heat 3 Tbsp. oil over low heat. Add garlic and anchovies and cook, stirring frequently and mashing anchovies, about 2 minutes, or until garlic is soft but not browned.
Look how the anchovies are breaking down…almost like a butter
Stir in red pepper flakes. Add tomatoes, wine, olives, and capers. Increase heat to medium and simmer gently, stirring occasionally, about 15 minutes, or until tomatoes have broken down. Season to taste with salt.
Ingredients added to the anchovy mixture
Sauce has nicely broken down
Season fish with salt, and lay gently in the sauce. Drizzle fillets with remaining 1 Tbsp. oil. Cover and simmer gently over low heat 7 to 10 minutes, or until fish is just cooked through and still moist.
Sprinkle with parsley and serve.
Braised Mahi Mahi served along with Creamy Polenta and Roasted Baby Asparagus
Bottom Line: This recipe is everything you could ask for in a Mediterranean fish dish. It is easy, healthy, savory, and with the addition of cooking it all in one pan, an easy clean up! Your family will ask for it again and again and you will impress any guests that have this at your dinner table. Give it a try and let me know what you think! I am Chef Frankie always in the kitchen and always cooking with “love and wild abandon”!
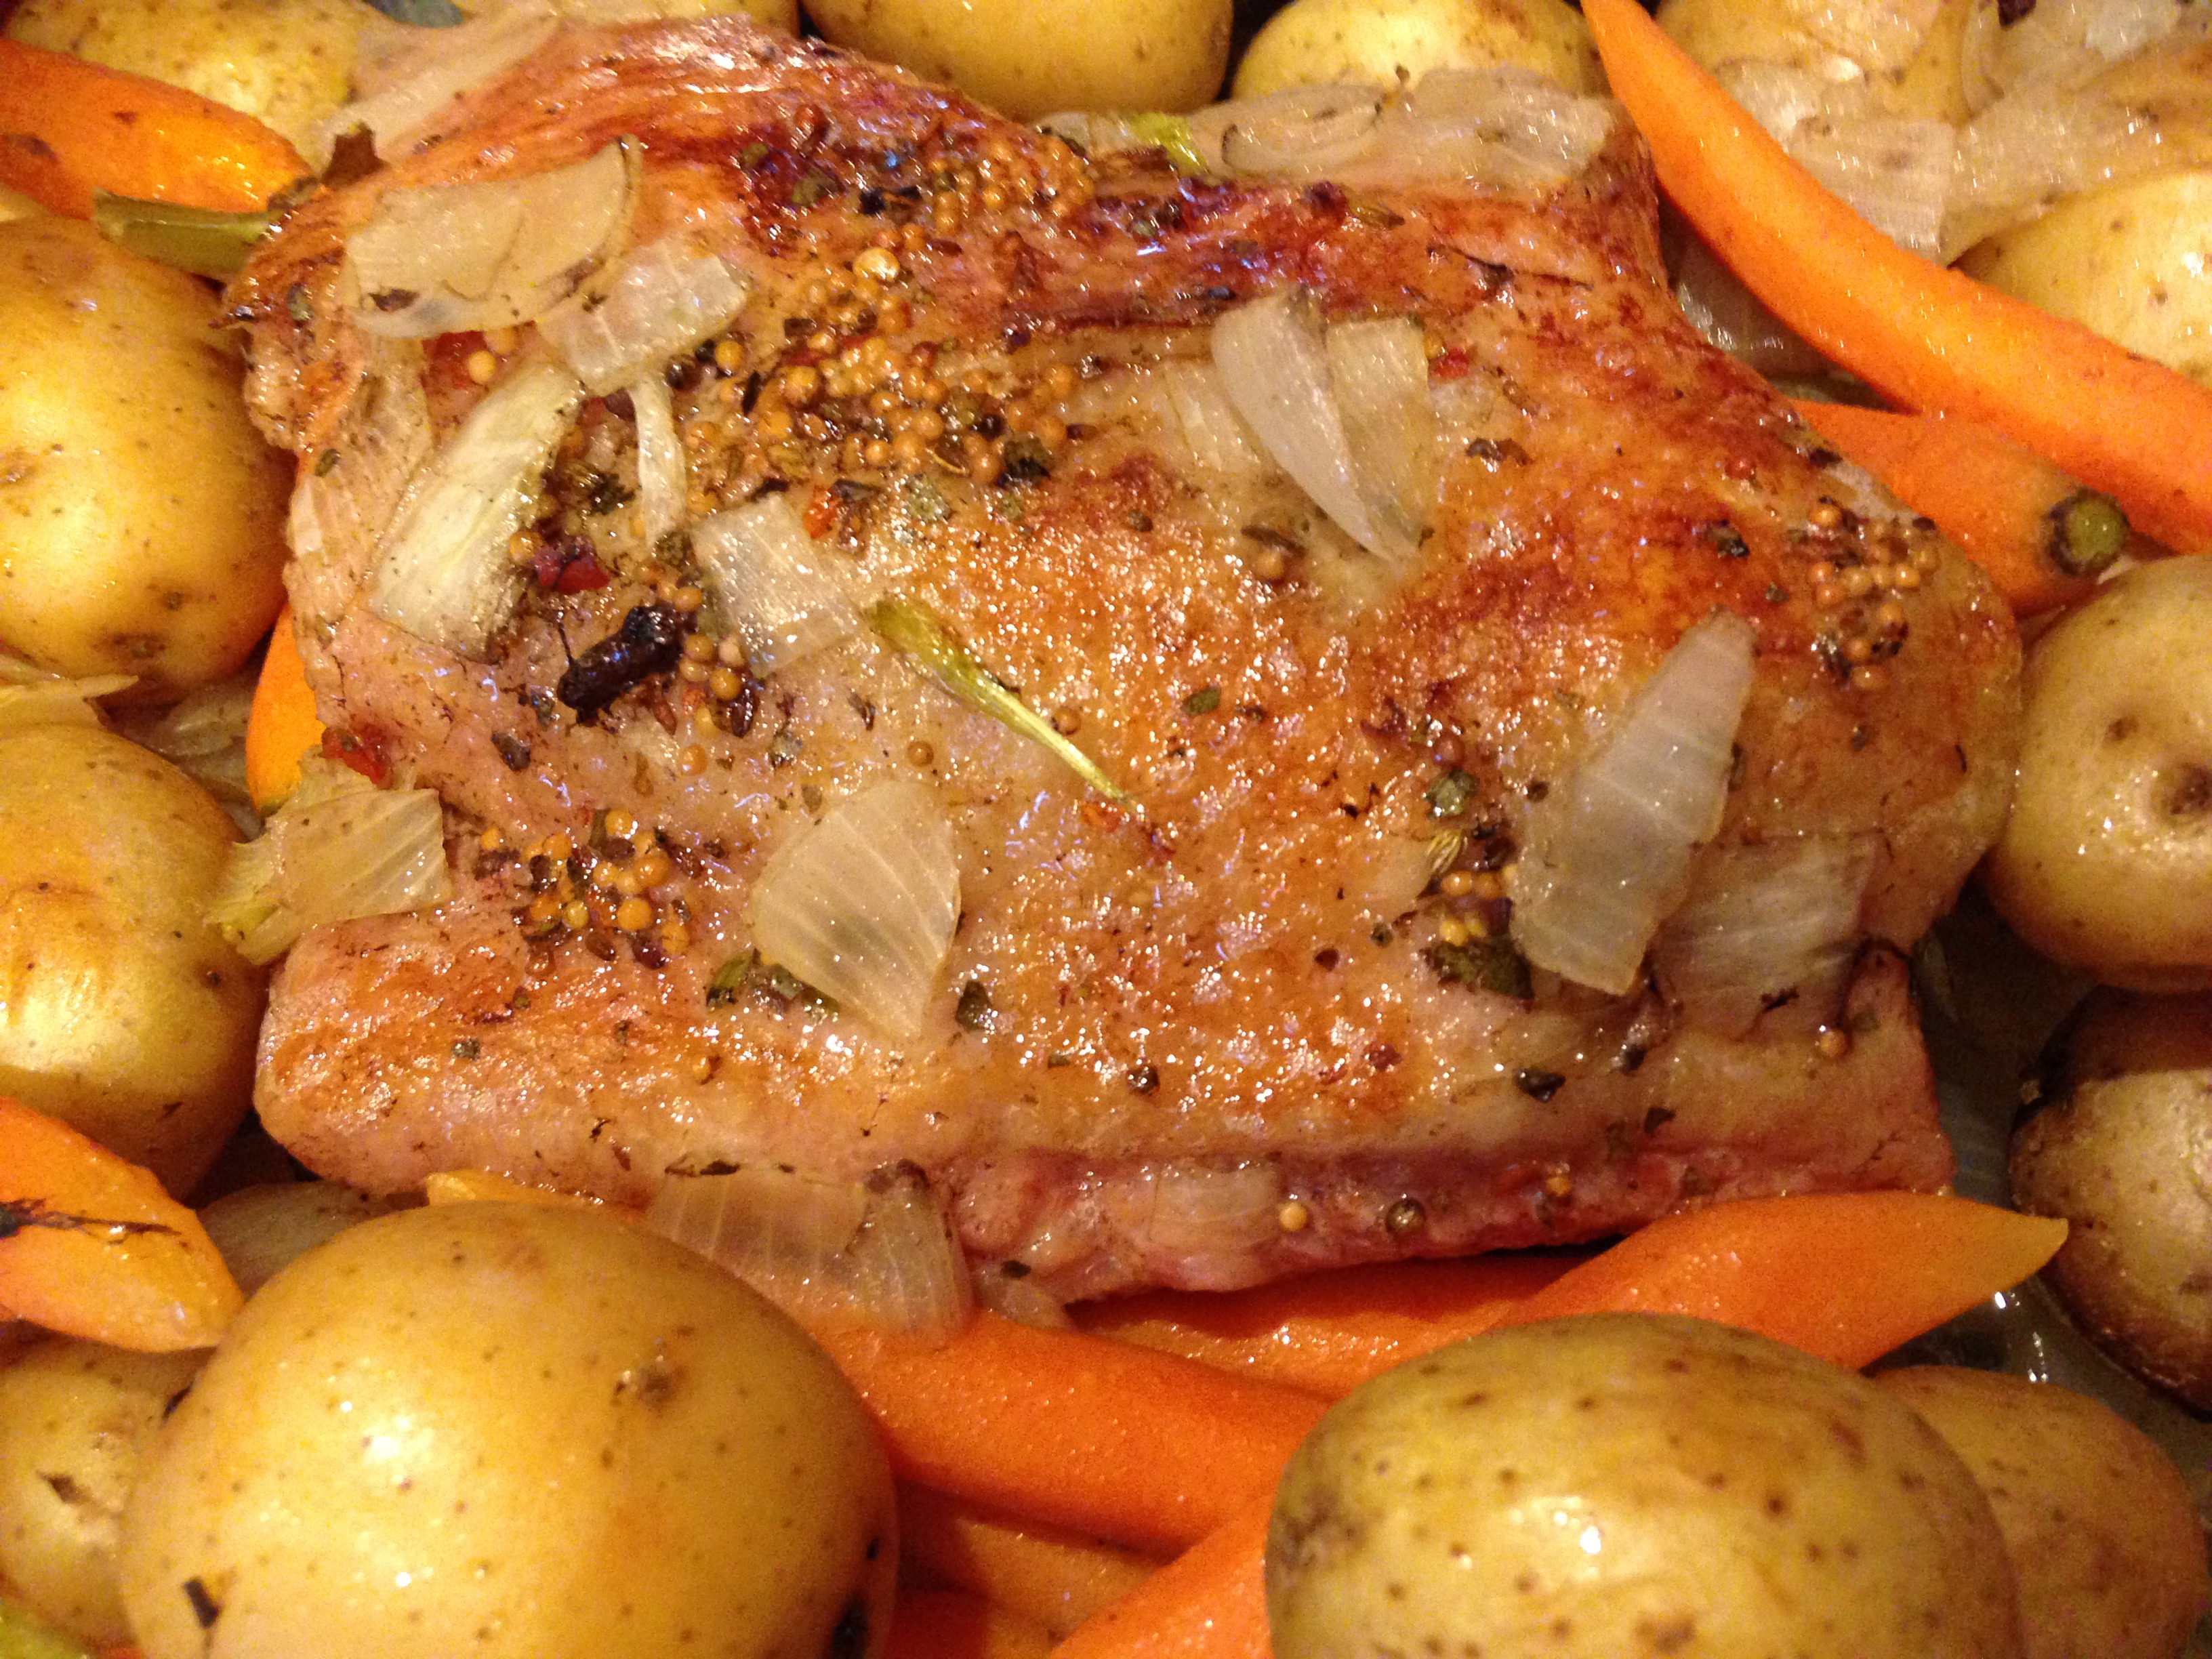
I love Corned Beef! My favorite way to have it is on couple of pieces of Rye Bread, smothered in sour kraut and mustard, topped with gooey swiss cheese…grill it and I’m good to go! You can always get excellent Corned Beef at your local market, too but every year around St. Patrick’s Day, you may get a little motivated to make it yourself when you see all the tasty pieces of brisket in the meat department. If so, I have got the recipe for you!
It is one that I have tweaked over the years and I think I have finally got it as close to perfection as possible…(Patting myself on the back now..ha, ha). The best part about it is that it is prepared in the crockpot so you don’t have to babysit it! At the end, just pull it out and put it under the broiler for a few minutes so you still get that beautiful crust on the outside.
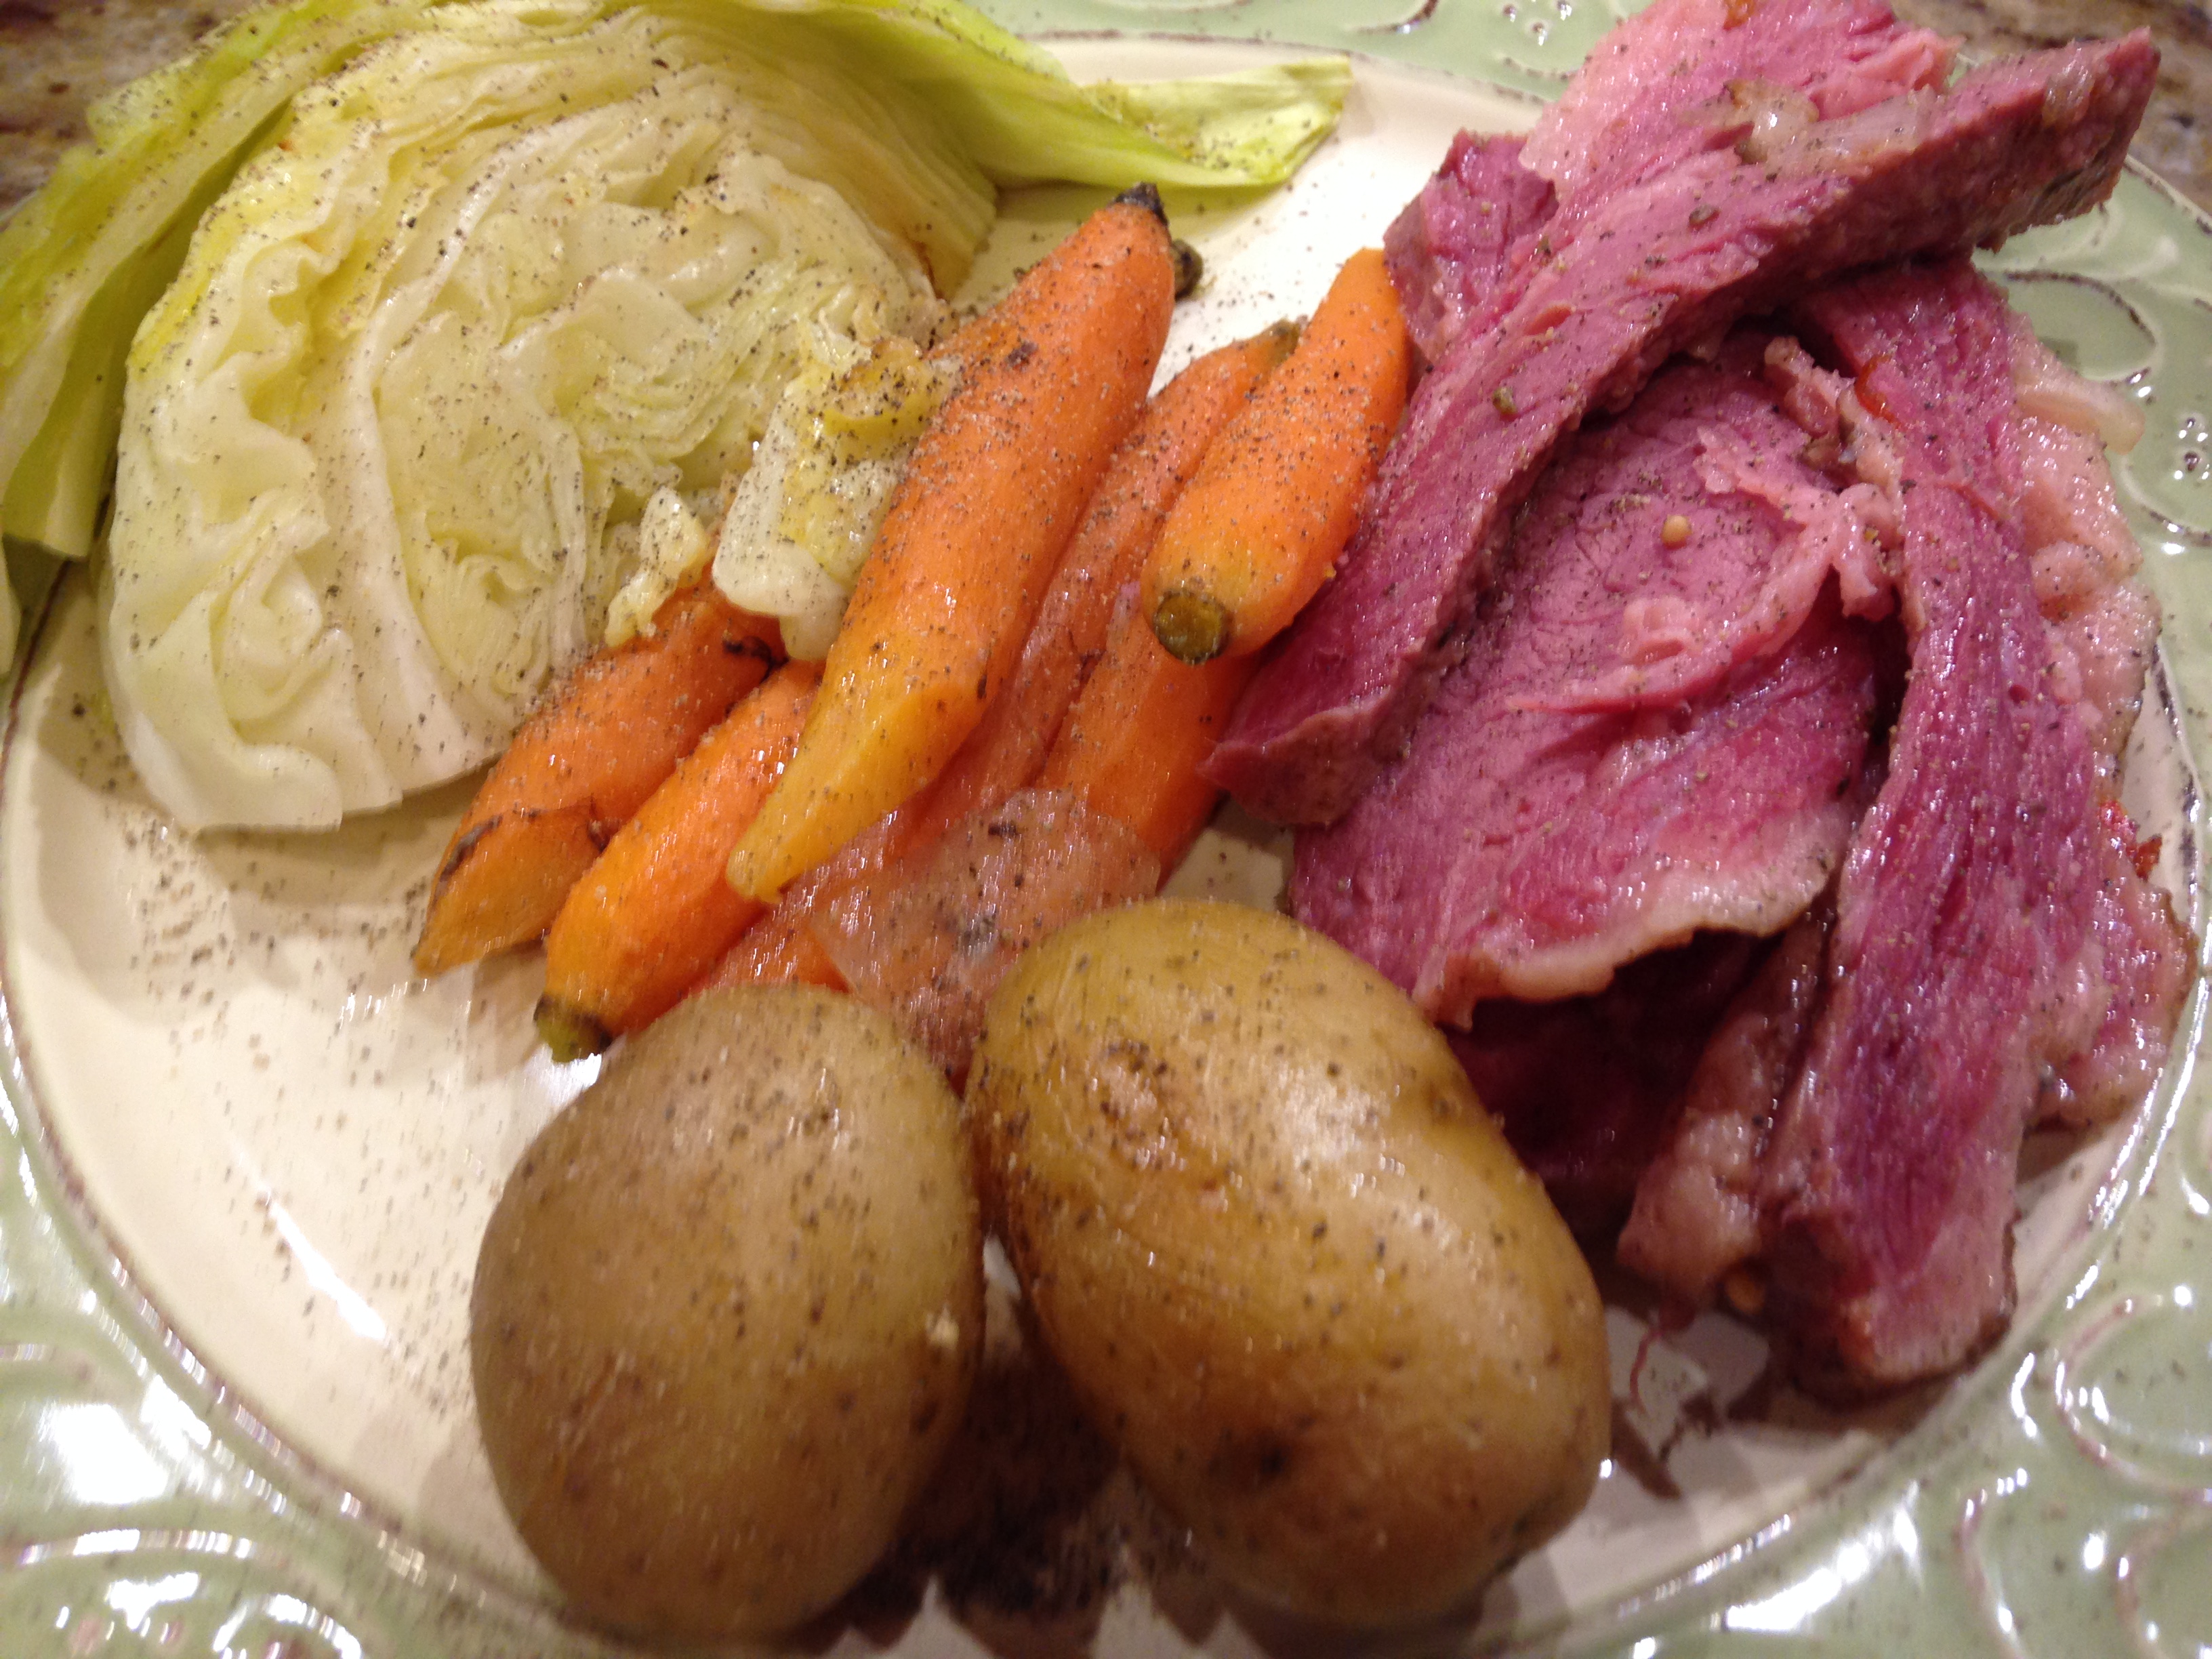
Corned Beef with Potatoes and Carrots
This is a great recipe because you have a delicious one pot meal of corned beef, potatoes, and carrots (I serve a Roasted Cabbage wedge with it that is also amazing), and the leftovers you can use to make a hash or that perfect sandwich I was talking about earlier! It is no fail and I promise, you will receive many compliments! So, here you go….
Frankie’s Savory Corned Beef, Potatoes, and Carrots
Ingredients
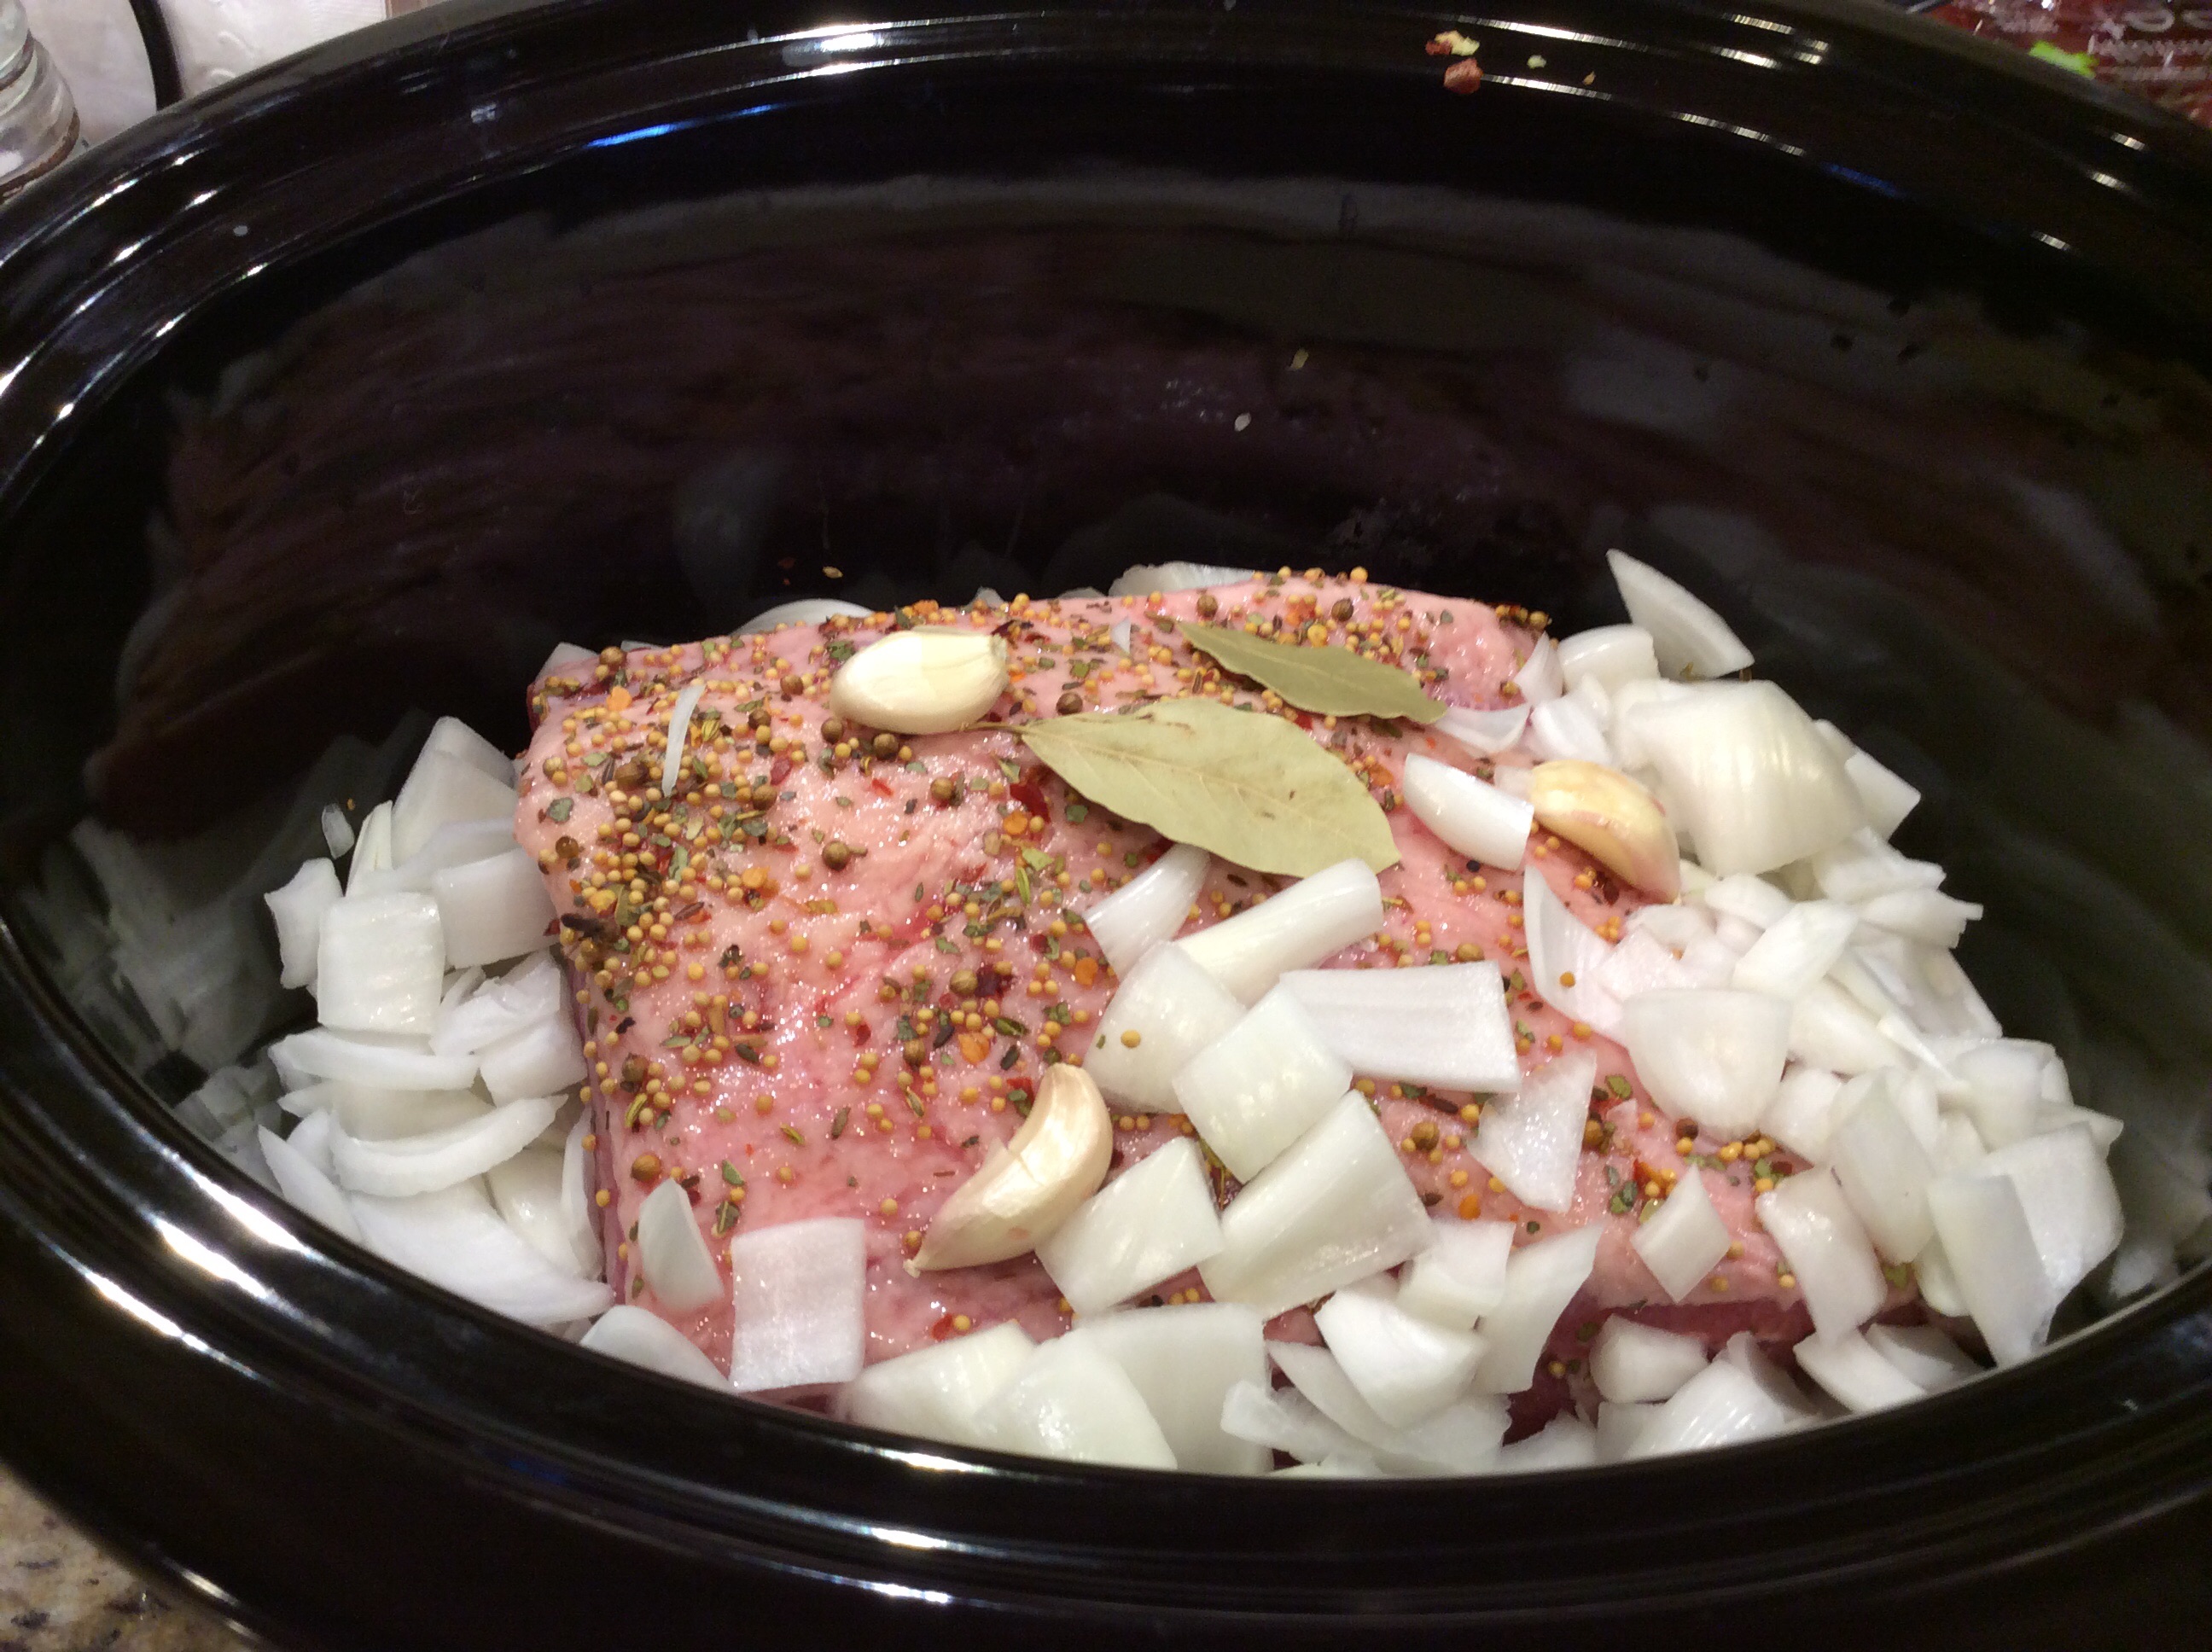
1 (3 lb.) corned beef brisket with spice packet
1 medium onion, roughly chopped
1/8 teaspoon whole cloves
4 garlic cloves, peeled and halved
2 bay leaves
1 14.9 oz can of Guiness Stout beer
2 cups water
1 pound baby Dutch potatoes
24 whole baby carrots, tops trimmed to 2 inches
Directions
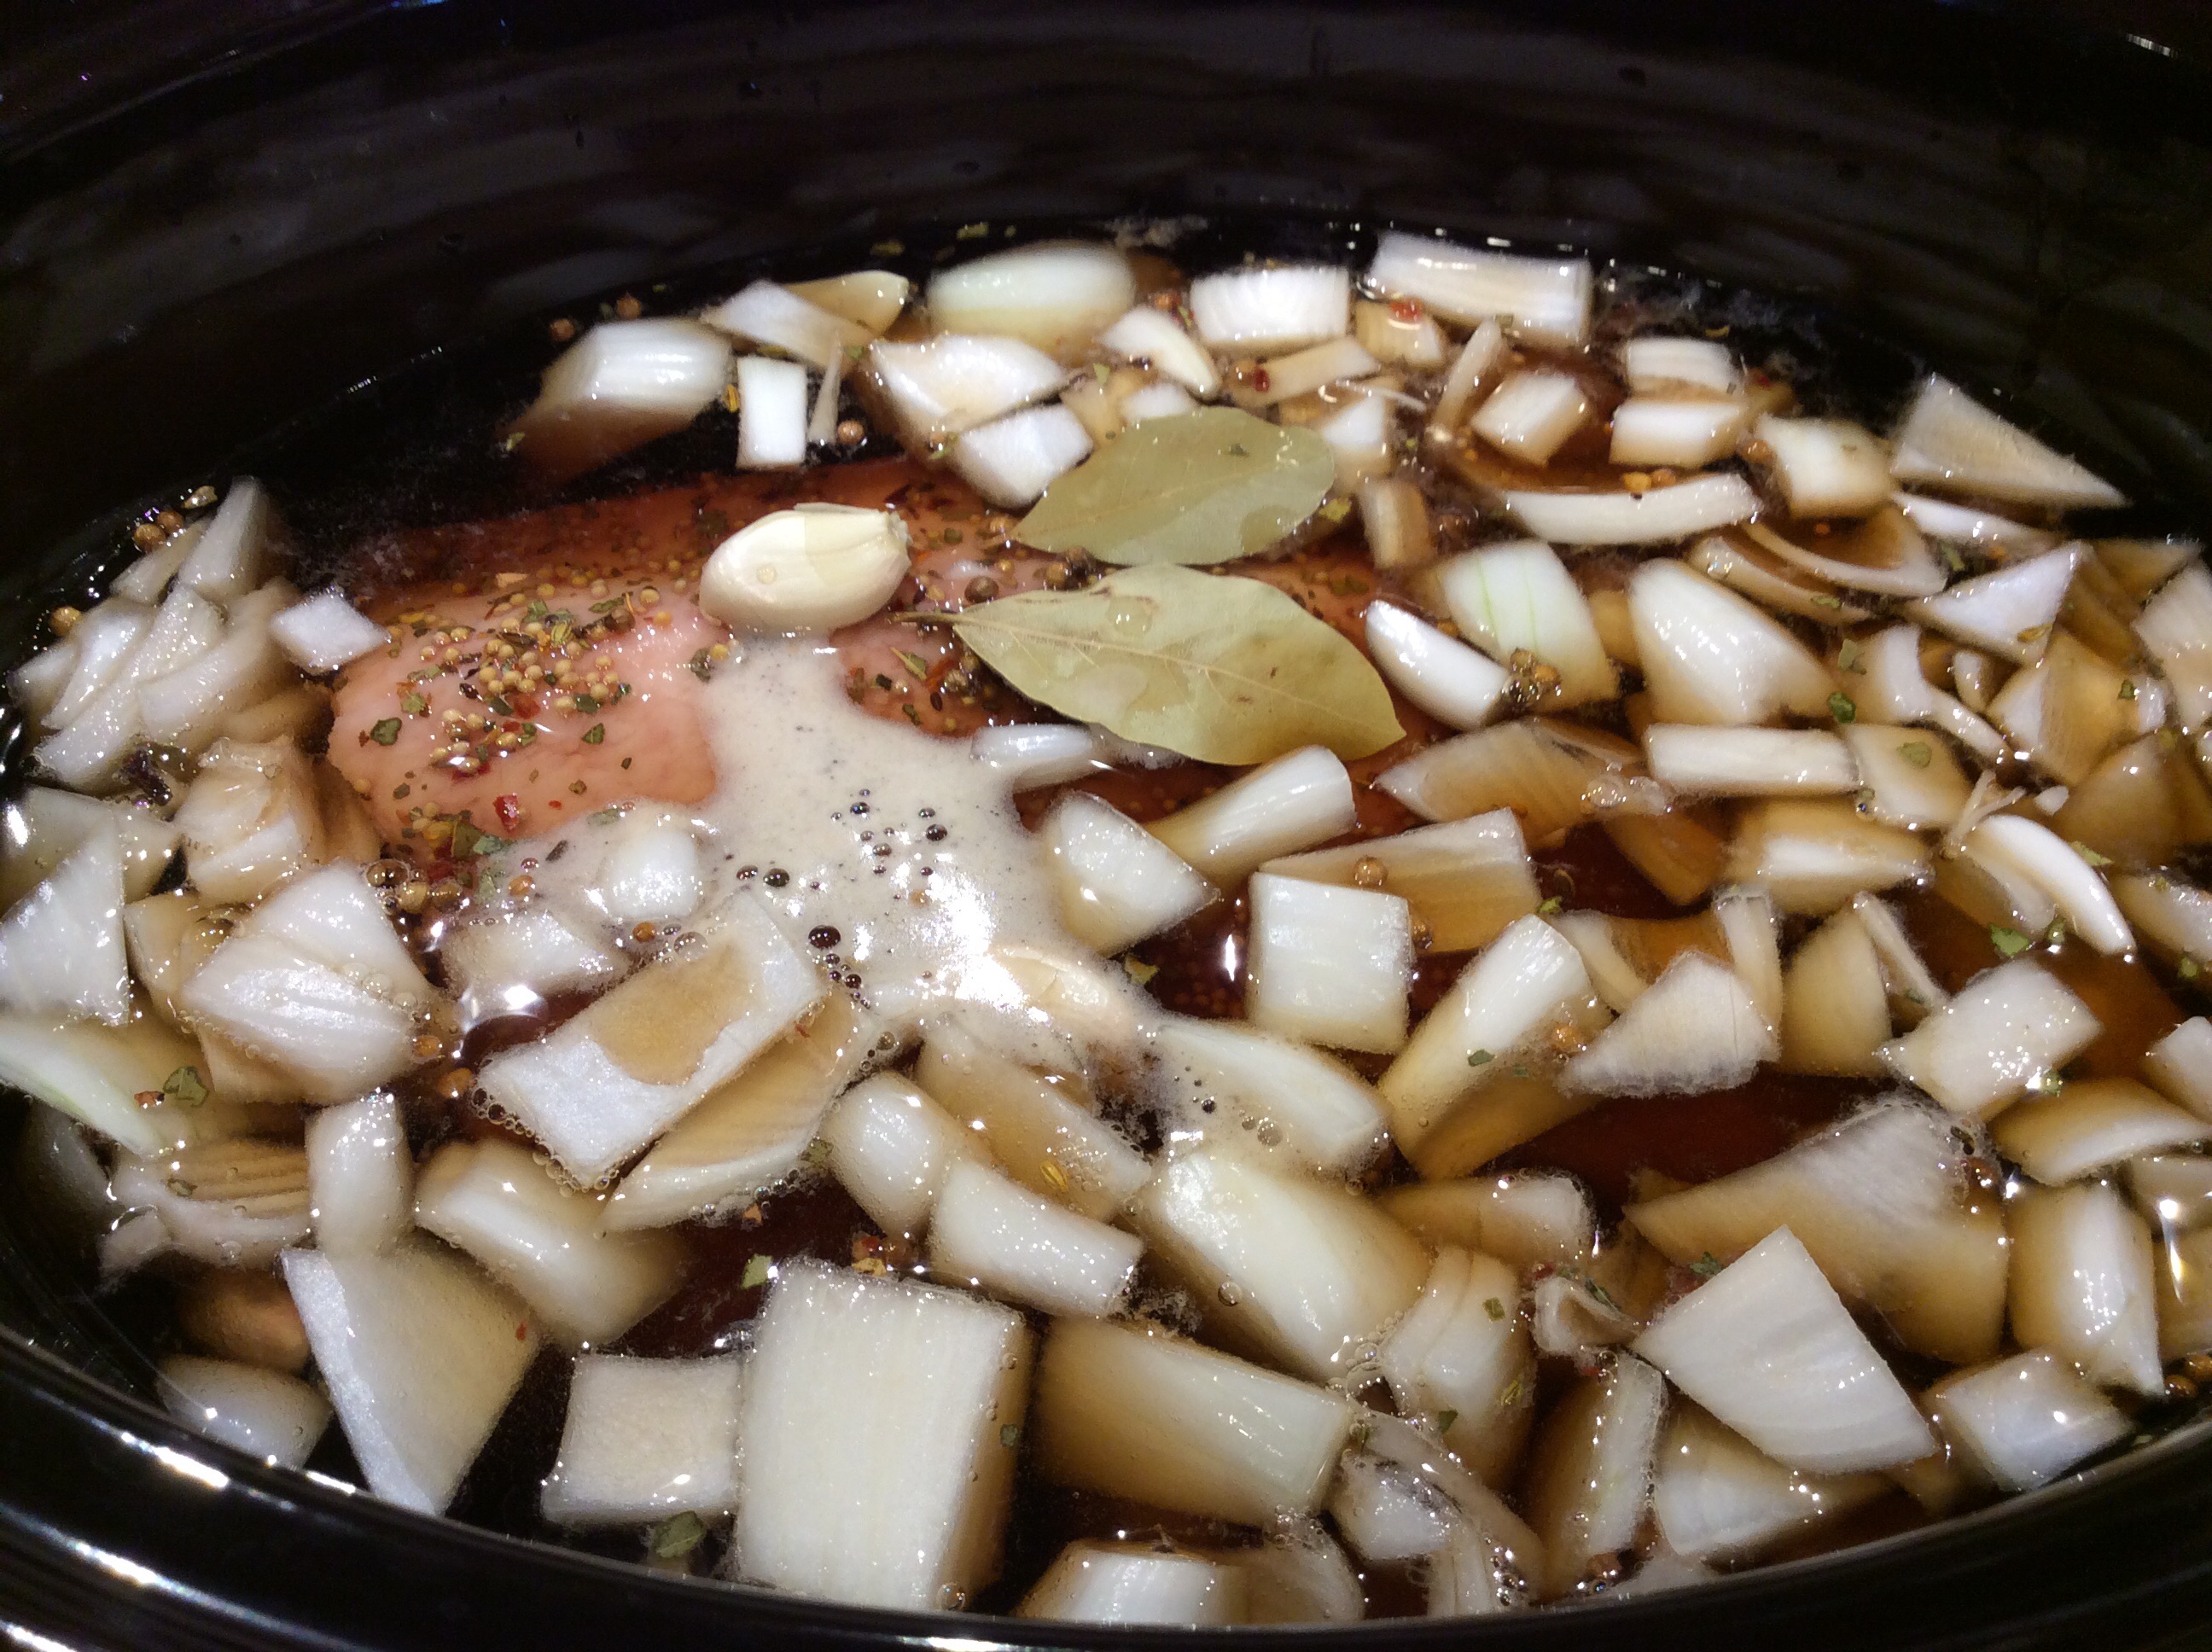
Place corned beef brisket, fat side up, into crock pot; sprinkle with pickling spice. Add onions, garlic, bay leaves and cloves.
Combine beer and water and pour around corned beef…you want the liquid to almost cover the corned beef. (Add more water if needed.)
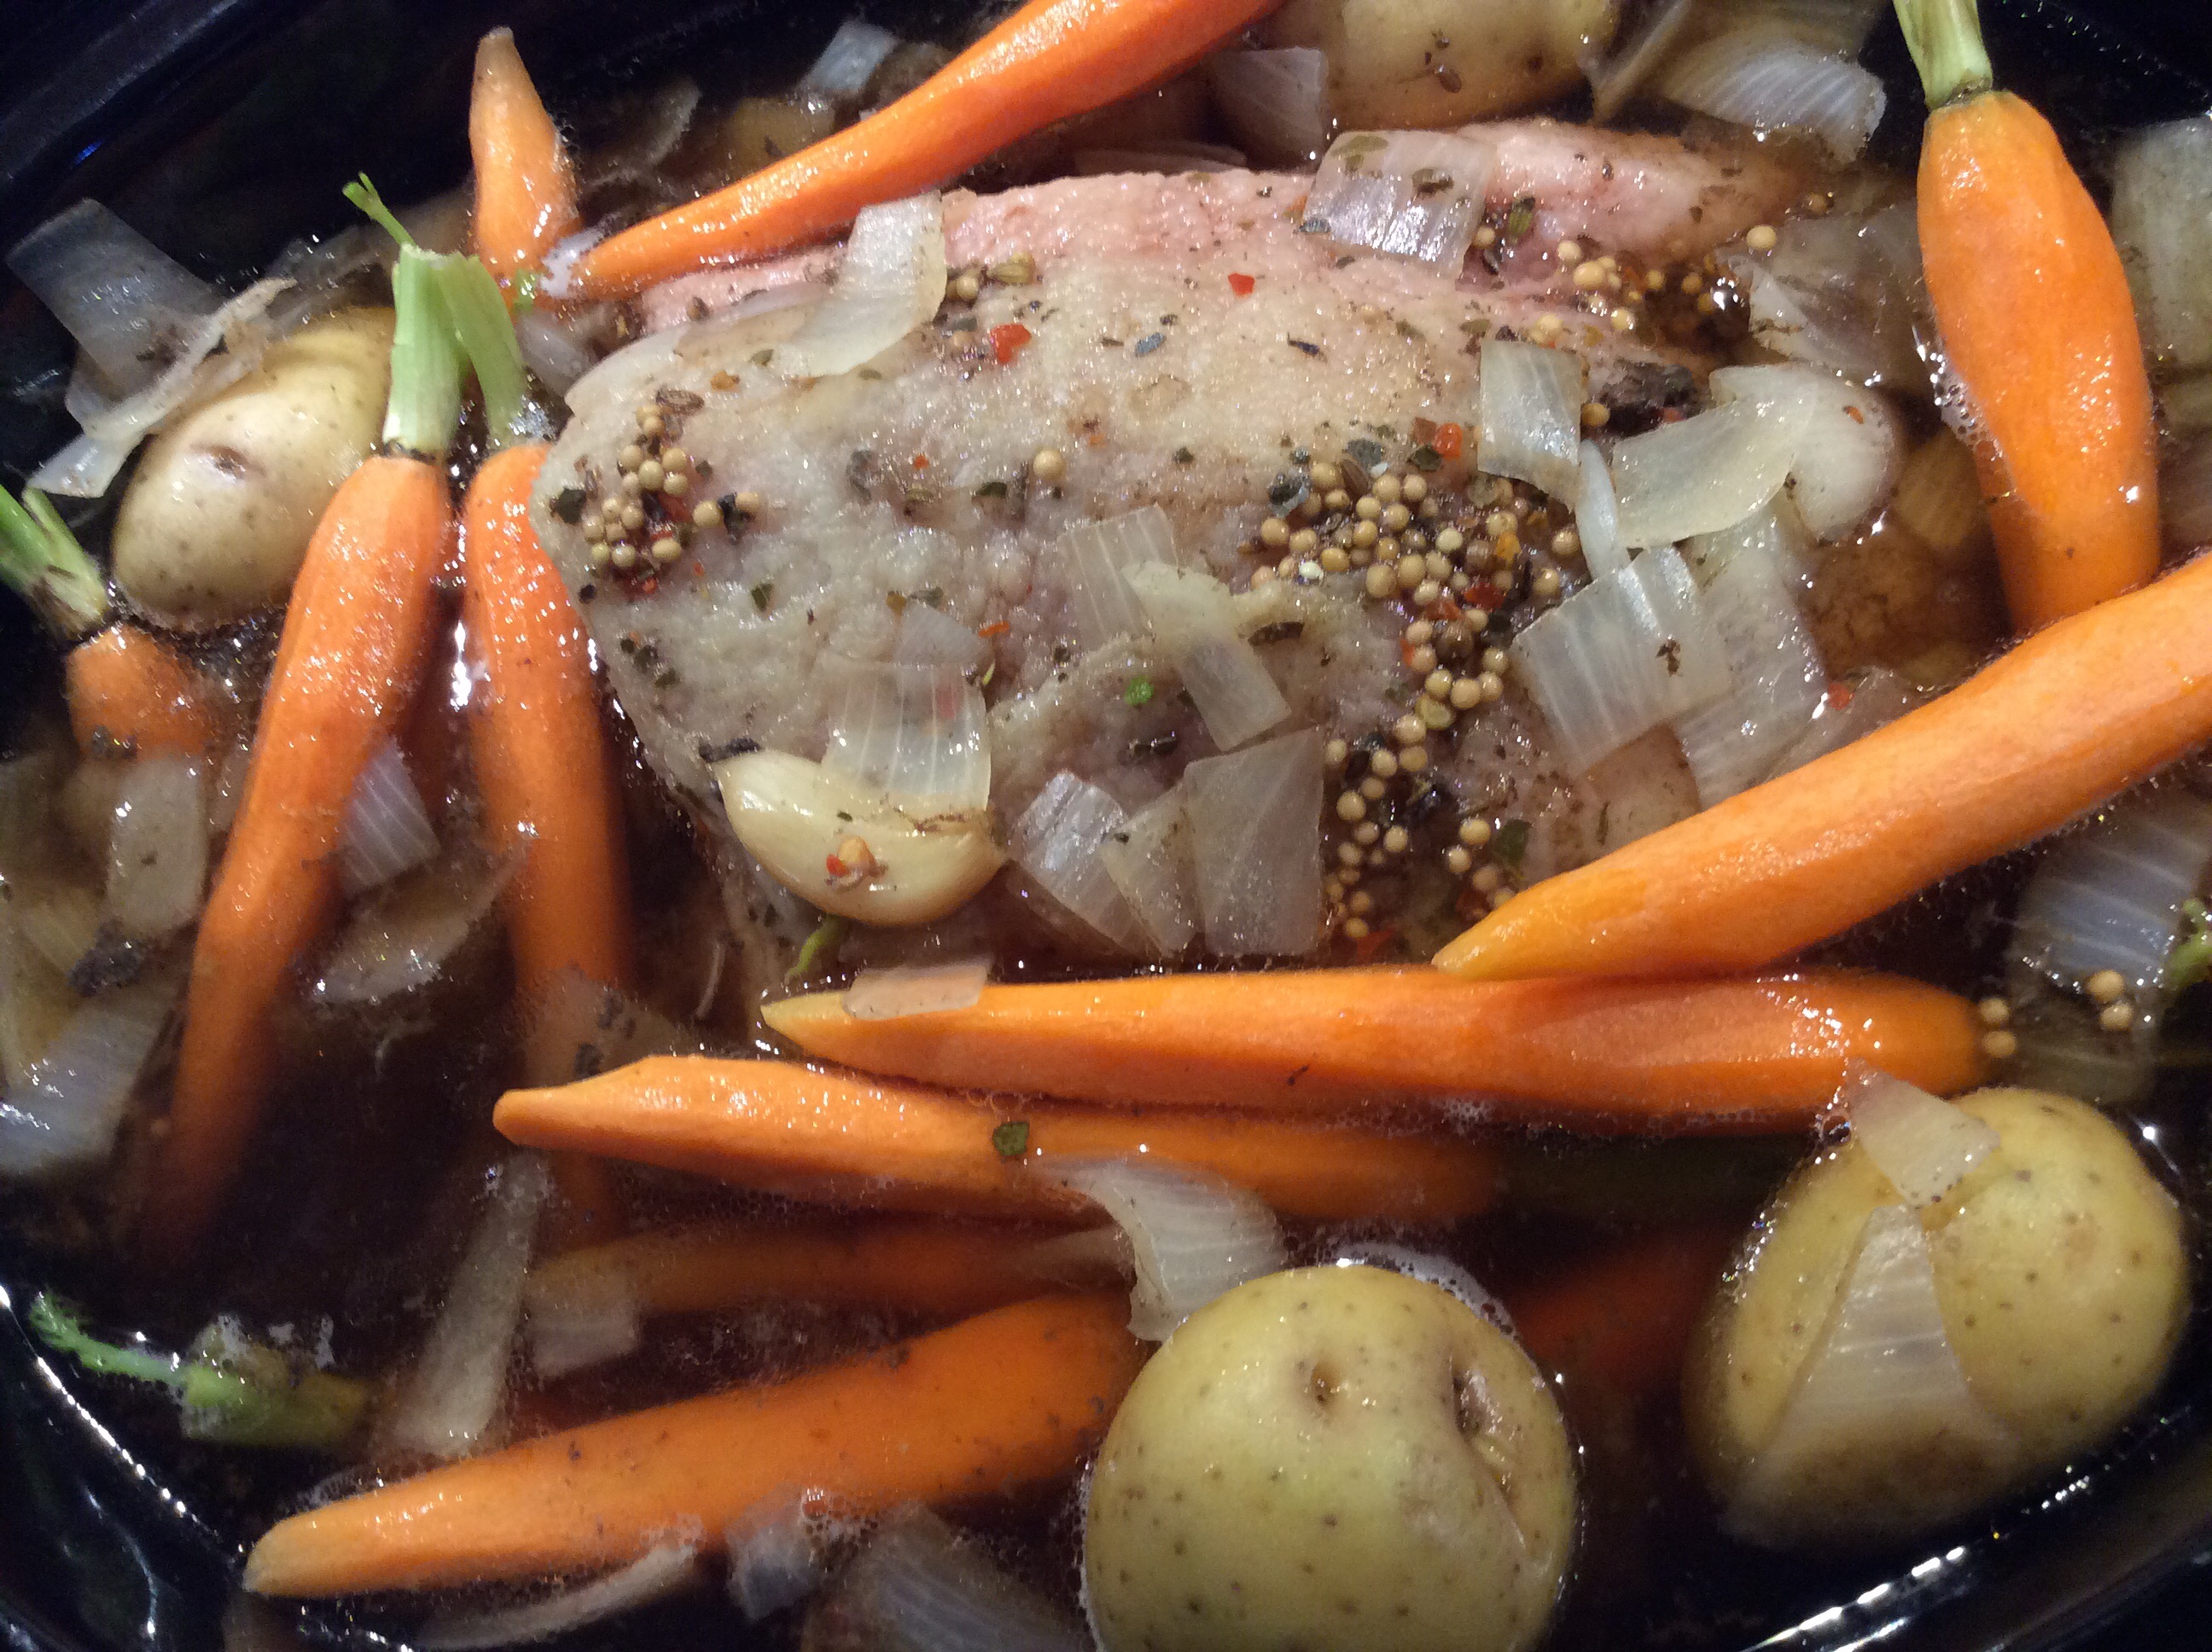
Cover and cook on low heat for 4 1/2 hours. Add carrots and potatoes and cook an additional 2 1/2 to 3 hours (or until veggies are tender).
Remove corned beef from crock pot and put in an oven-safe dish spreading the carrots and potatoes around it. Broil on high for 5-7 minutes until you get a caramelized crust.
Corned Beef with Potatoes and Carrots
Remove corned beef and let rest for 5 minutes. Thinly slice the corned beef against the grain and place it back in the dish with the carrots and potatoes.
Serve with Roasted Cabbage Wedges and Lemons. (Instructions for this easy side dish follows recipe)
Bottom Line: This recipe is so good and so easy, you will not want to wait for St. Patrick’s Day to have it! You can always add some chopped cabbage right on into the crockpot as well but I love the crunchy, crispiness of the oven- roasted version. I hope that you give this a try tomorrow in your kitchen and let me know how it turn out. I am Chef Frankie…always in the kitchen and always cooking with “wild abandon”!
Roasted Cabbage with Lemon
This is the easiest recipe ever and all it calls for is a head of cabbage, olive oil, salt, pepper, and some fresh lemon juice. Cut your cabbage into 8 wedges (removing the core from each wedge) and place on a baking sheet. ,one side with olive oil and sprinkle with salt and pepper. Turn over and repeat on the other side. Bake 15 minutes on each side at 400 degrees. Sprinkle fresh lemon juice over the wedges and you will love this so much, you may never eat cabbage another way..ha ha!
If you are looking for a recipe to serve for the Big Game on Sunday (or any other casual gathering you may be having) and you want to wow your guests, this recipe is for you! It can be made the day before (it’s actually better the next day) and it truly tastes like authentic Mexican cuisine….Mexican Pork Carnitas!
Mexican Pork Carnitas
I found the recipe one day while perusing Pinterest (the best place in the world to store great ideas) and what caught my attention most was not only the delicious looking photo but the fact that her tagline said that these were the best carnitas her husband had ever had and since he was originally from Mexico, I thought that was a very strong endorsement! The link took me to a blog called “Food To Luv” and it has some really good recipes, so
be sure to check it out!
Now, a little warning, this recipe feeds a crowd! Since I didn’t have a crowd that particular day, I was able to send some to friends (who were very impressed, I might add) and freeze some for later. I also am trying a new recipe using the leftover carnita meat tonight called Mexican Stromboli…stay tuned for that!
I followed this recipe to the letter and you should have smelled my house while it was cooking! Wow! The only thing I would change is a very small detail…I would have put the lid on while braising, because I would have preferred a little more liquid remaining. I have always done my braising recipes with the lid on and I found it a little odd that the recipe stated to do it with the lid off. Either way, it is a great recipe!
Mexican Pork Carnitas
Ingredients
5 lbs pork shoulder
Sea Salt
2 tbsp vegetable oil
1 cinnamon stick
2 bay leaves
1 tsp chile powder
1 tsp ancho chile powder
1/4 tsp cumin
5 cloves of garlic, minced
Directions
Preheat the oven to 350 degrees.
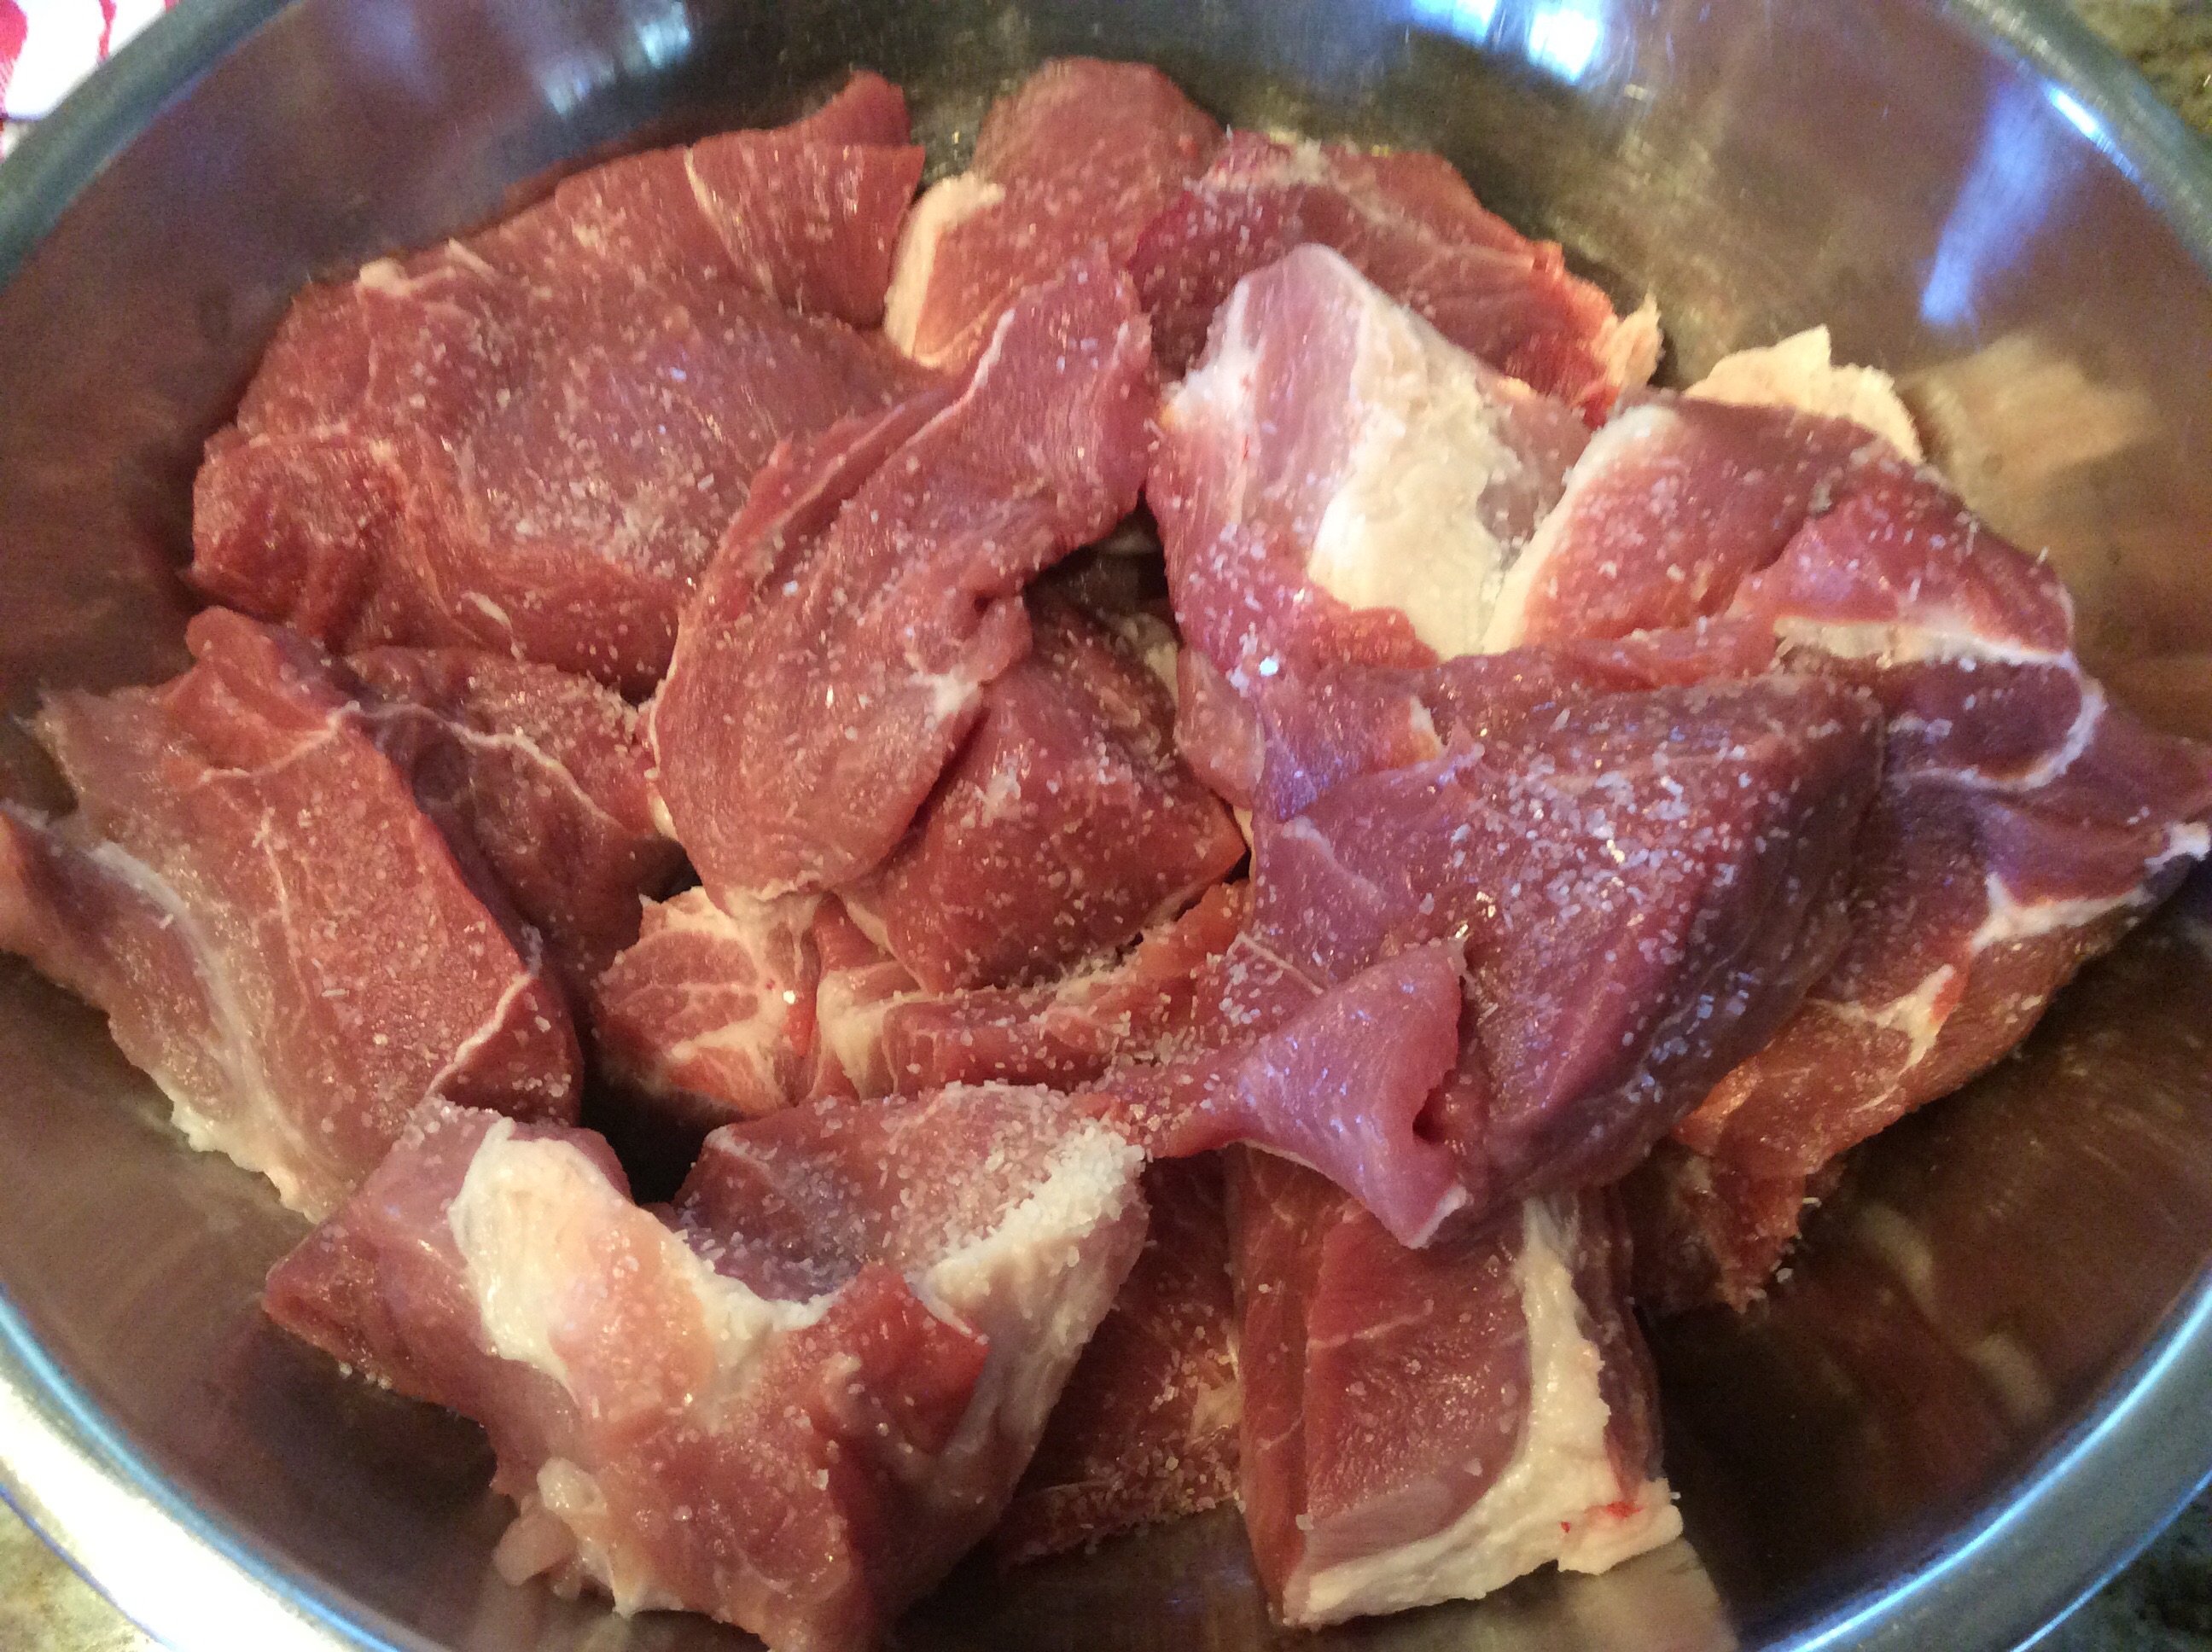
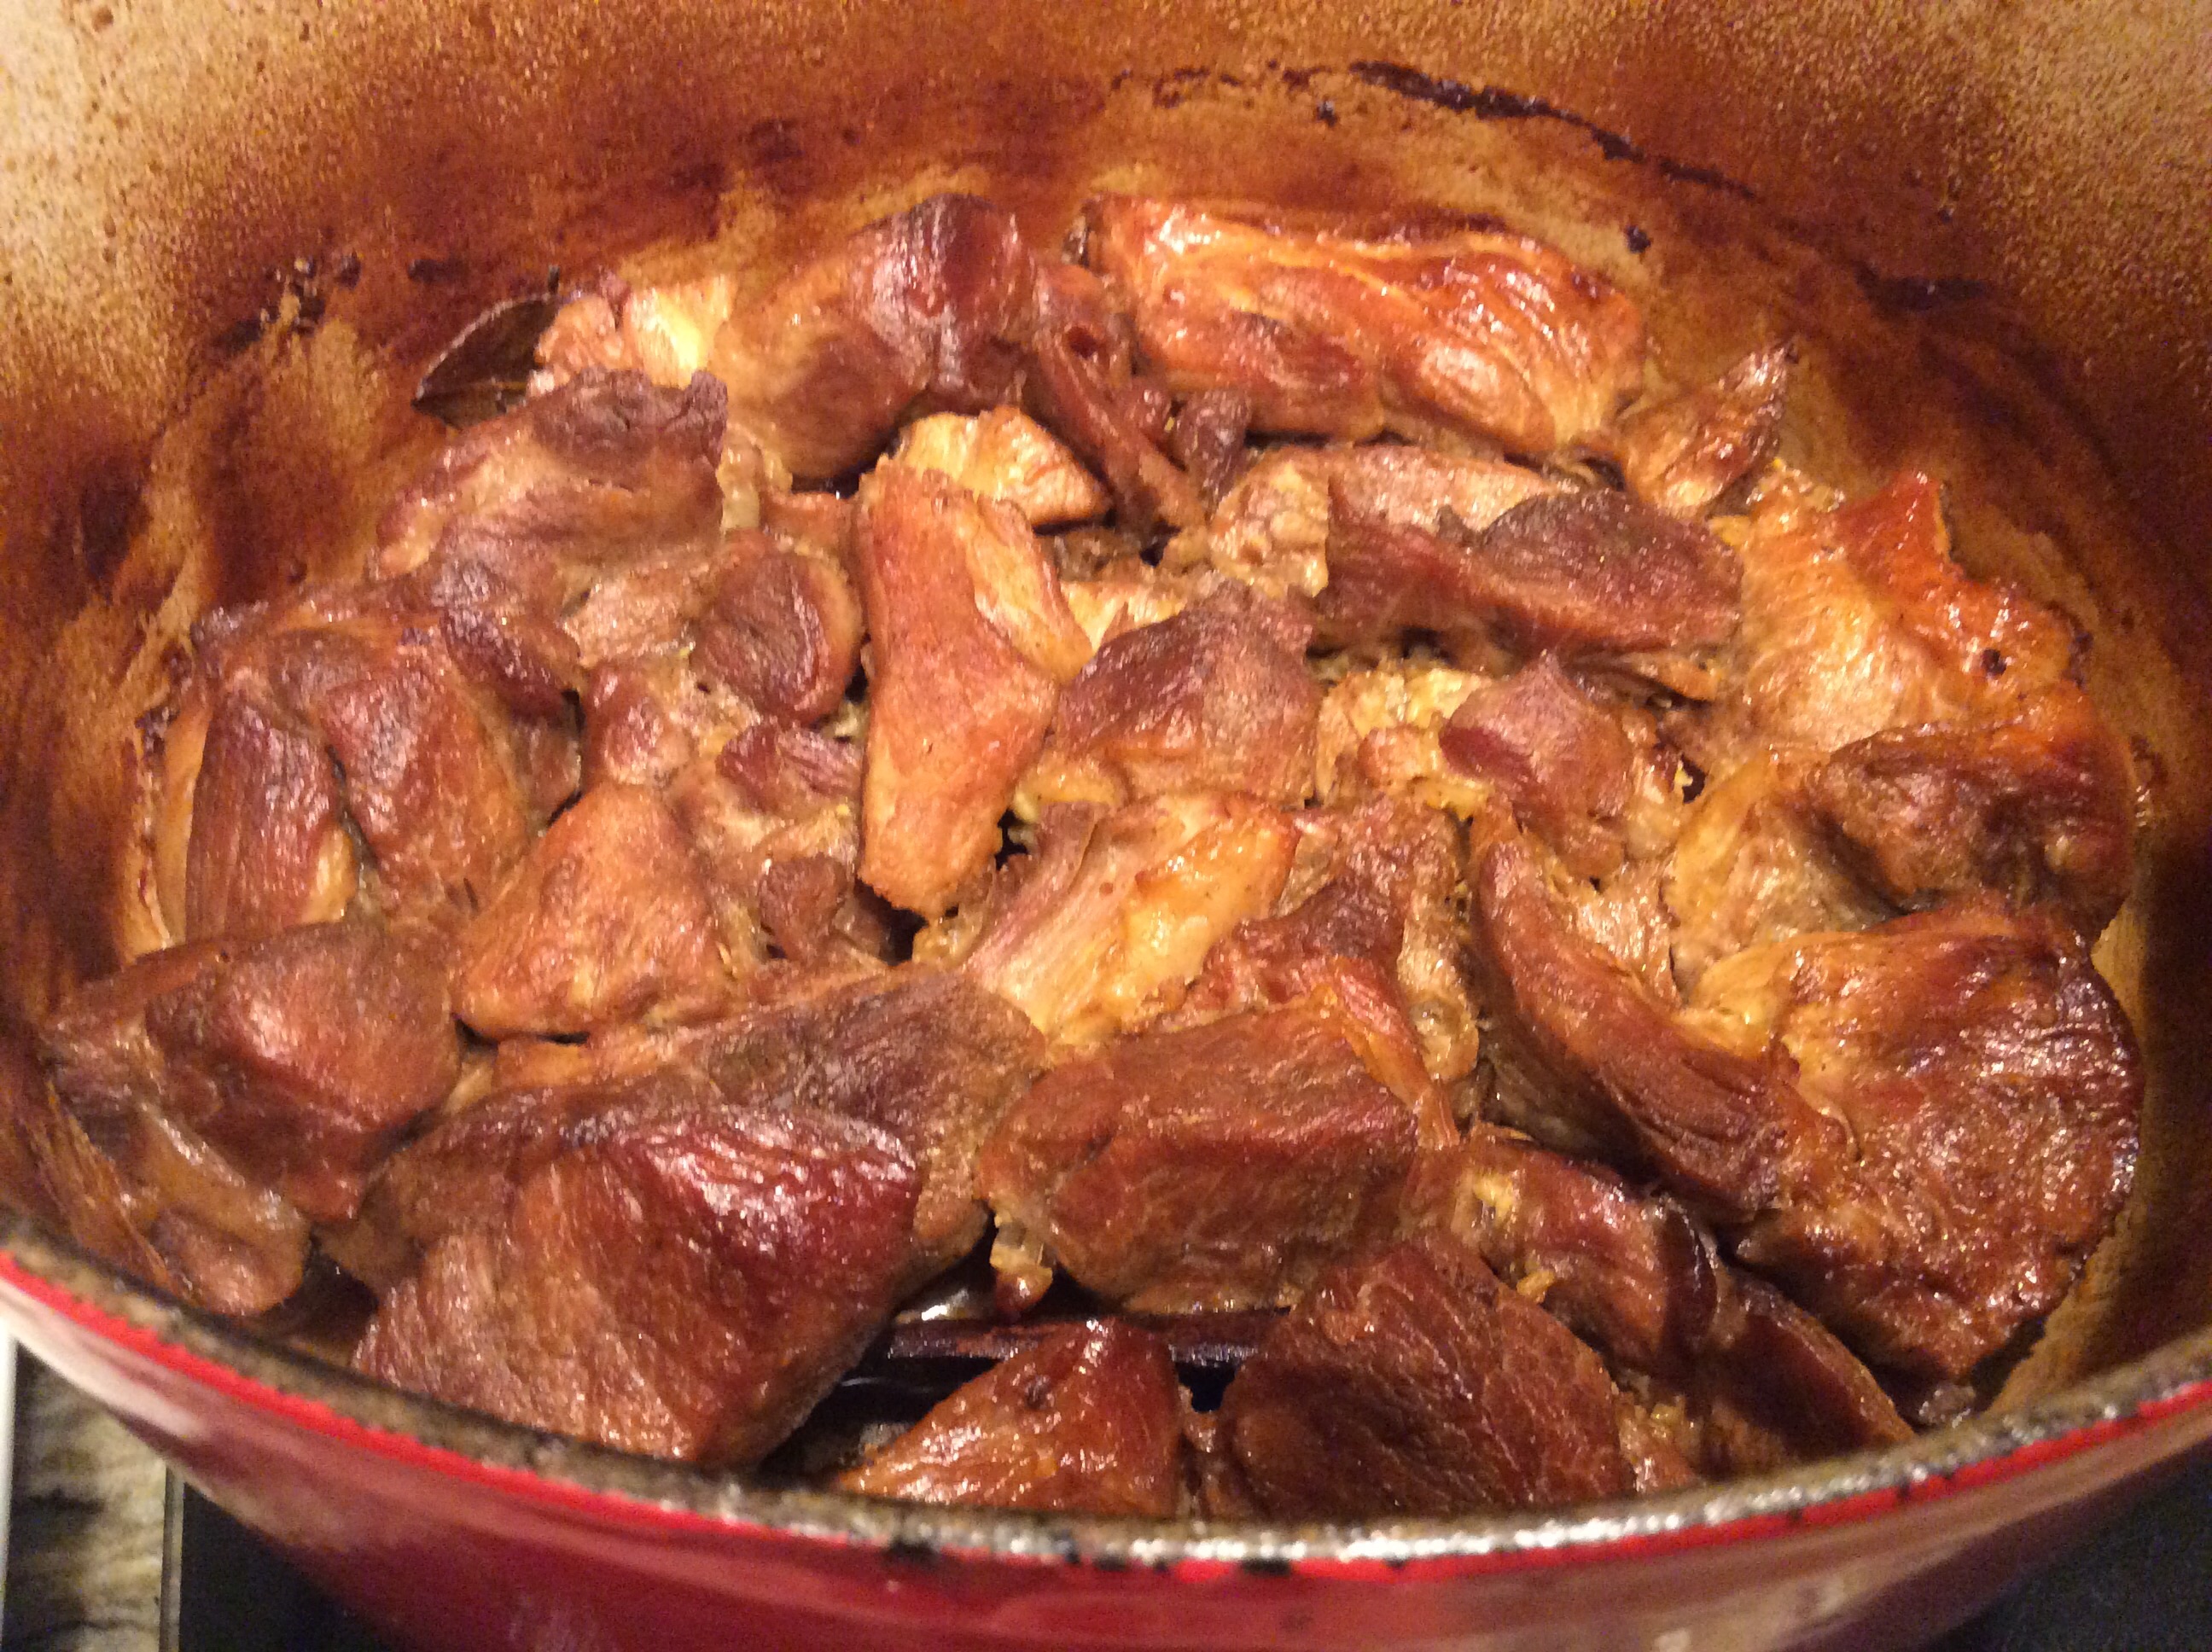
Cut the meat into 4 – 5″ chunks, removing any excess fat. Season all sides well with Sea Salt. (I used about 1 1/2 tablespoons).
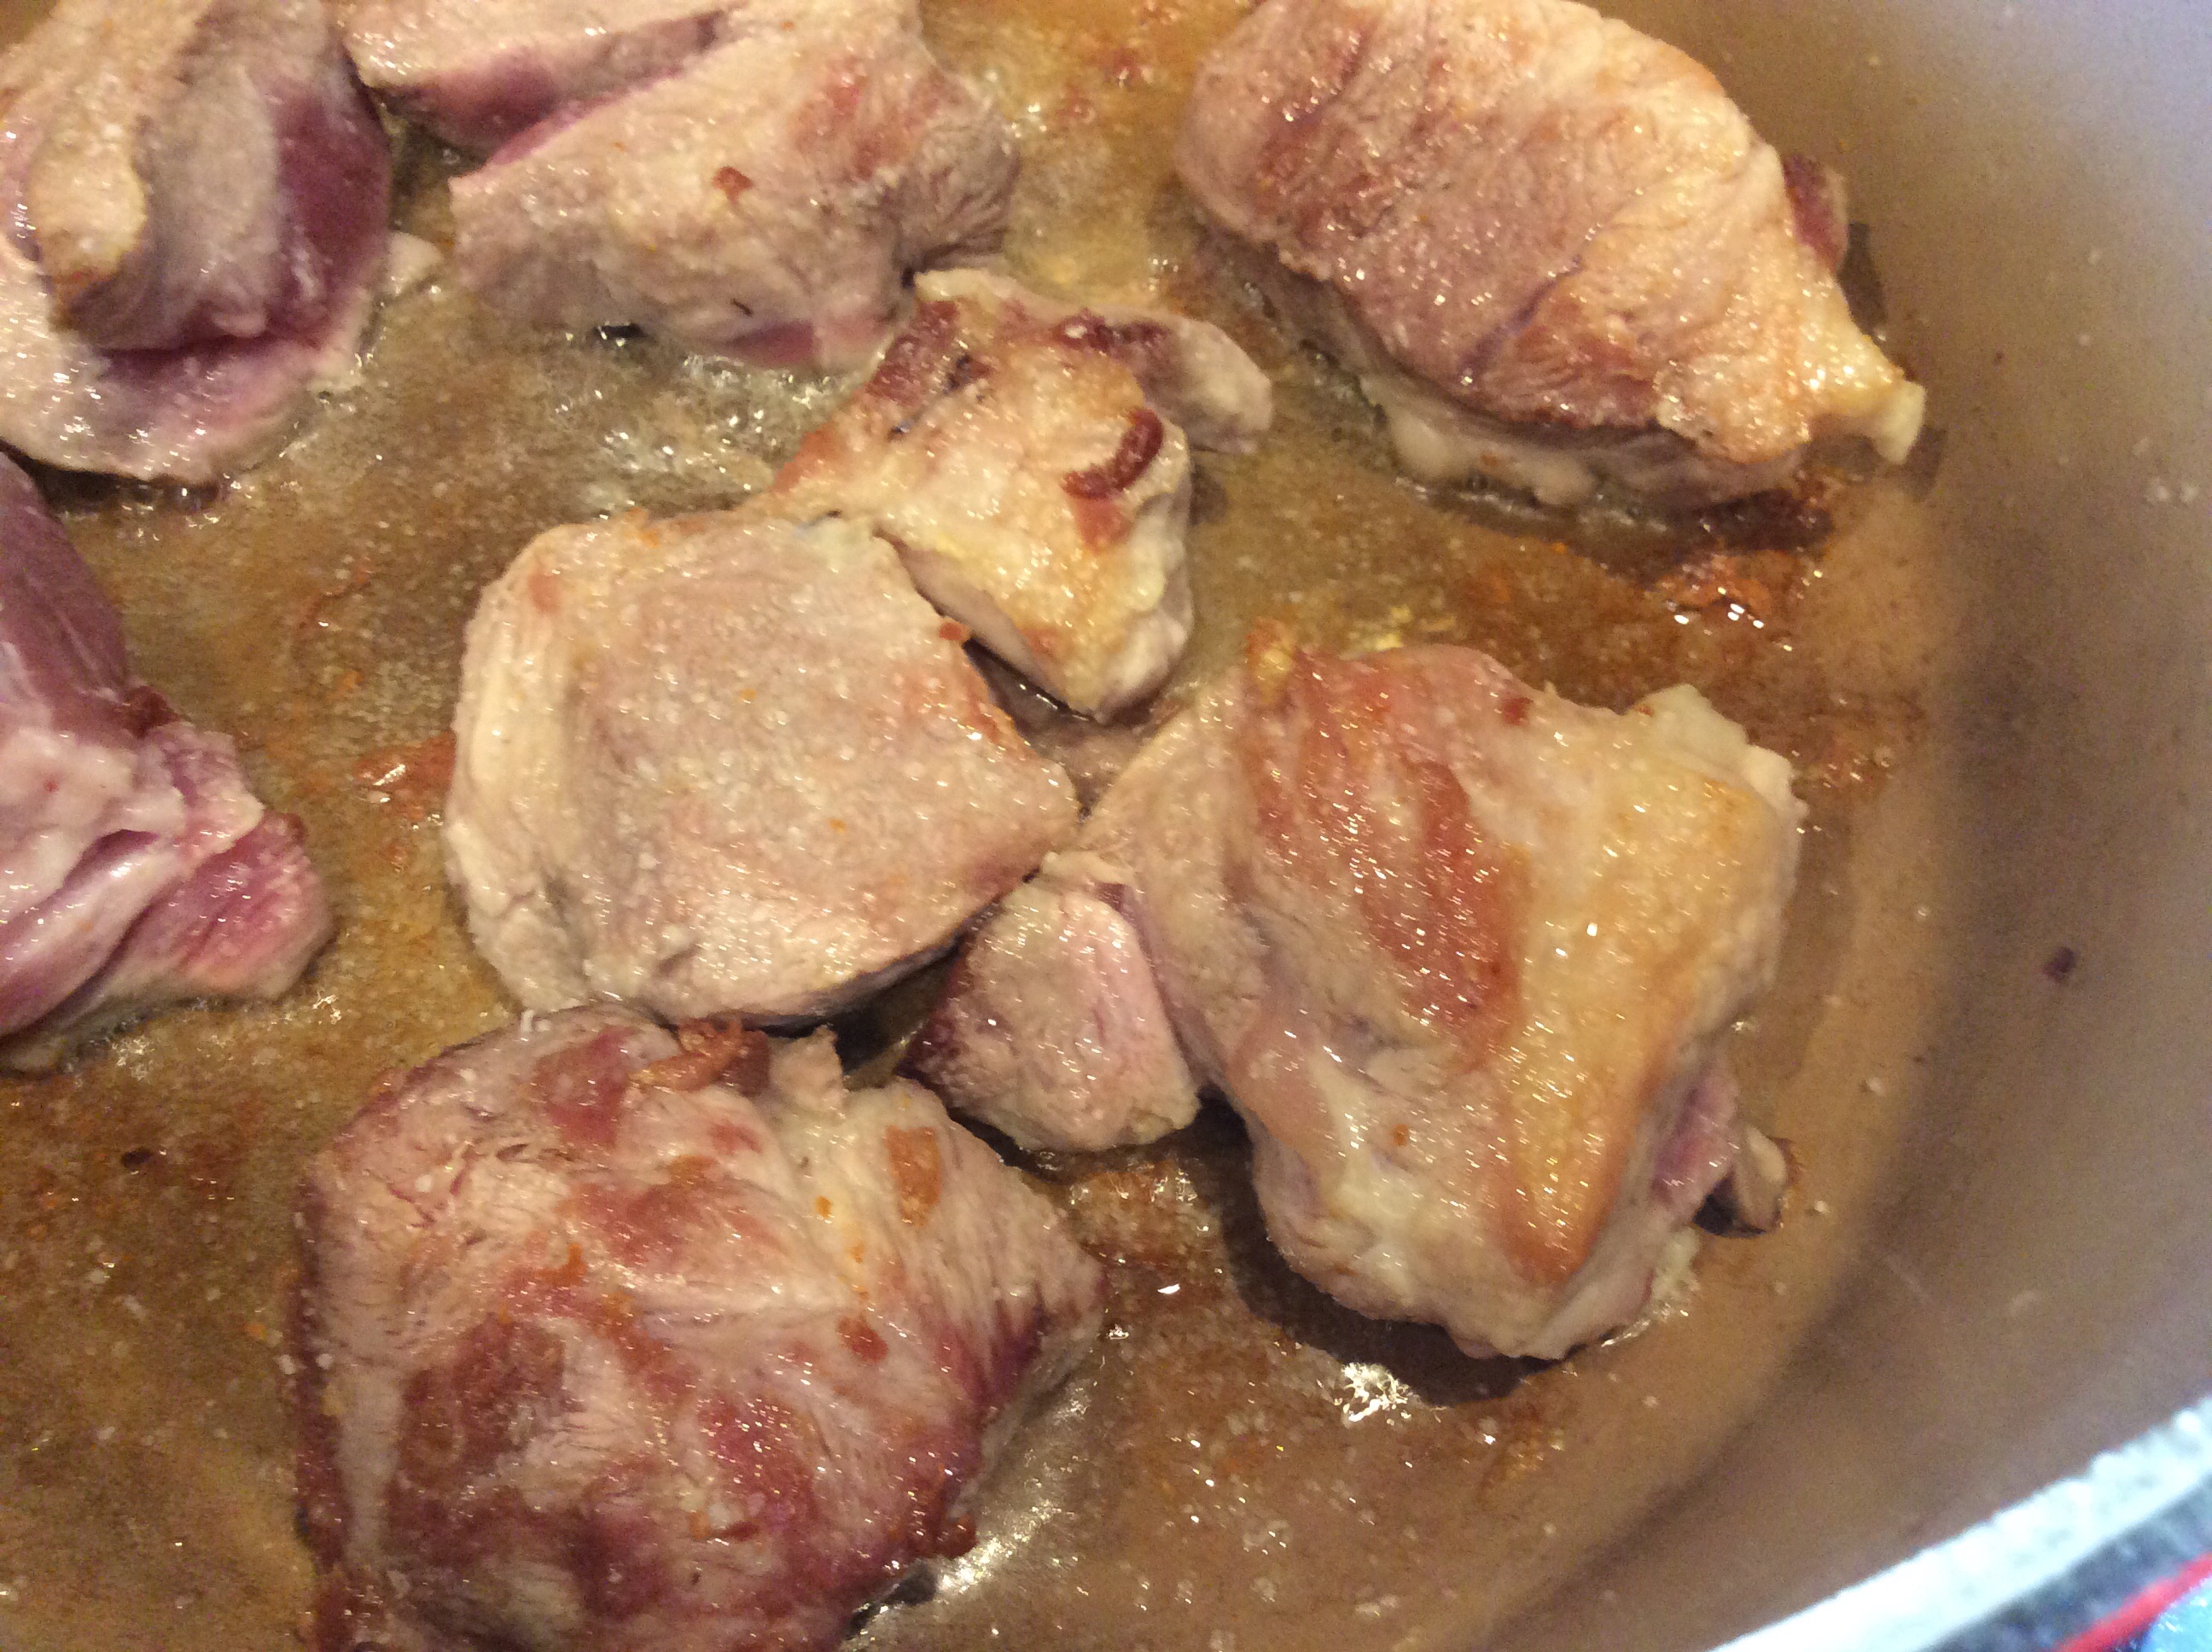
In a large dutch oven or pot, heat the oil (Make sure to get it really hot so you won’t have issues with the meat sticking if you aren’t using a non-stick pan)
Cook the meat until very well browned on all sides. You will need to do this in batches so as not to steam the meat.
Once the meat is brown, remove them from the pot. (The recipe states to blot with a towel put I just placed them on some paper towels to absorb the excess oil.)
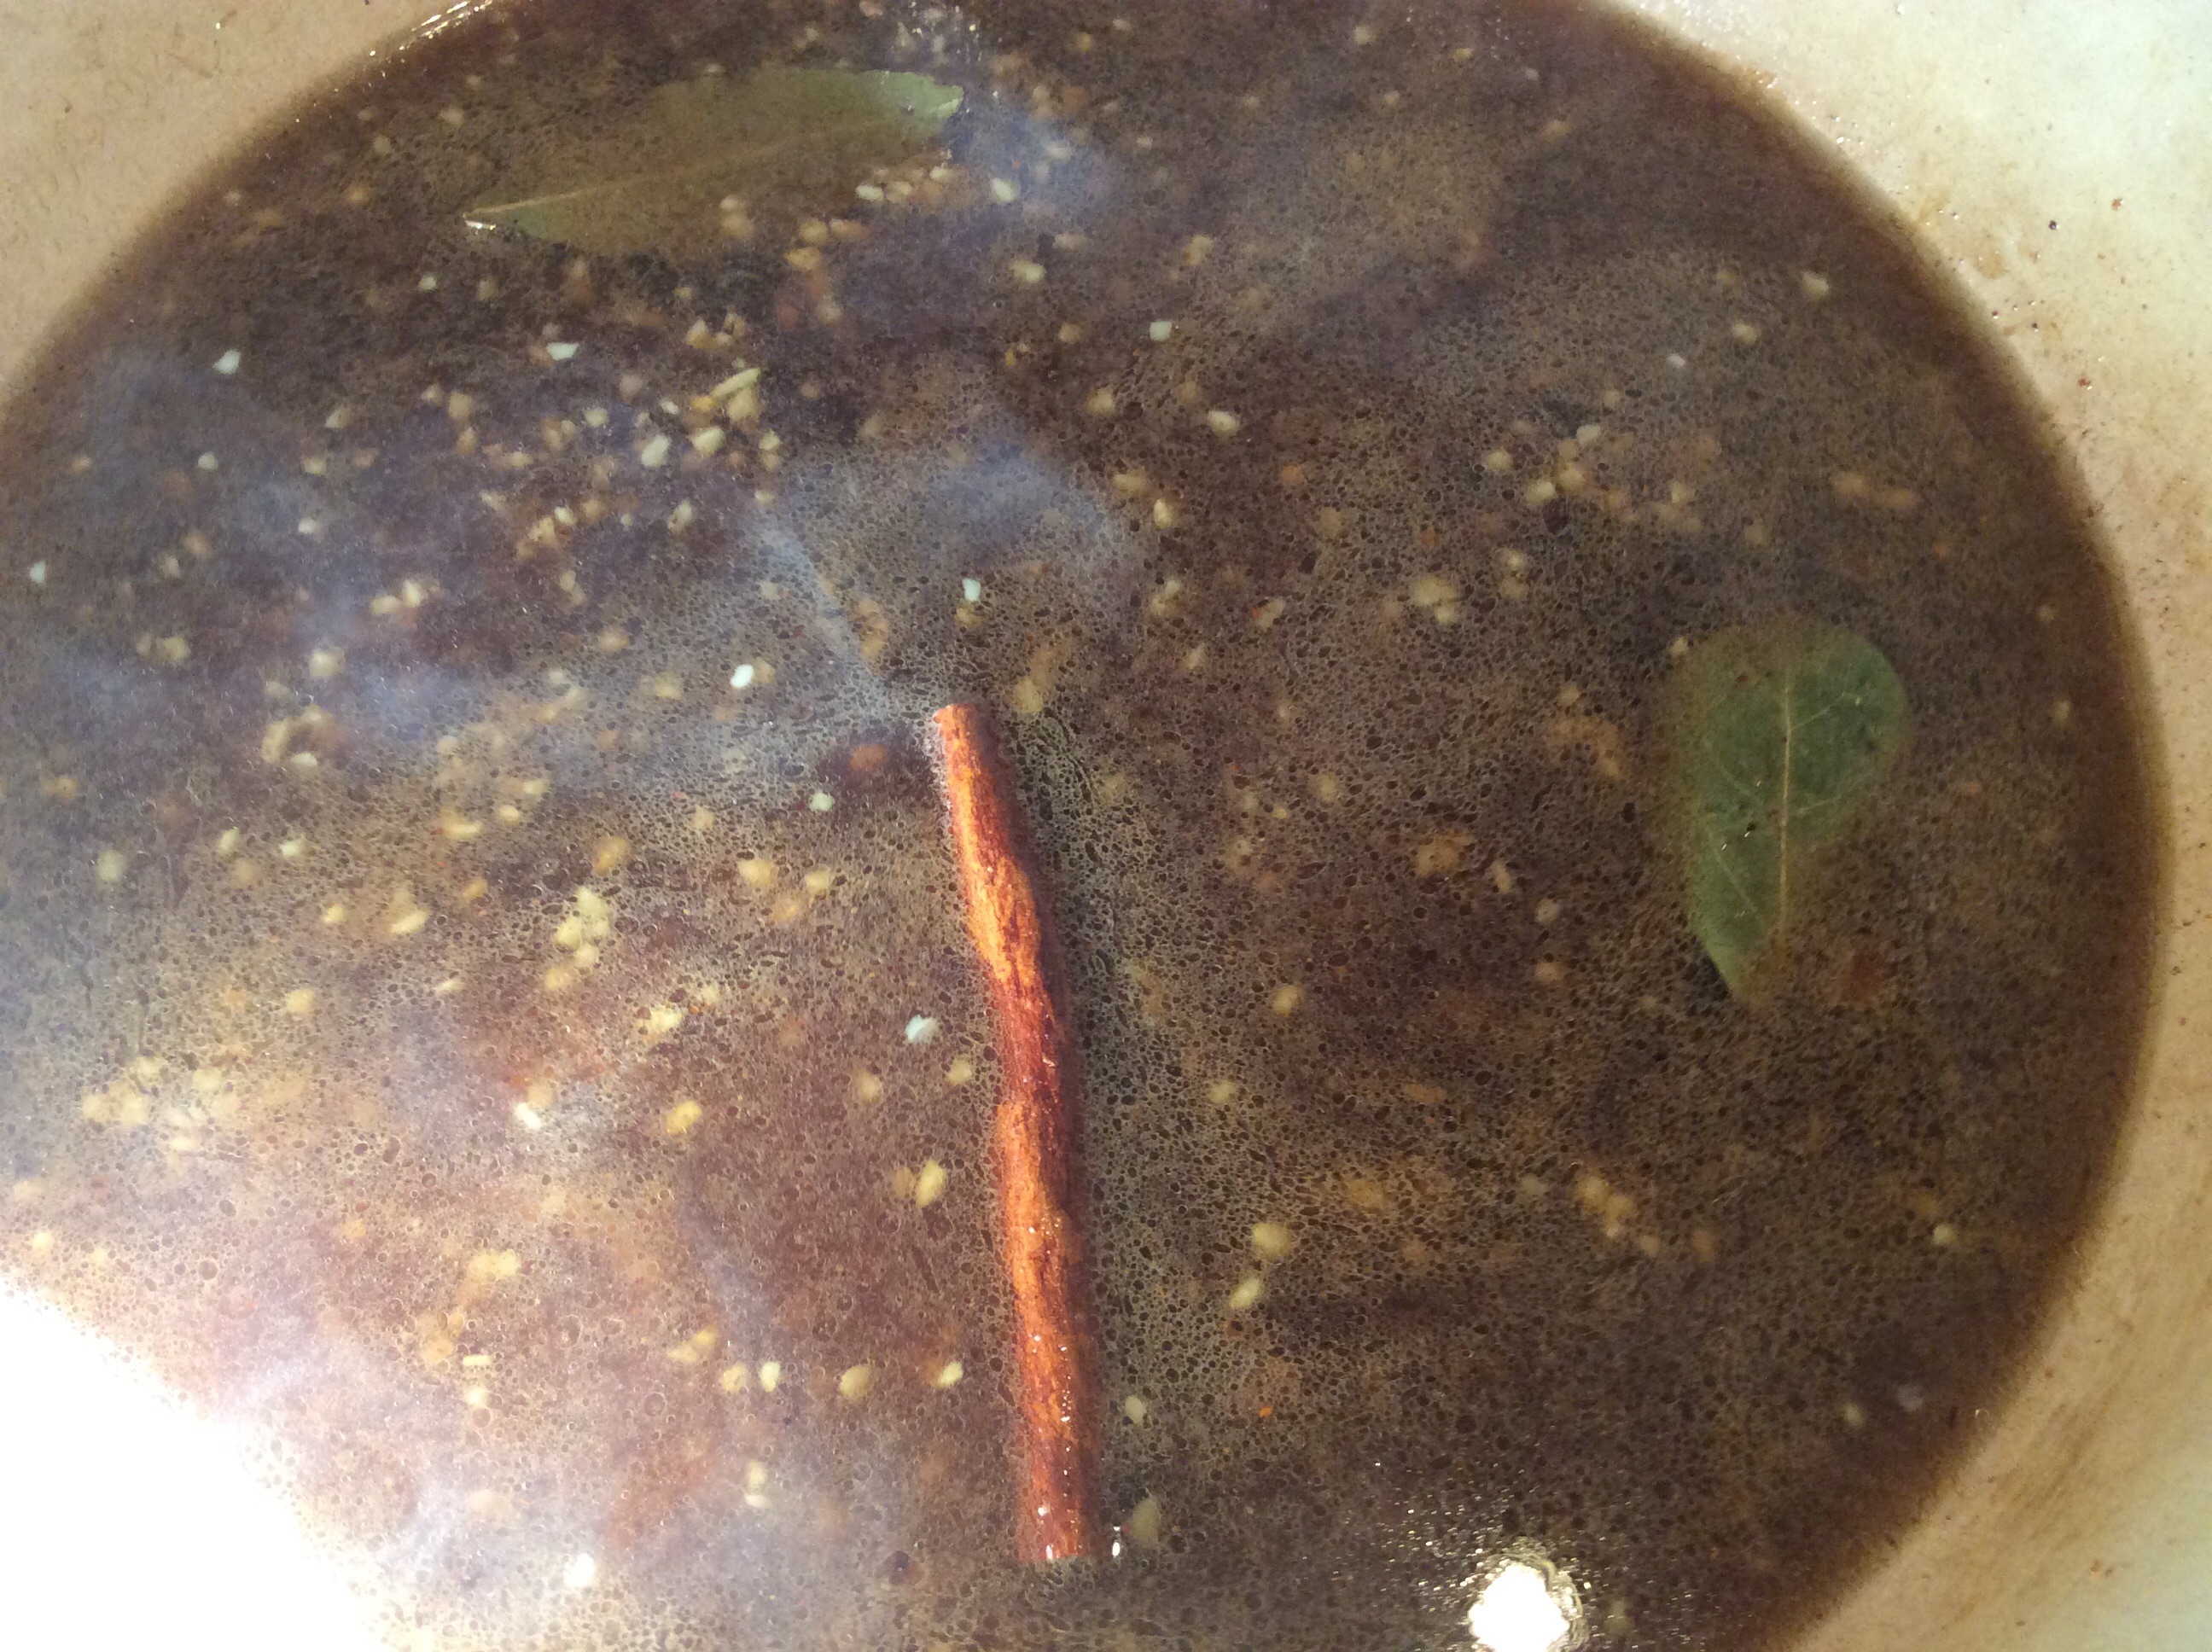
Add 2 cups of water to the pan and scrape the bottom of the pot to release all the brown bits.
Add the cinnamon stick, bay leaves, garlic, both chili powders, and cumin. Mix well.
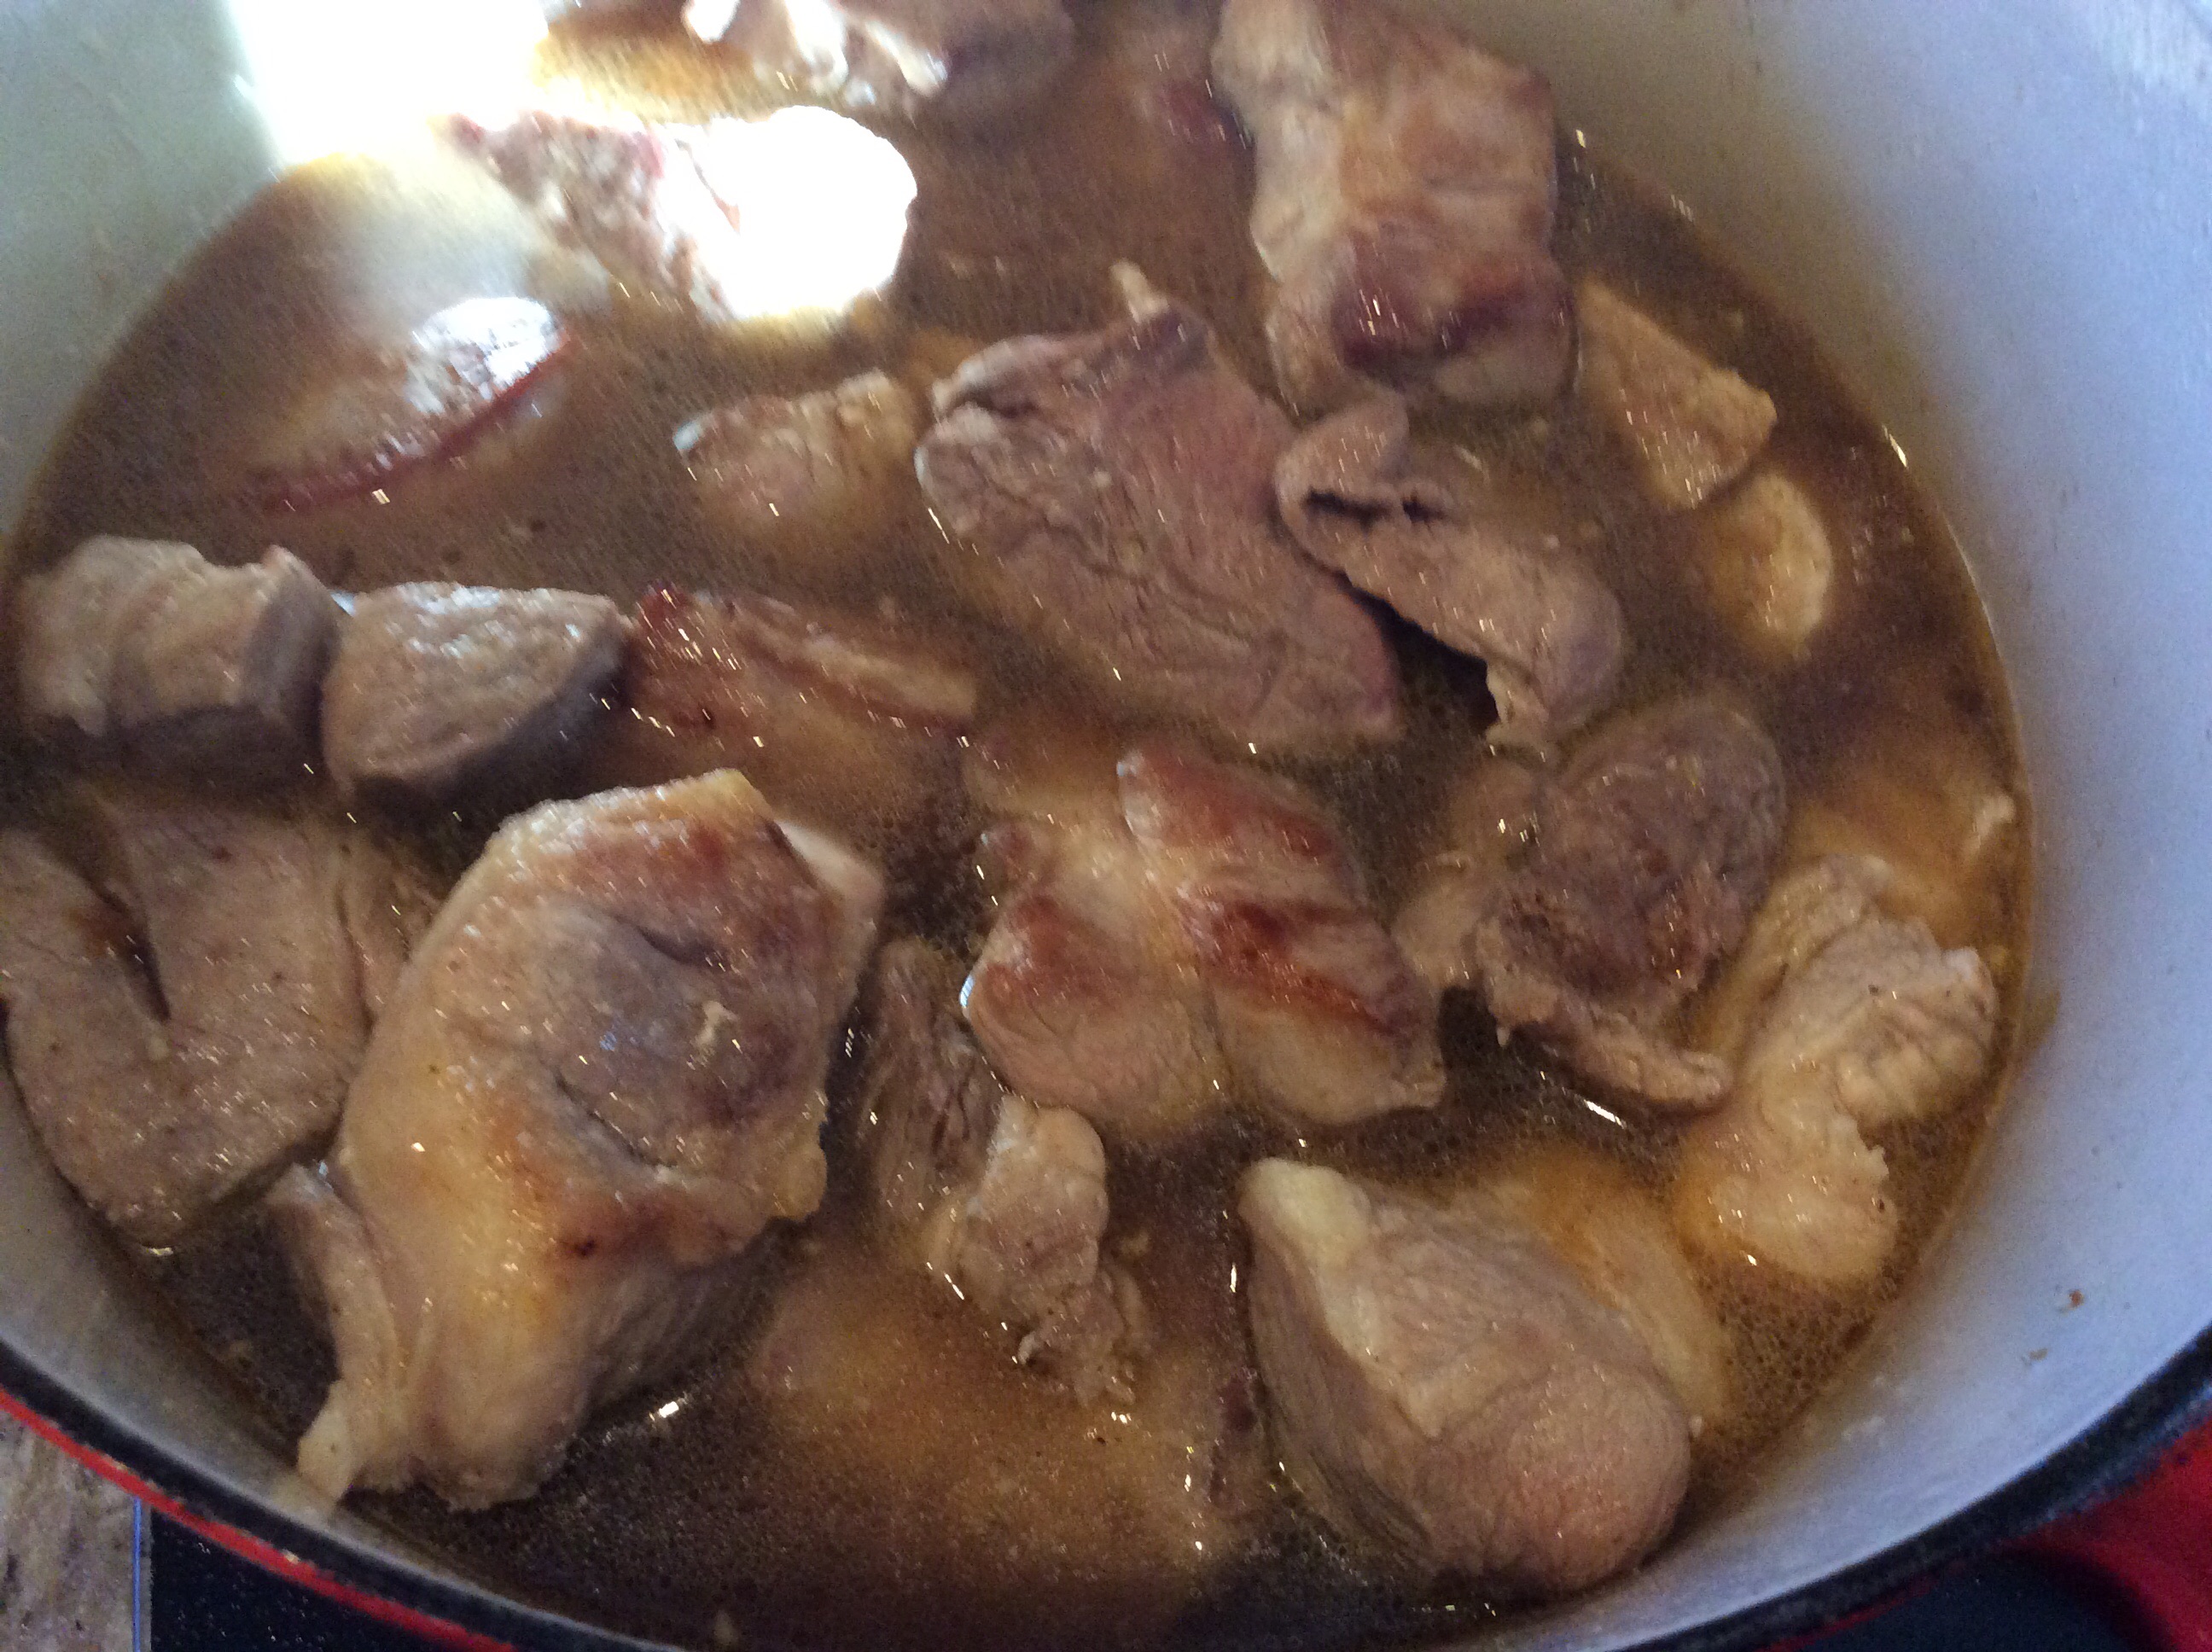
Add the meat back to the pan and stir.
Add in more water until the meat is 2/3 covered.
Braise in the oven, uncovered (I say covered!!!), for 3 1/2 hours, turning the pork a few times during your braising. Much of your liquid will evaporate.
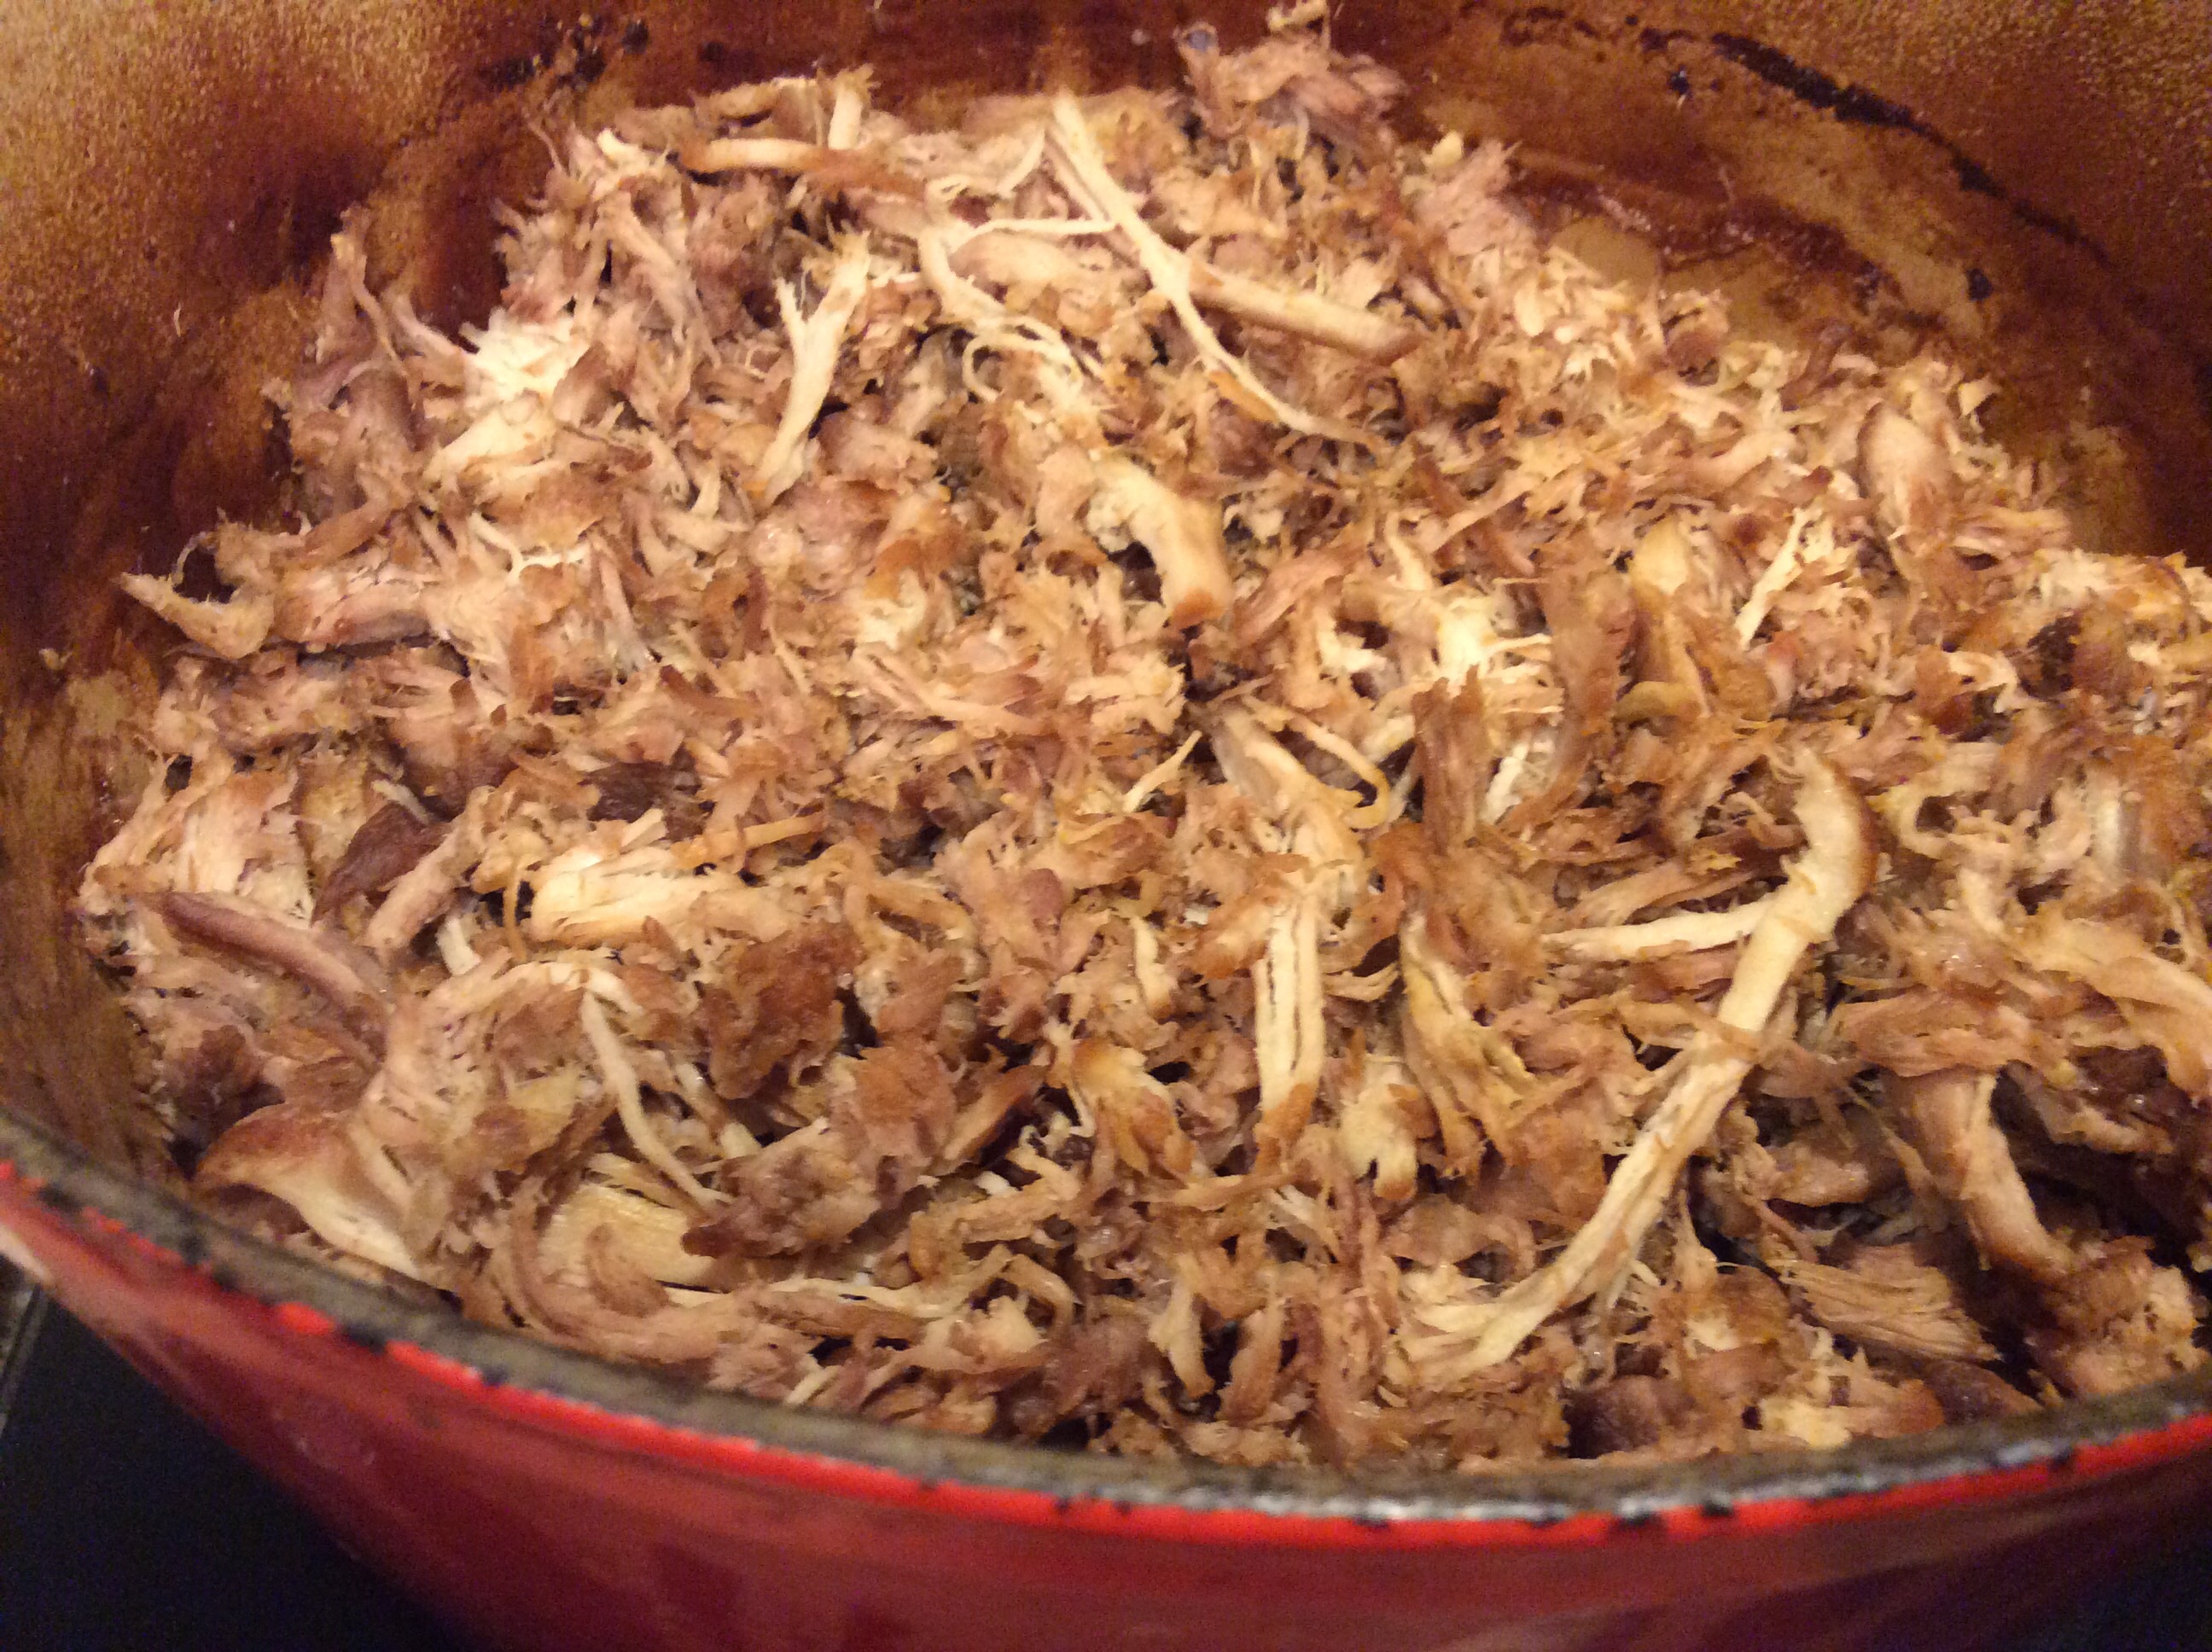
Remove the pot from the oven and transfer the meat to a platter to cool.
Strain the liquid into a bowl and reserve any meaty bits and discard any other solids. The fat will rise to the top when cooled so just skim off as much as possible.
When the meat is cool enough to handle, shred it and put it back into the pot. Add the liquid and stirl well. Cook until much of the liquid has evaporated and the outer edges of the pork becomes caramelized and crispy.
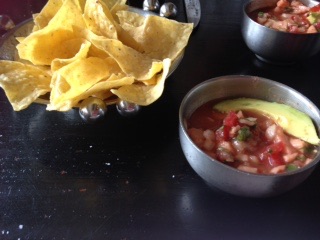
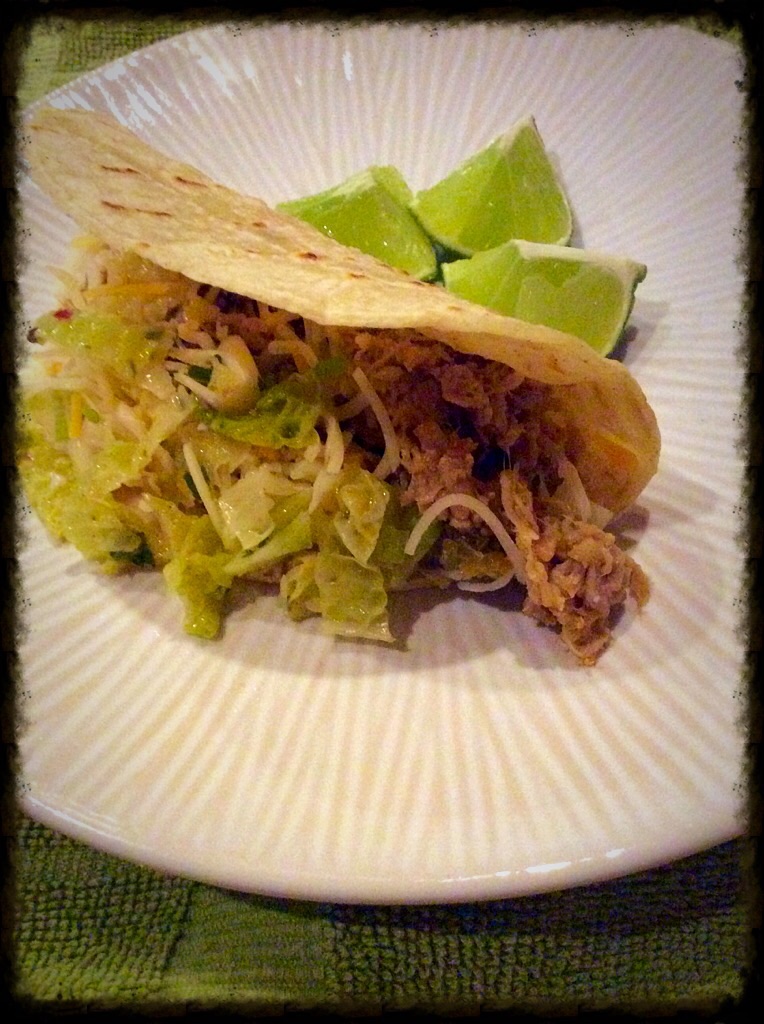
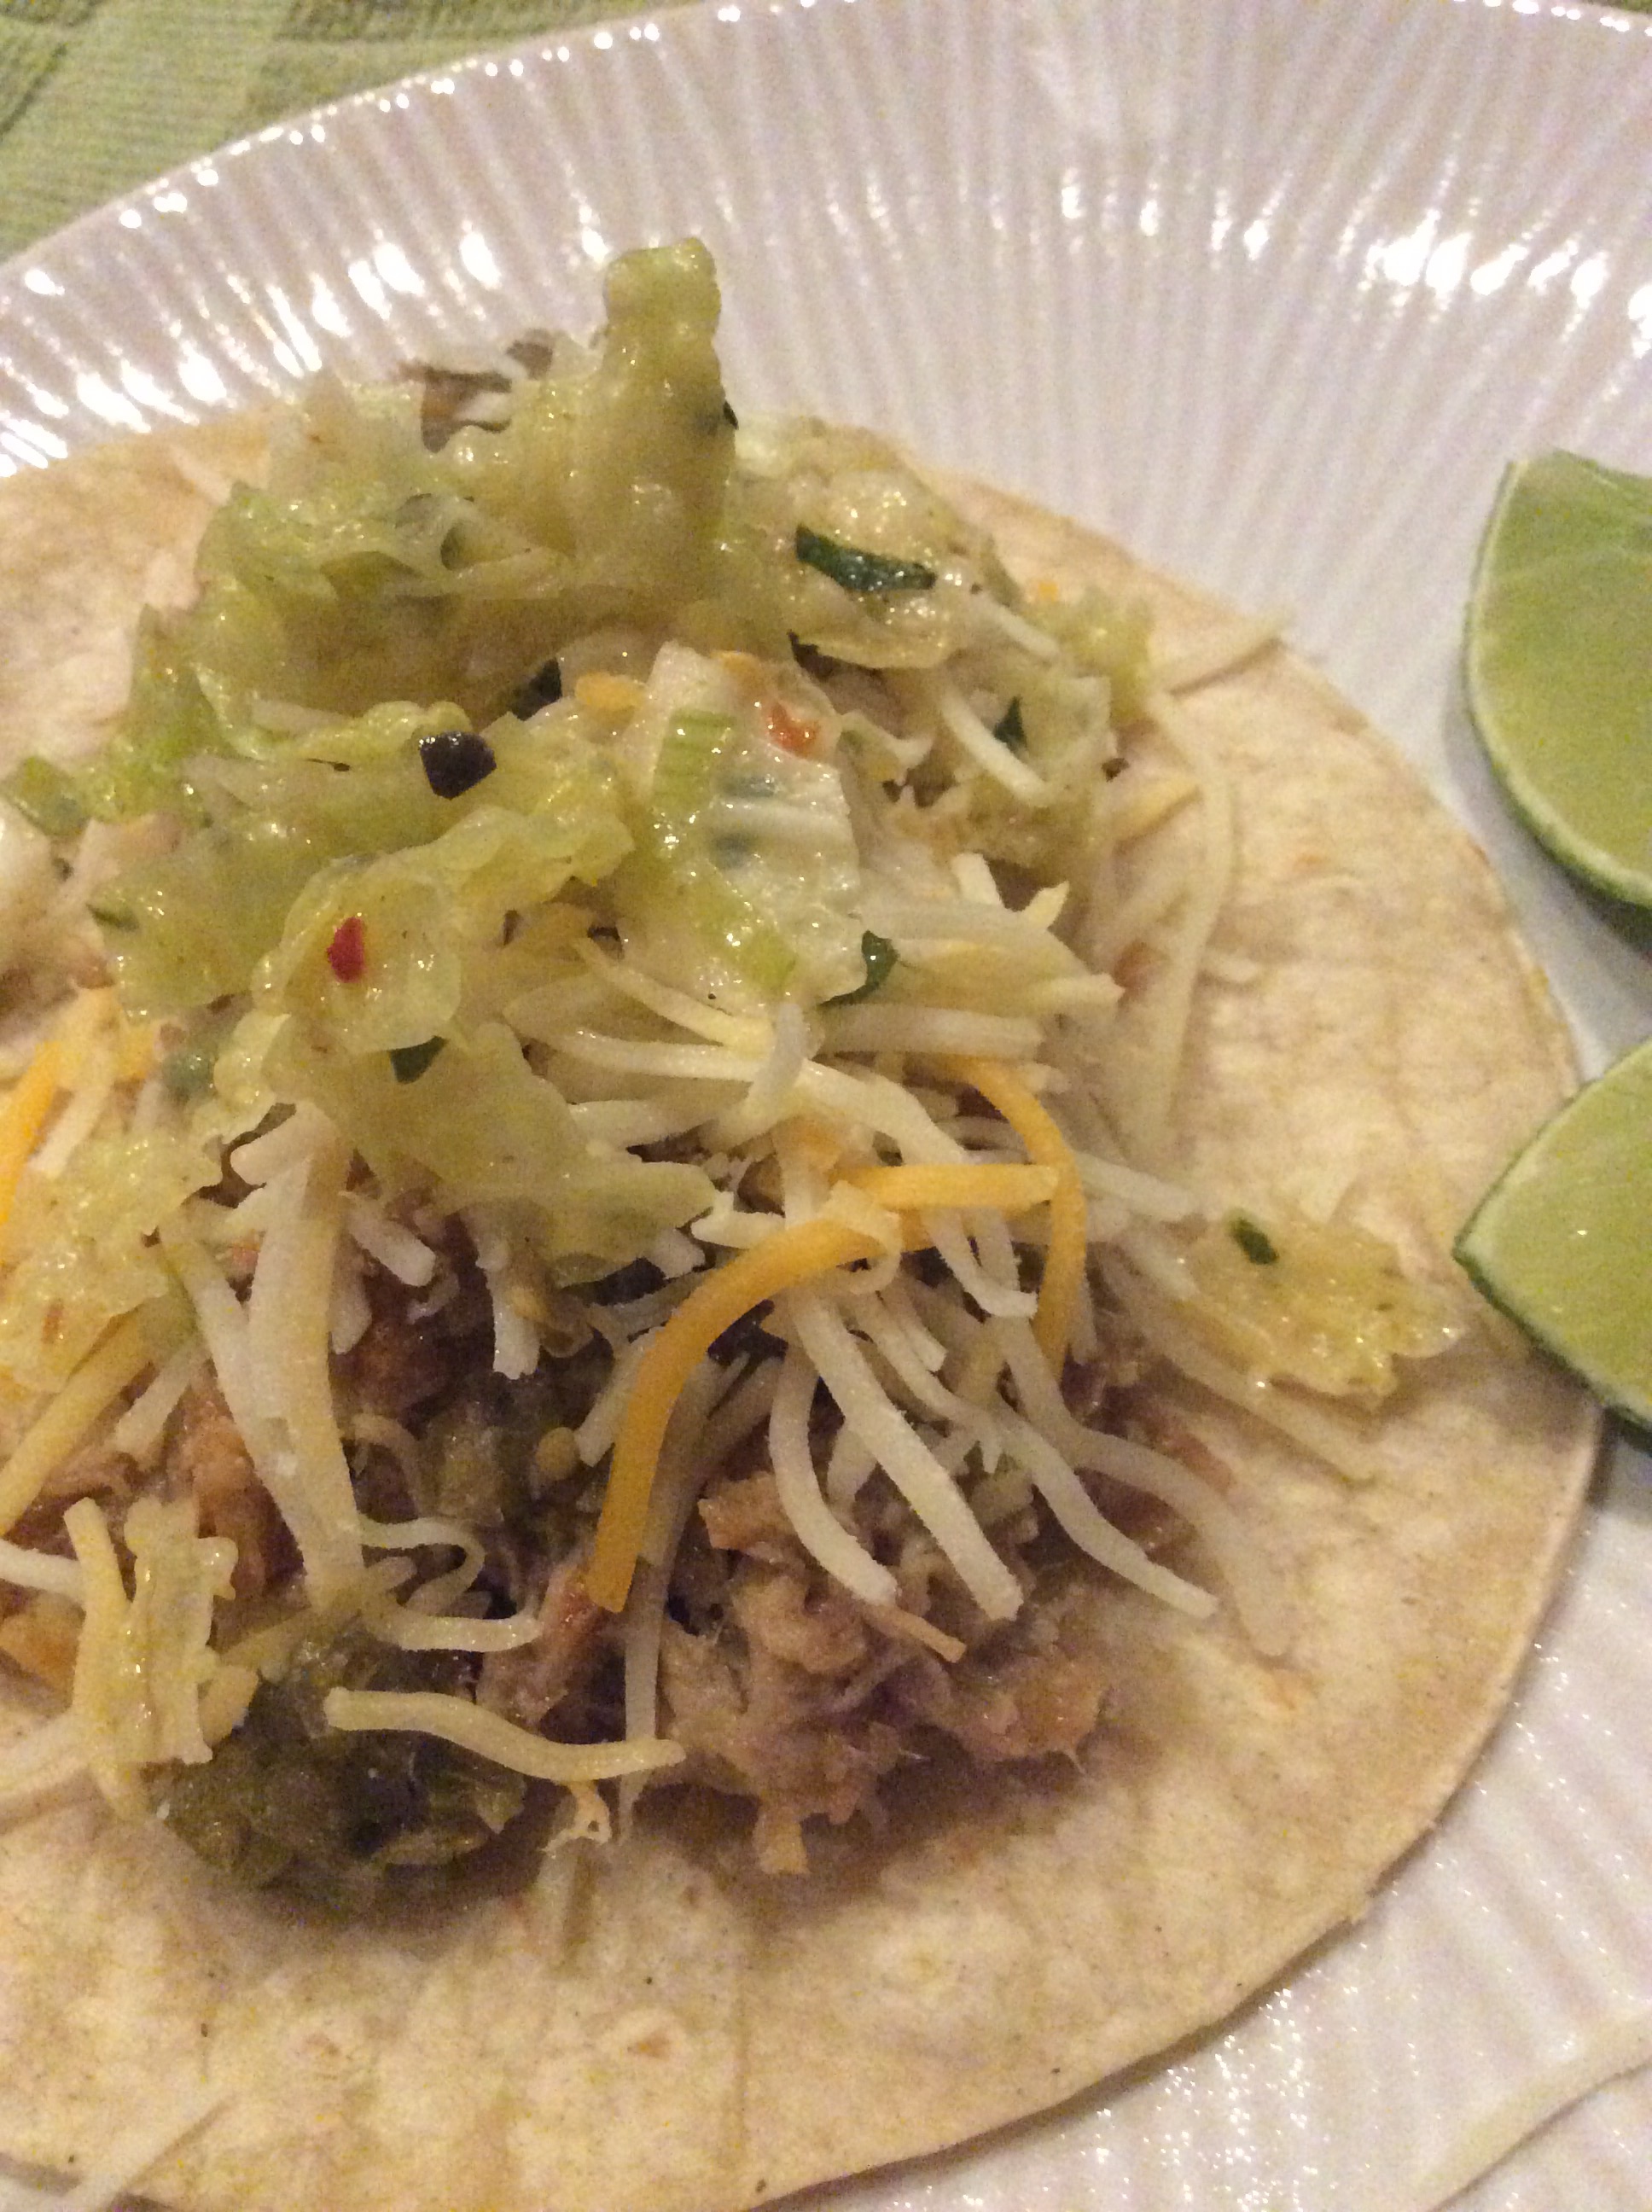
Serve on corn tortillas with your favorite toppings such as tomato or tomatilla salsa, cilantro slaw, onion, guacamole, sour cream, hot sauce, cheese…anything you like!
My pork carnita topped with homemade cilantro slaw,homemade tomatillo sauce, and cheese..Yummy!
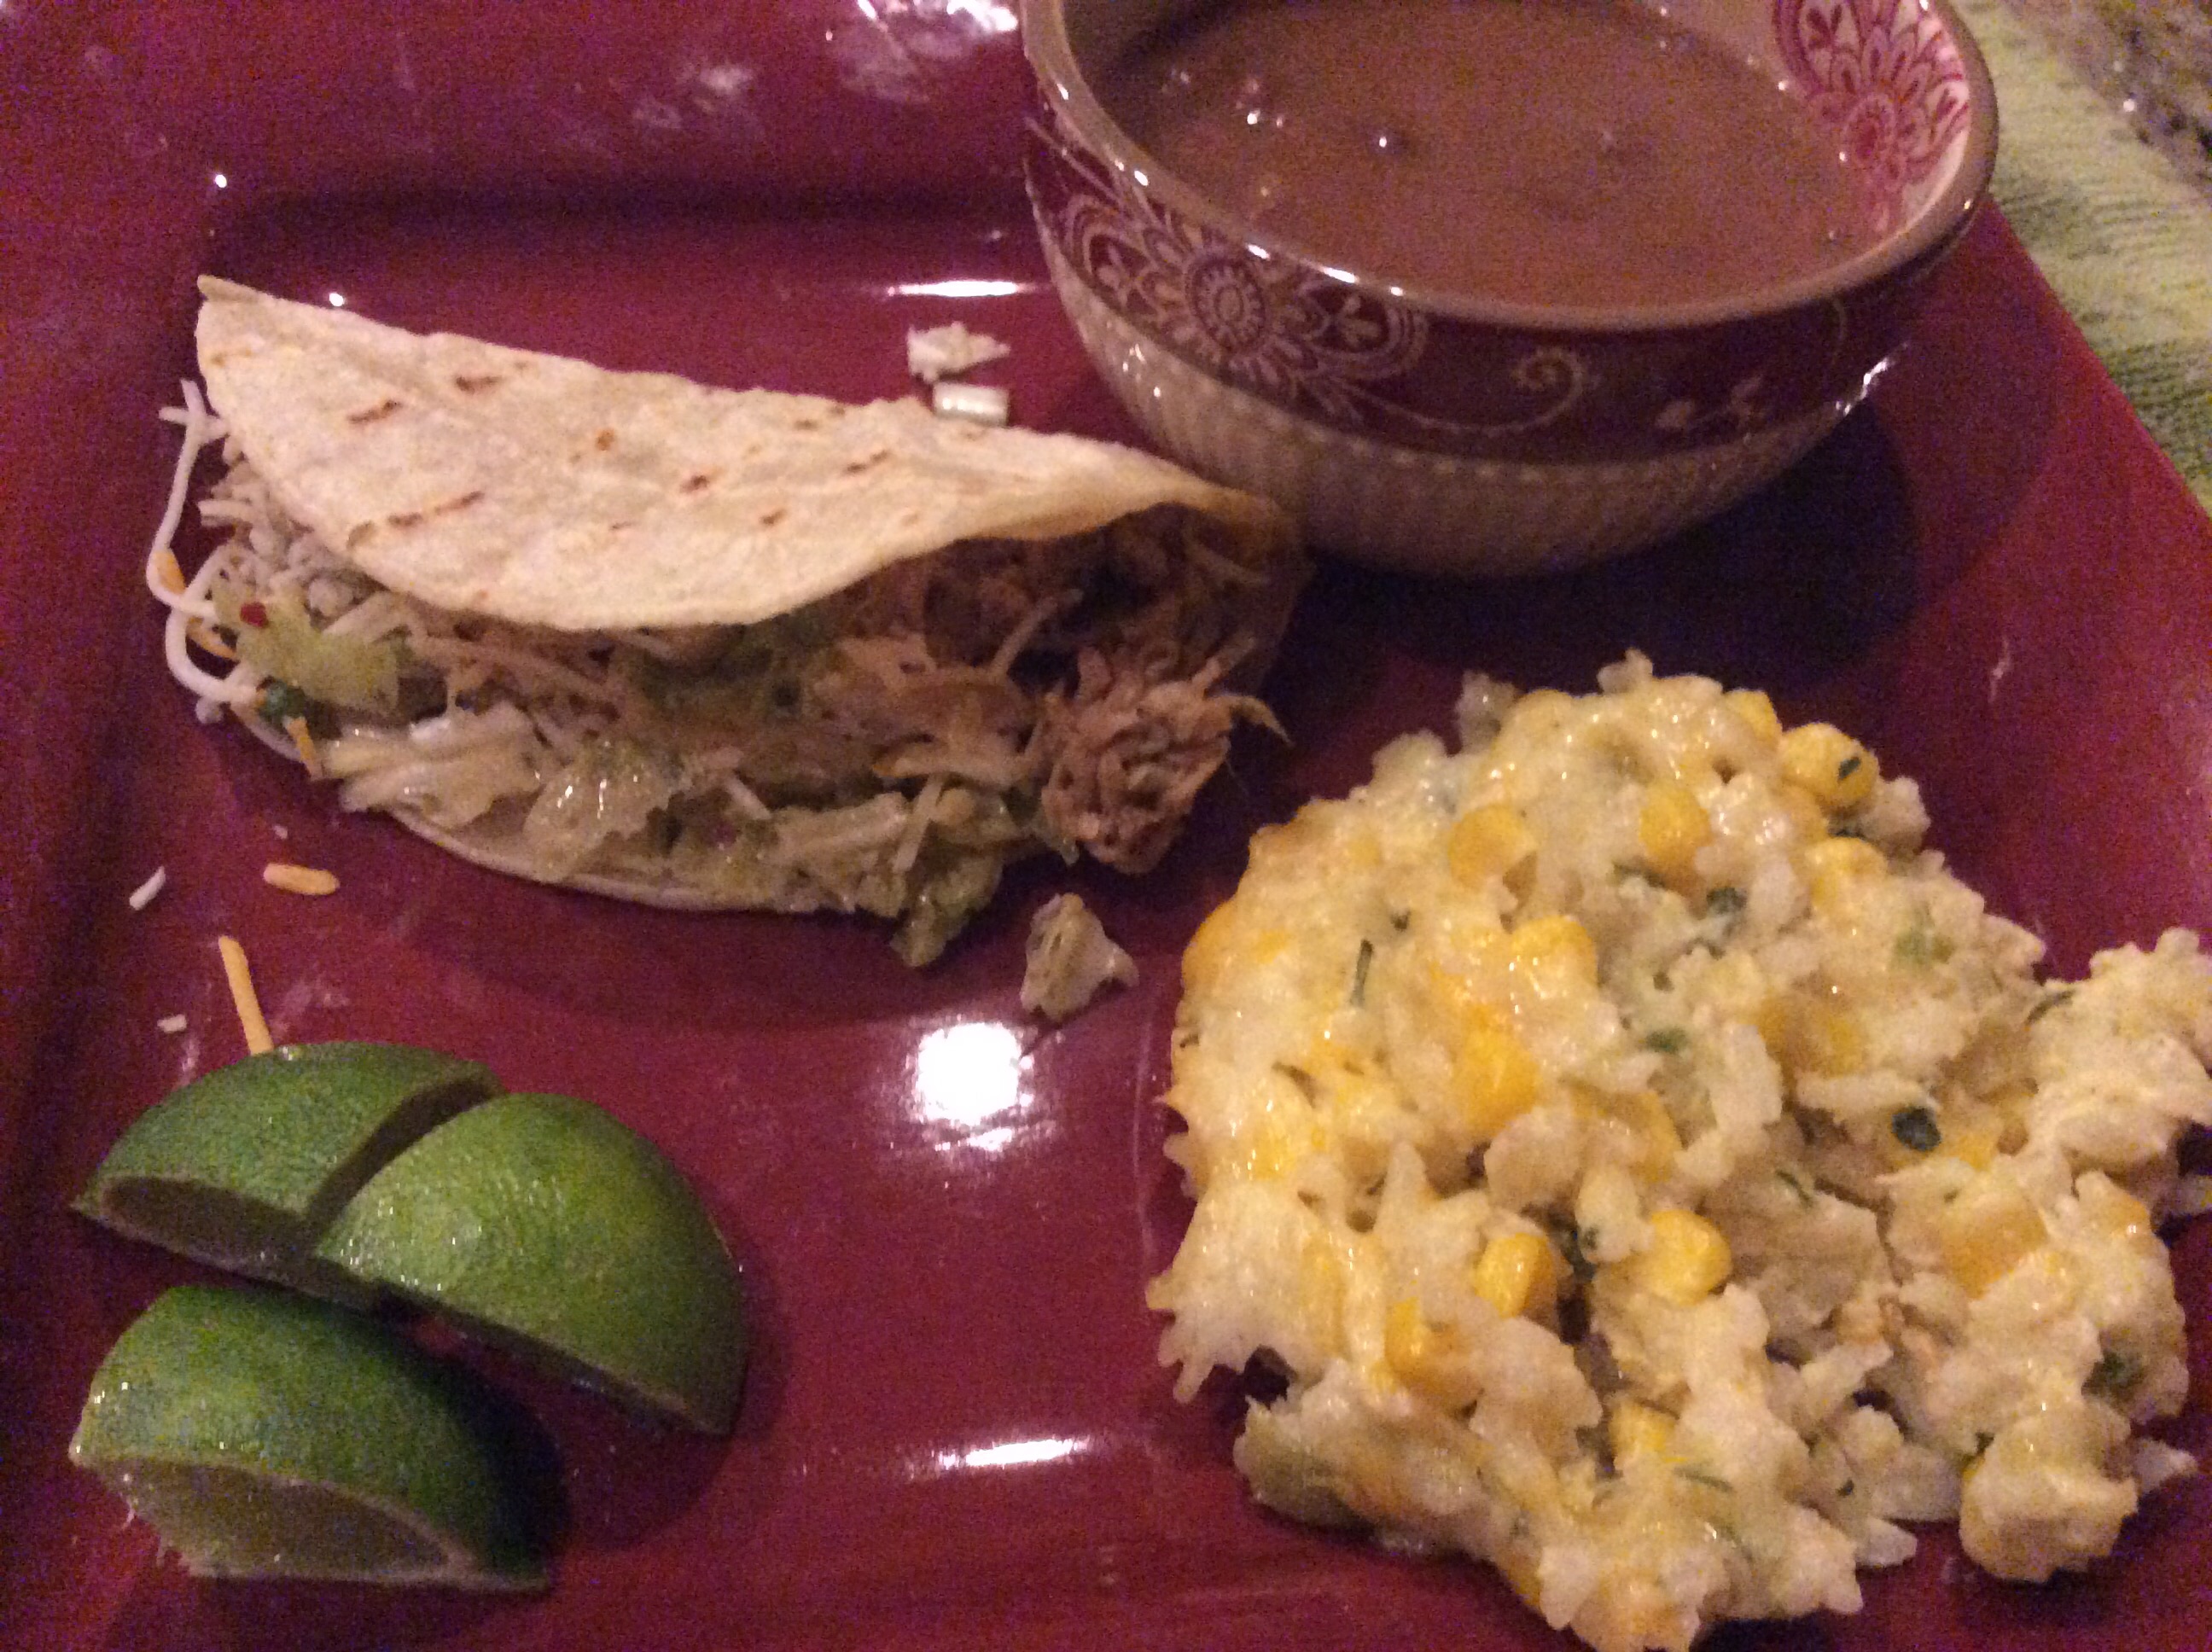
Pork Carnitas served with Mexican Pinto Beans and Sour Cream Rice
Bottom Line: This was delicous and tasted like true authentic Mexican Cuisine…This is a must try in your kitchen. Enjoy your the Super Bowl!
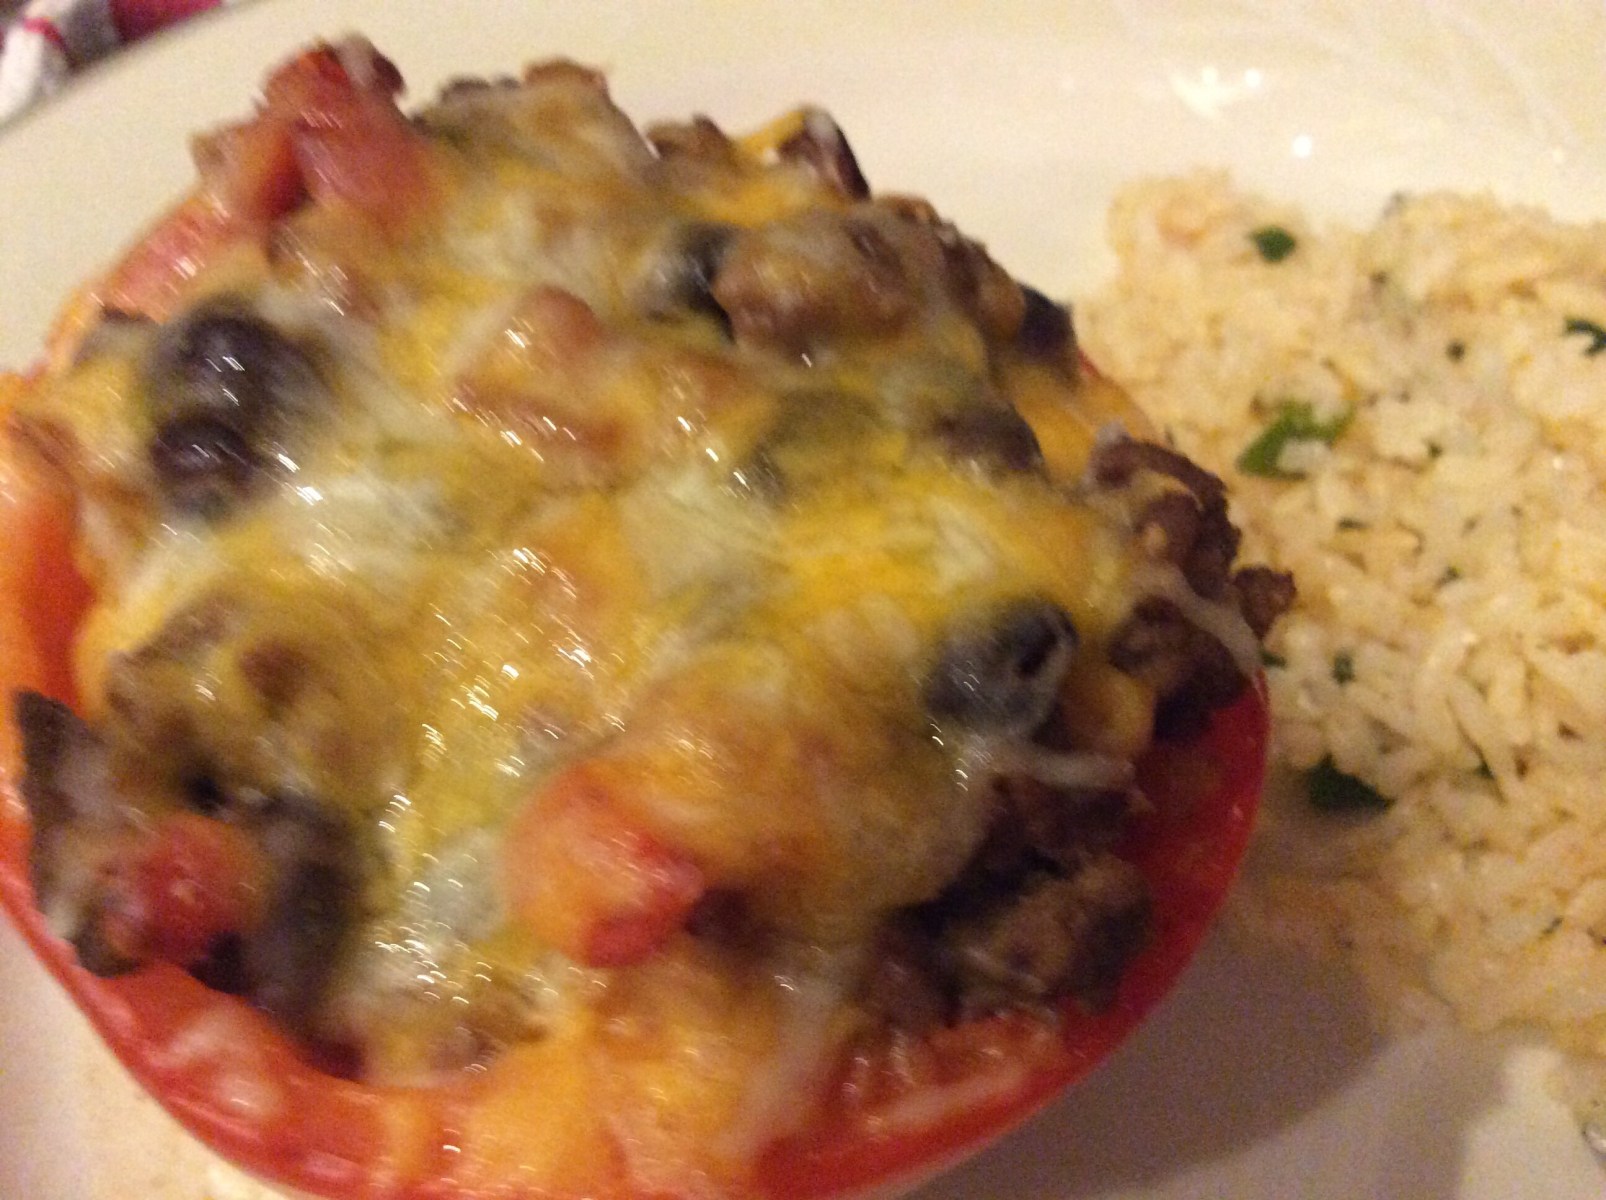
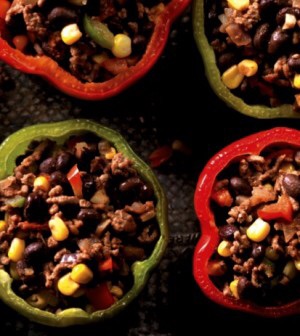
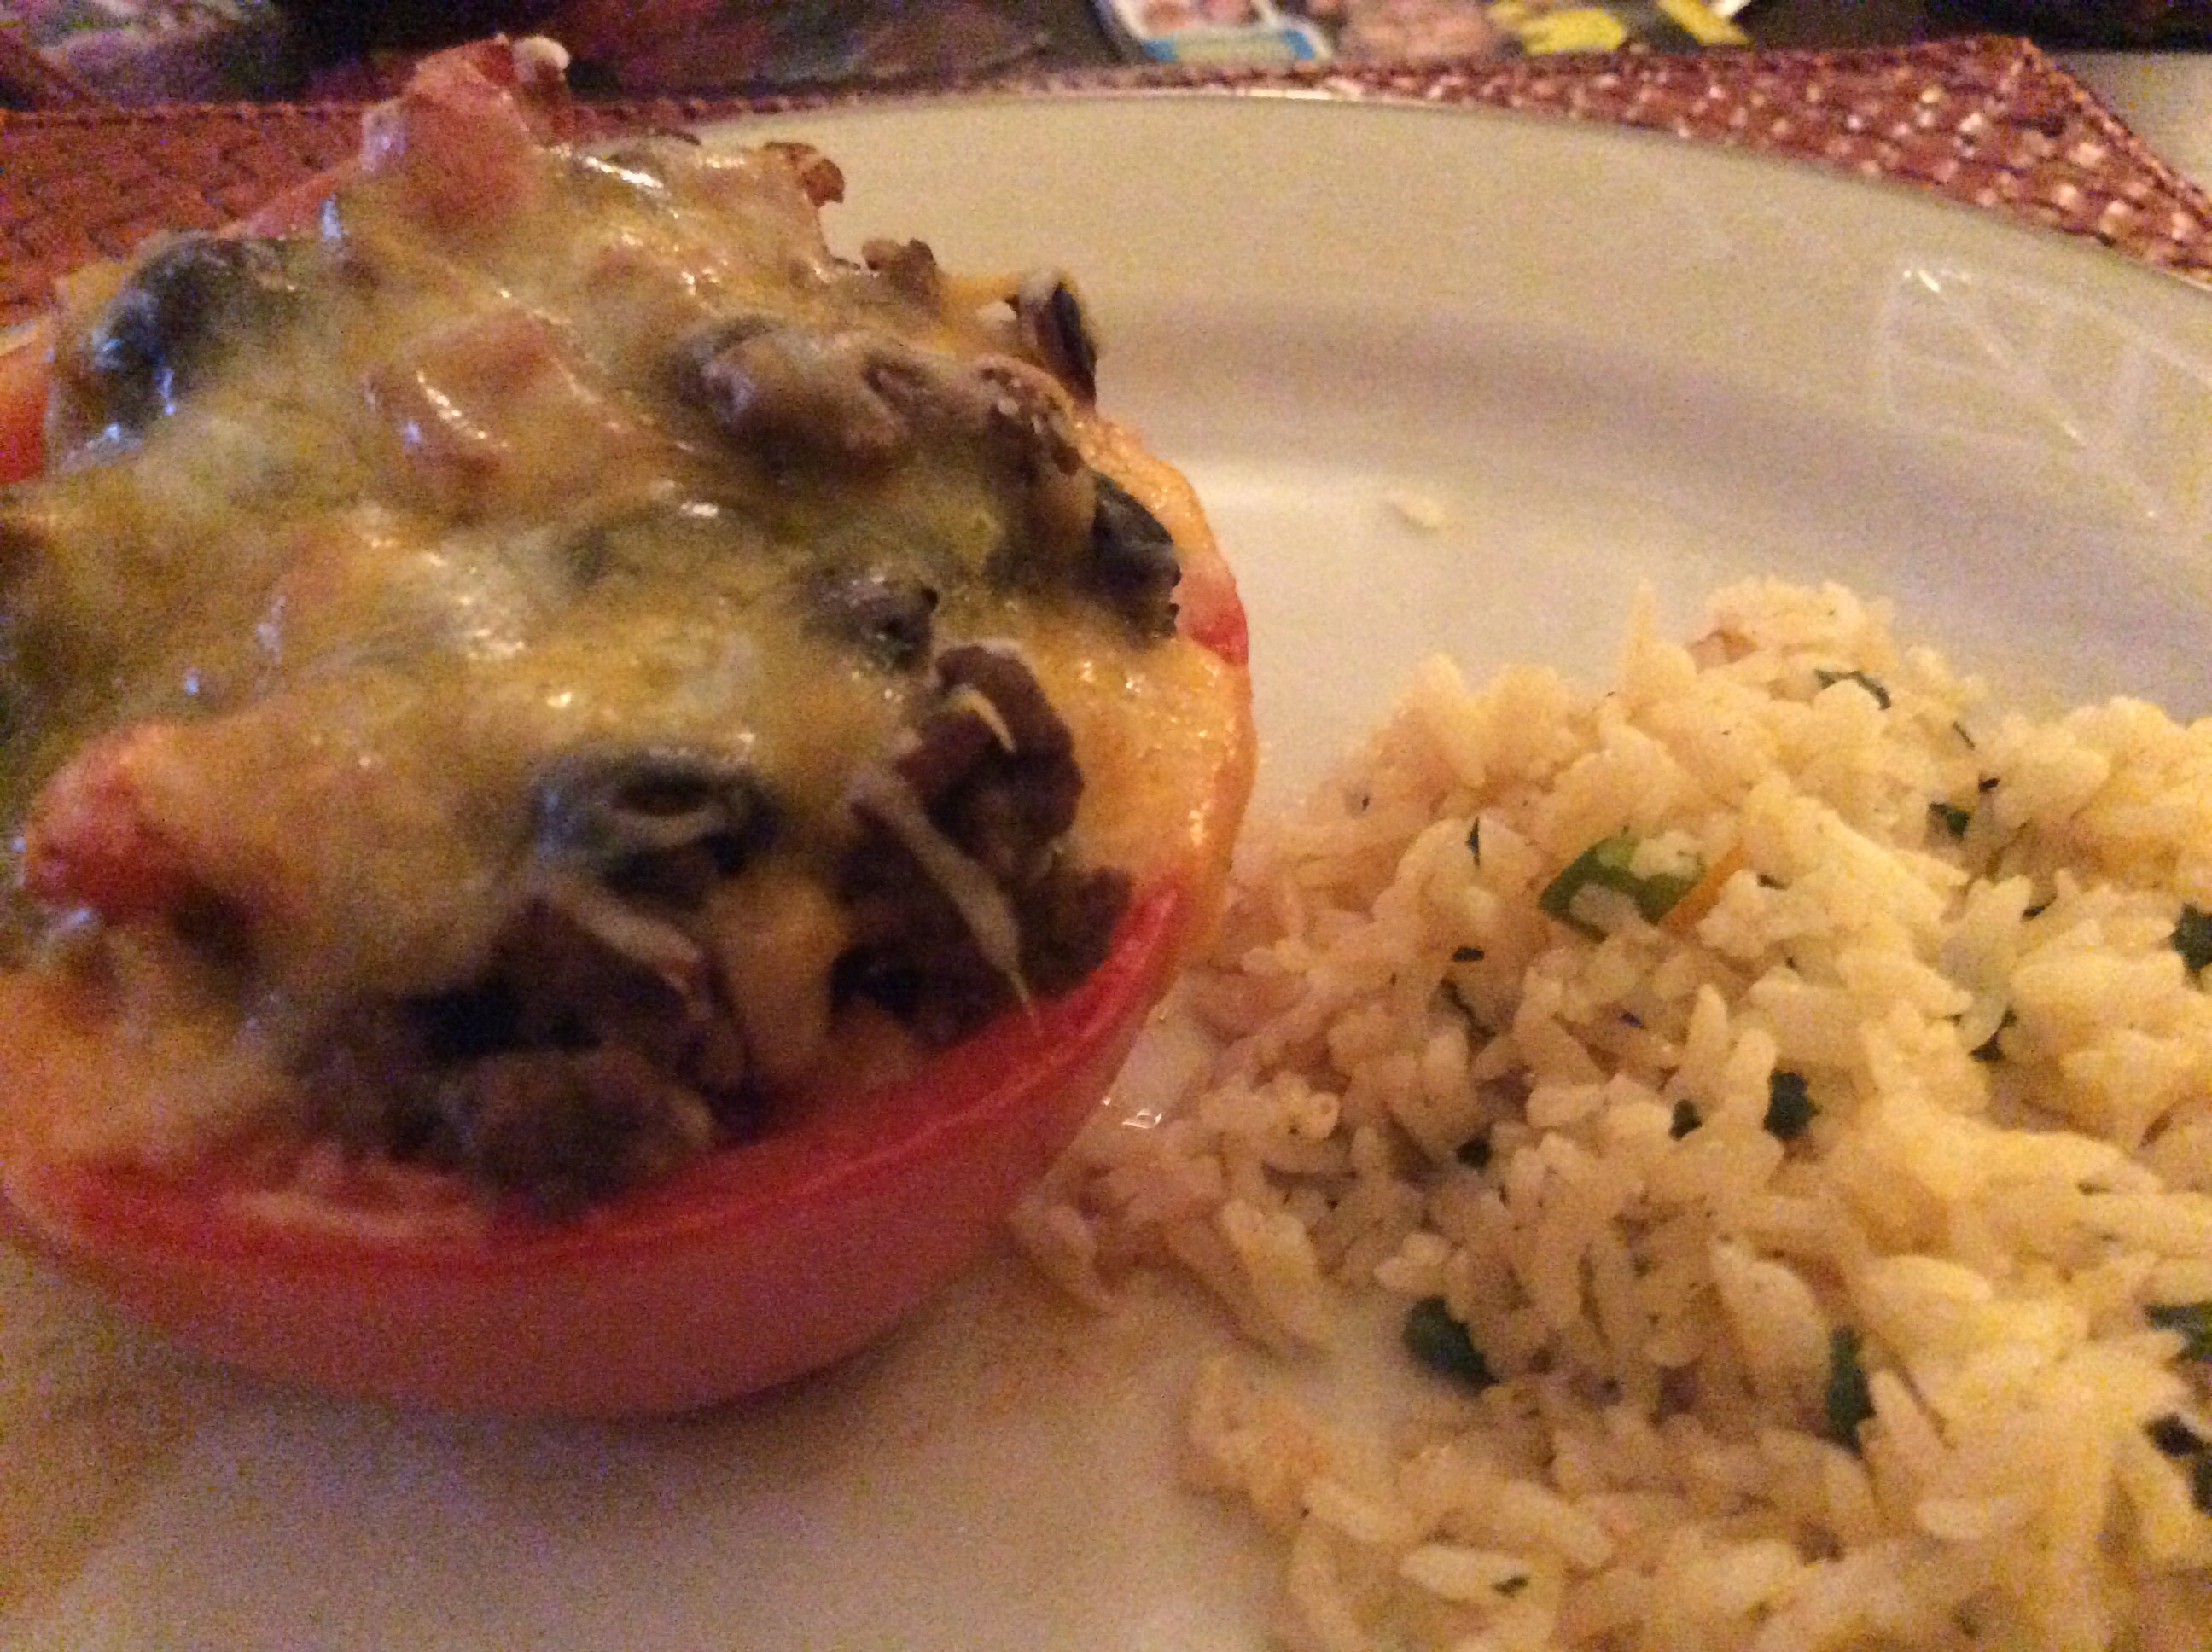
I love Mexican food….the cheesier and spicier the better but usually it also is loaded with tons of calories and lots of fat. Being that the New Year brings all kinds of new resolutions (sometimes the same ones every year…ha, ha), like eating better and doing more exercise, I thought I would make my first blog of 2015 about a healthier version of an old favorite….Mexican Stuffed Bell Peppers!
This recipe comes from Clean Eating Magazine and has everything you are looking for in a healthy Mexican dish. It is heavy on the fiber, light on the fat, and is still packed with savory beans and meat. My only addition was to add a little hot sauce (you know I love that spicy kick) and I added a little shredded low-fat cheese on the top because it’s just not Mexican without a little cheese!
Clean Eating Magazine’s Mexican Stuffed Bell Peppers
Ingredients:
4 large red and/or green bell peppers
1 1/2 tsp safflower or olive oil, divided
8 oz extra-lean ground beef
1 cup finely chopped red onion
1/2 tsp ground cumin
1/2 tsp ground coriander
1/2 tsp sea salt
1/4 tsp chipotle chile powder
3 cloves garlic, minced
1 15-oz BPA-free can unsalted black or pinto beans, drained and rinsed
1 cup fresh or frozen corn kernels, thawed
2 tbsp unsalted tomato paste
2 tsp hot sauce (or more if you like it!), optional
2 tsp fresh lime juice
1/4 cup Shredded Reduced Fat Mexican Cheese(I used Sargento’s), optional
Chopped fresh cilantro leaves for garnish, optional
Directions:
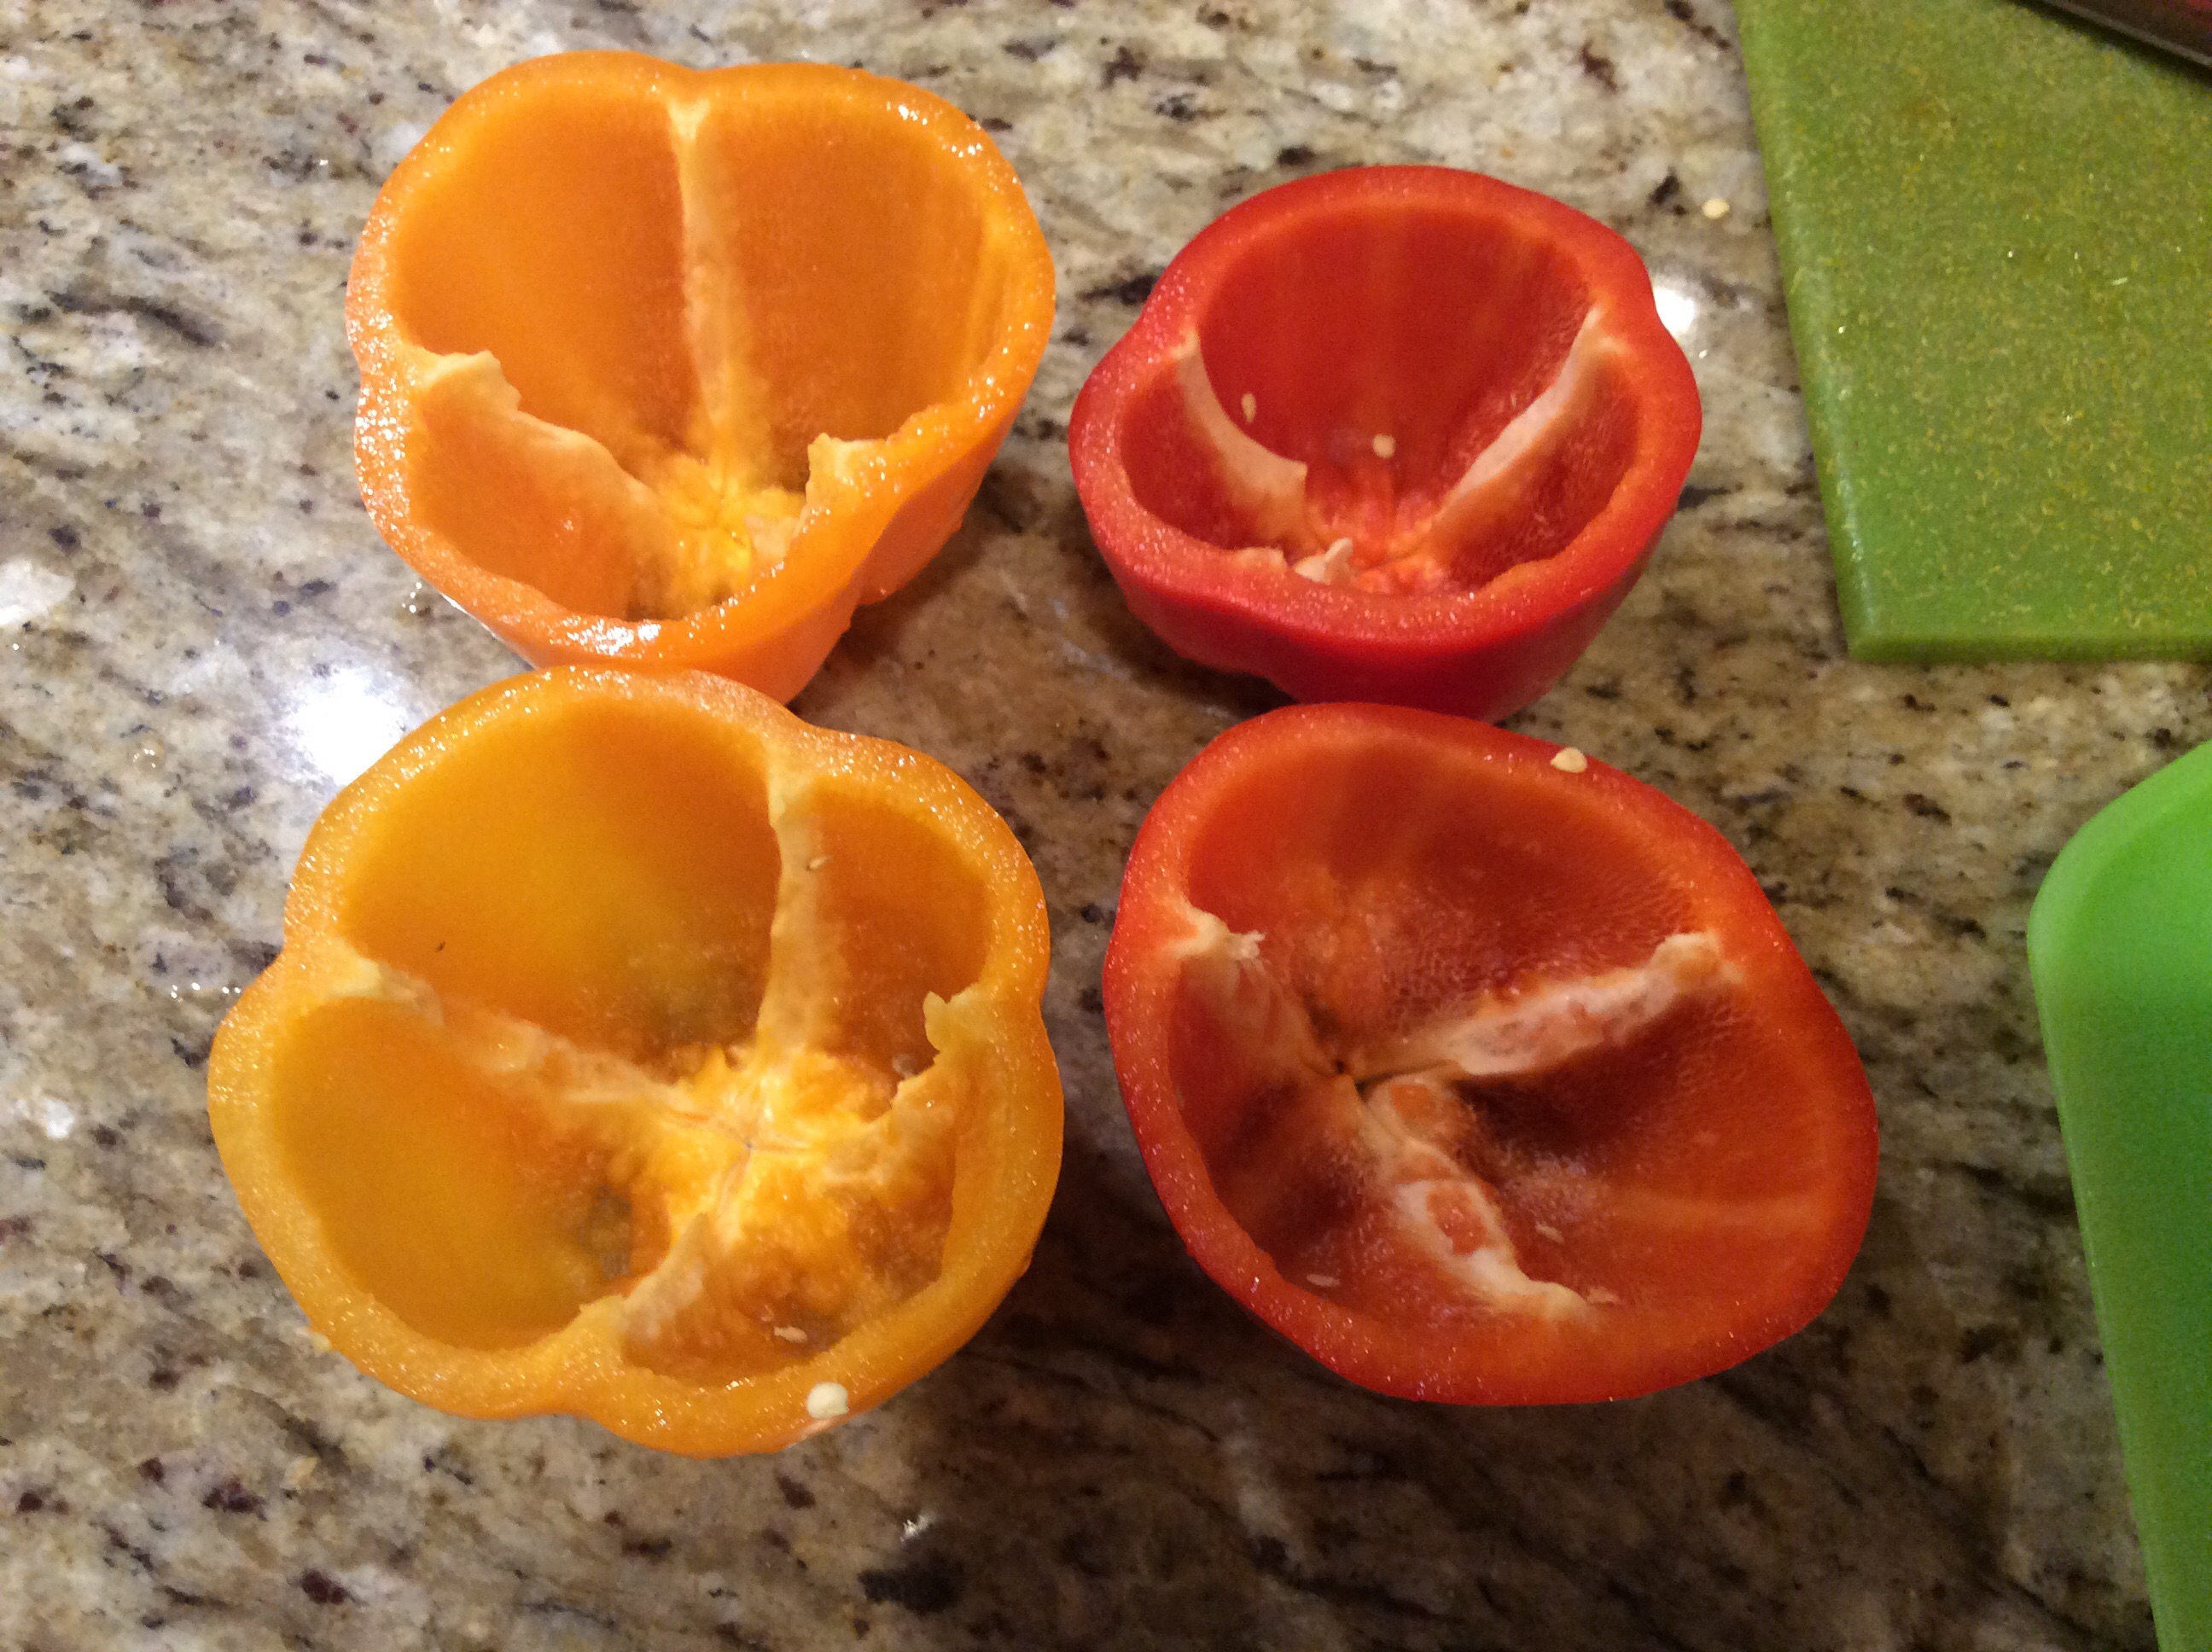
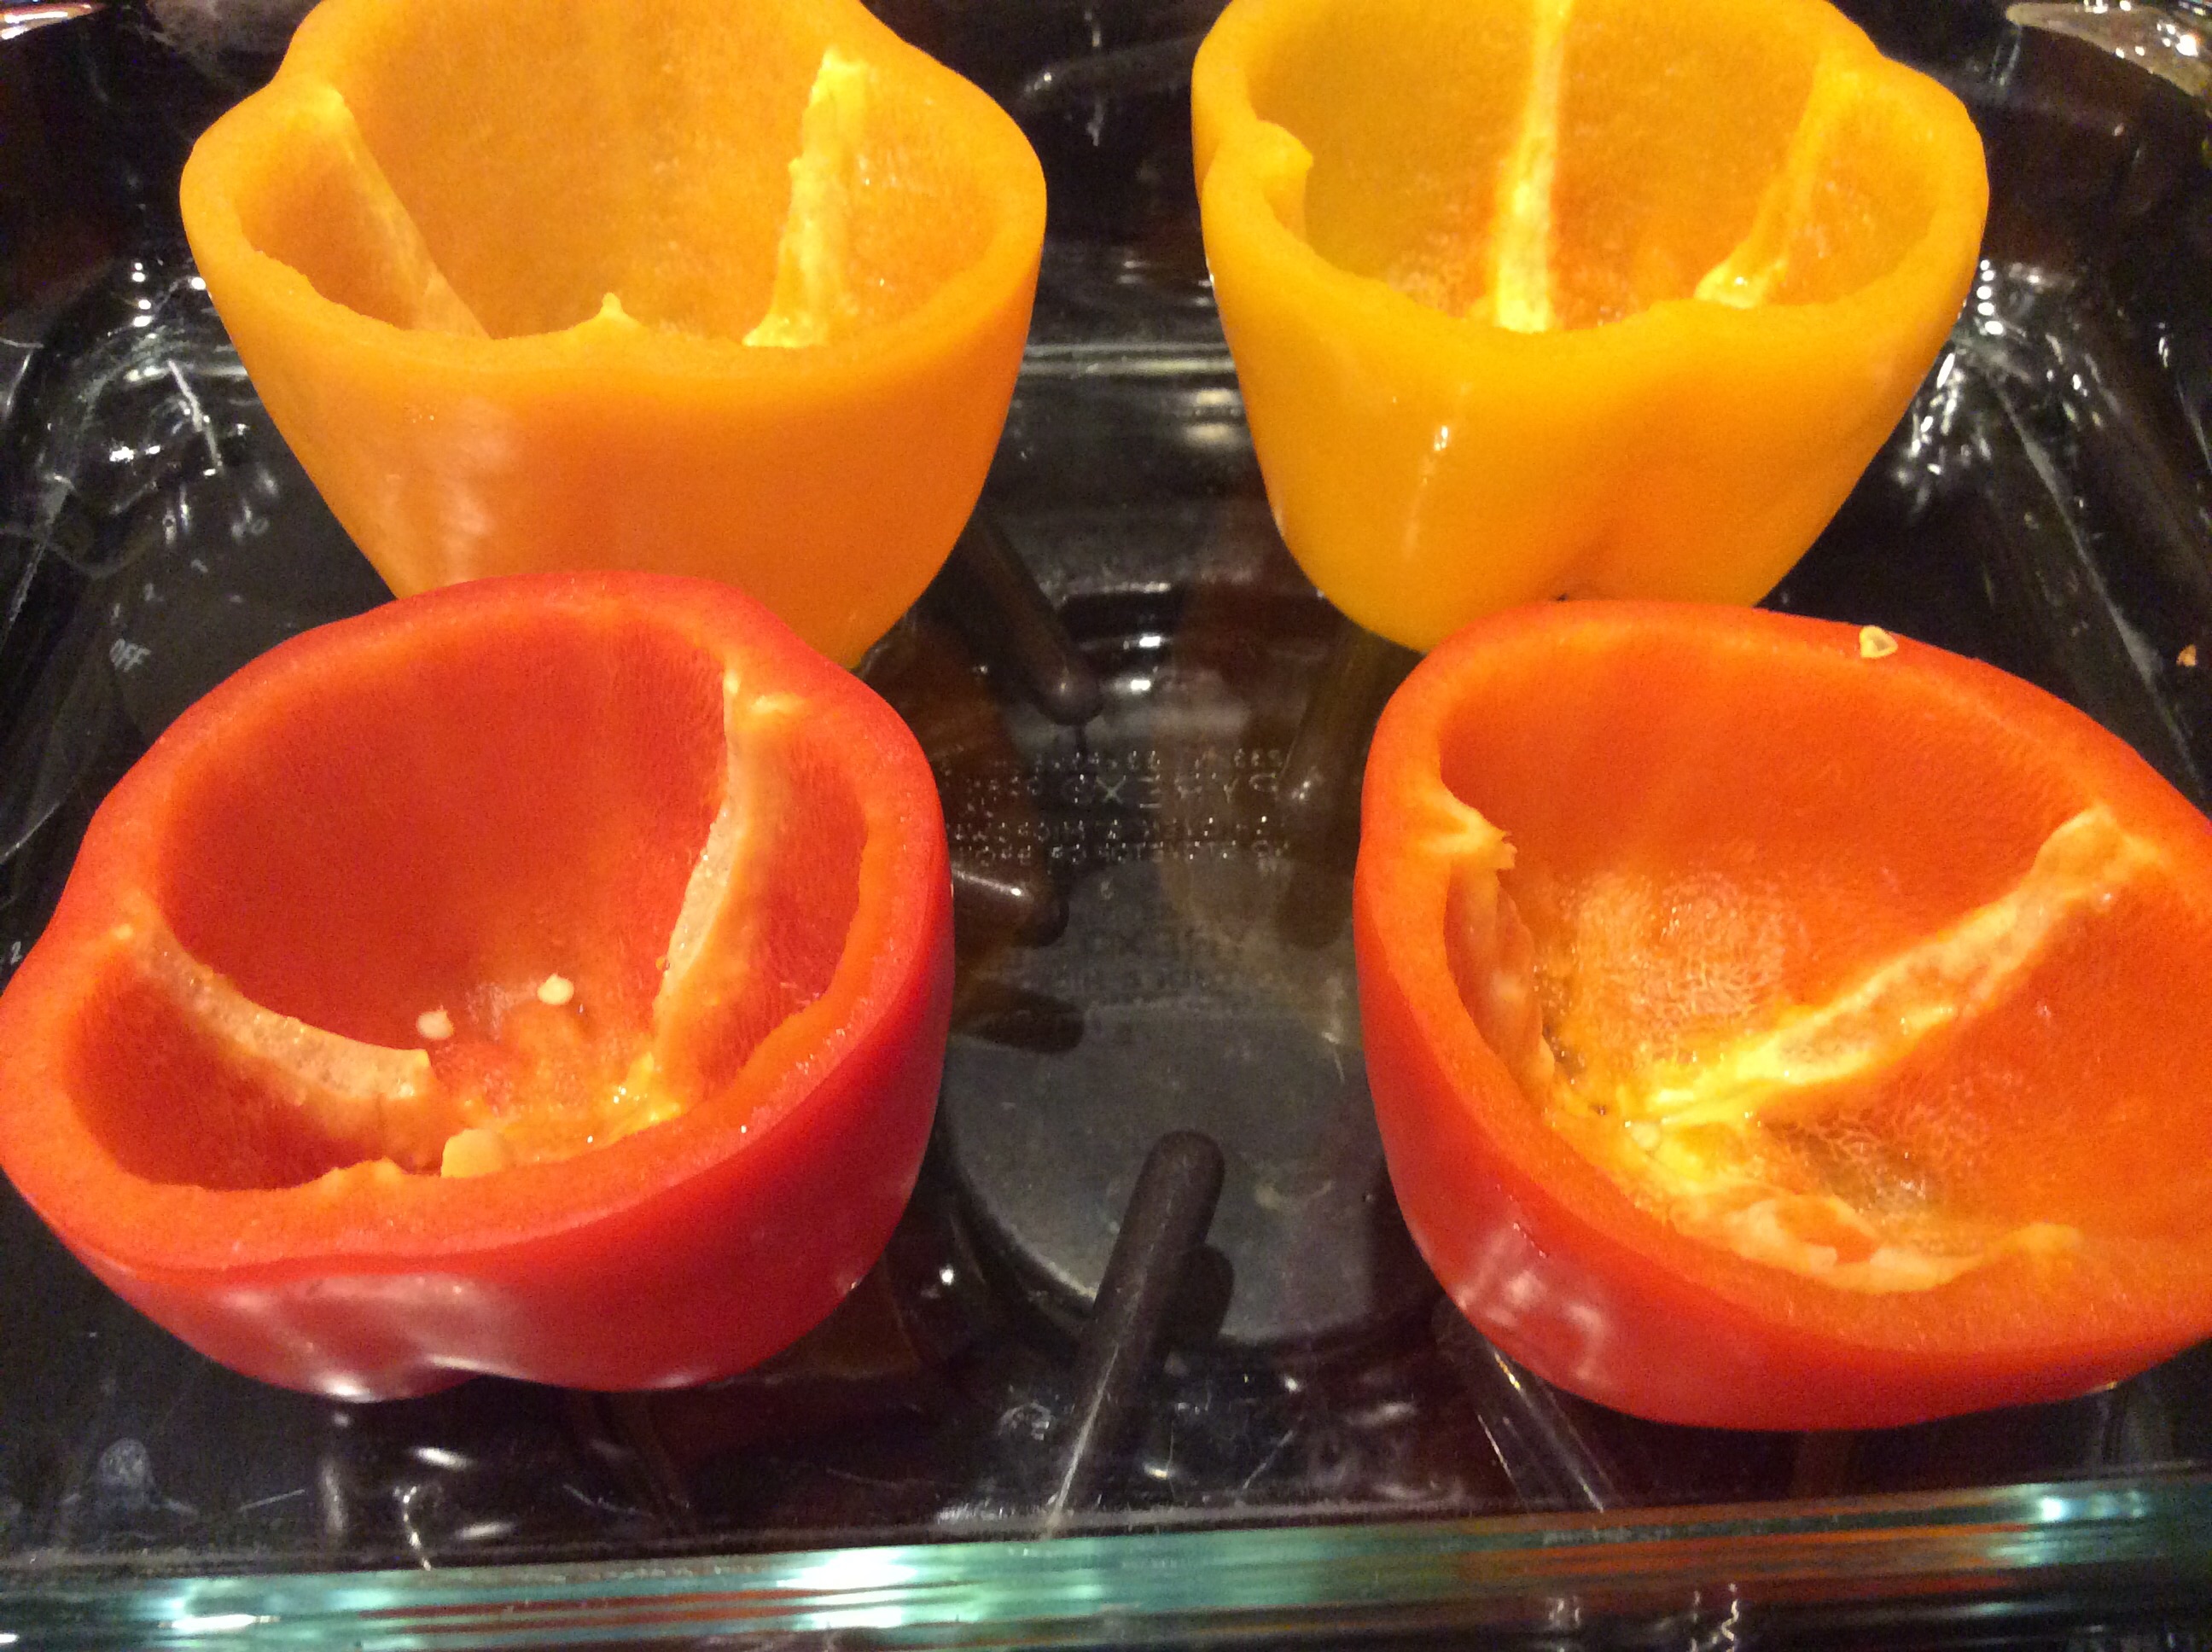
Preheat oven to 400˚F. With a paring knife, carefully trim bottoms of peppers so they stand upright; do not cut through flesh. Slice off tops and remove and discard stems; finely chop tops and set aside. Carefully insert a paring knife into cavities of peppers and trim away seeds and membranes from insides.
Peppers are prepped for steaming
Chop up the tops so you use all the pepper and don’t waste abit
Wrap each pepper in foil and arrange upright in an 8-inch square baking dish. Bake until slightly softened, about 20 minutes. Remove from foil and set aside until cooled slightly. Reduce oven heat to 350˚F.
Peppers have been steamed in the foil and are ready to stuff
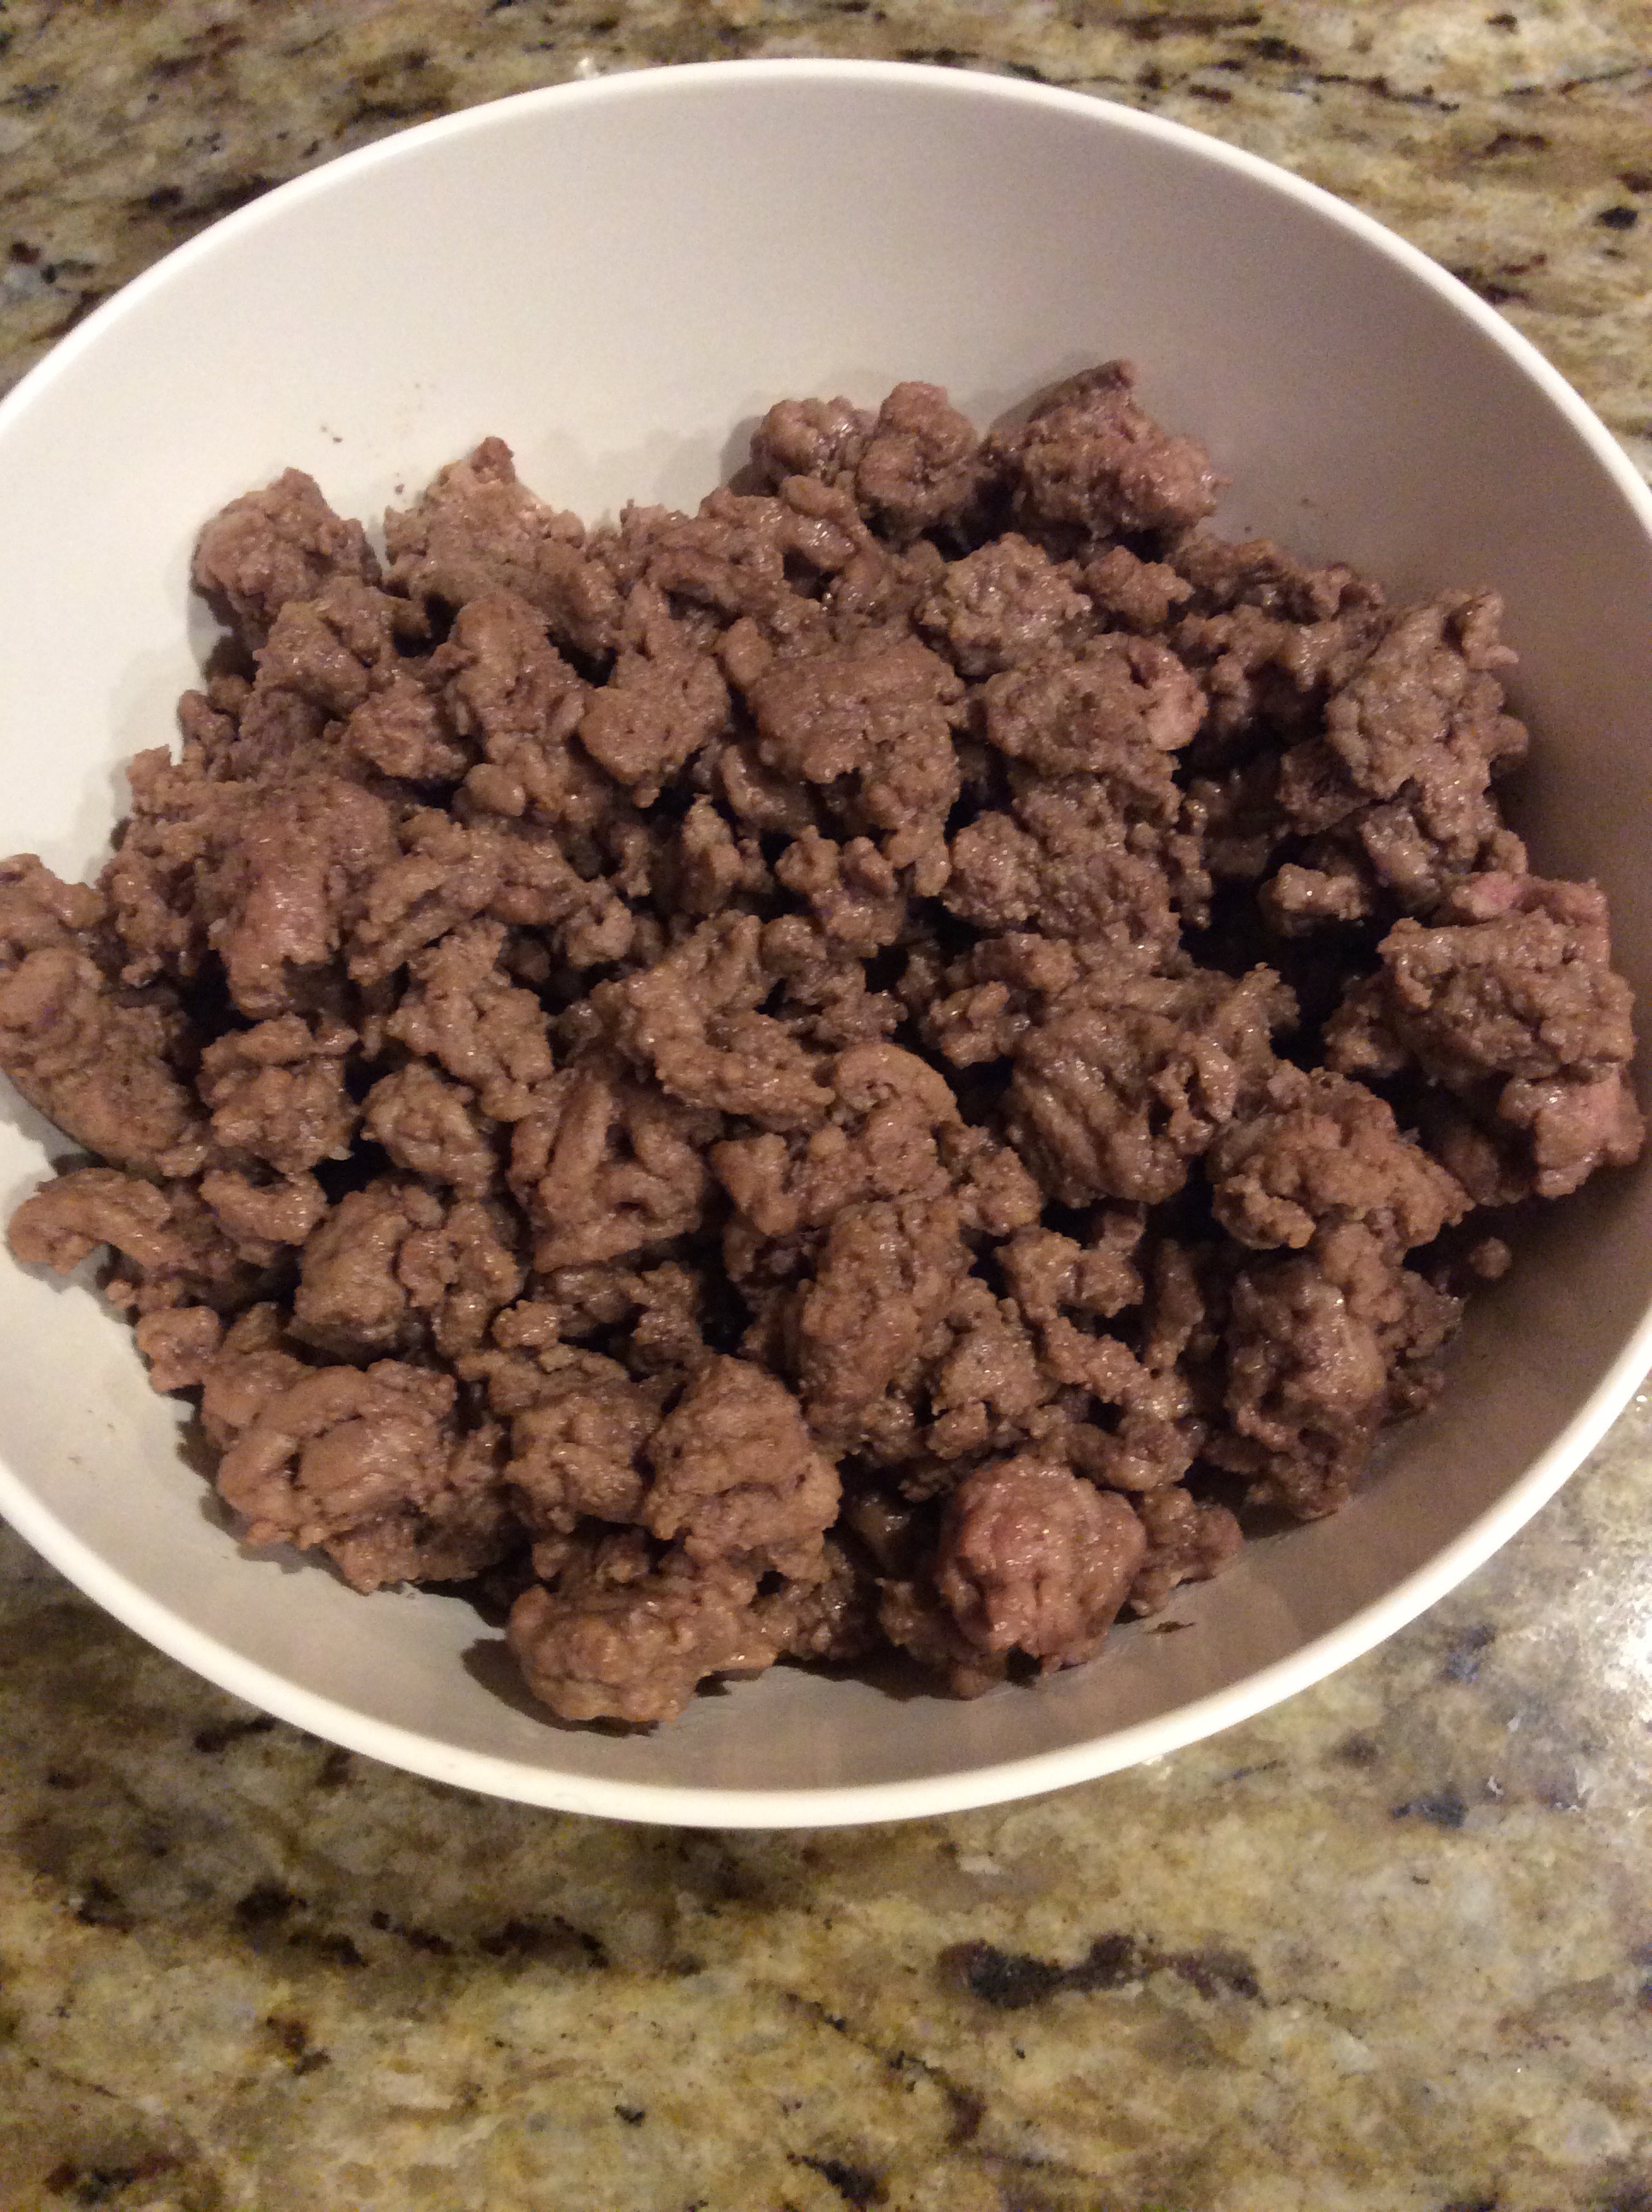
Meanwhile, in a medium nonstick skillet, heat 1 tsp oil on medium. Add beef and sauté, breaking up with a wooden spoon, until cooked through, about 8 minutes. Remove beef from skillet, cover and set aside; keep skillet on medium heat.
Meat is browned and put aside while we work on the chopped peppers
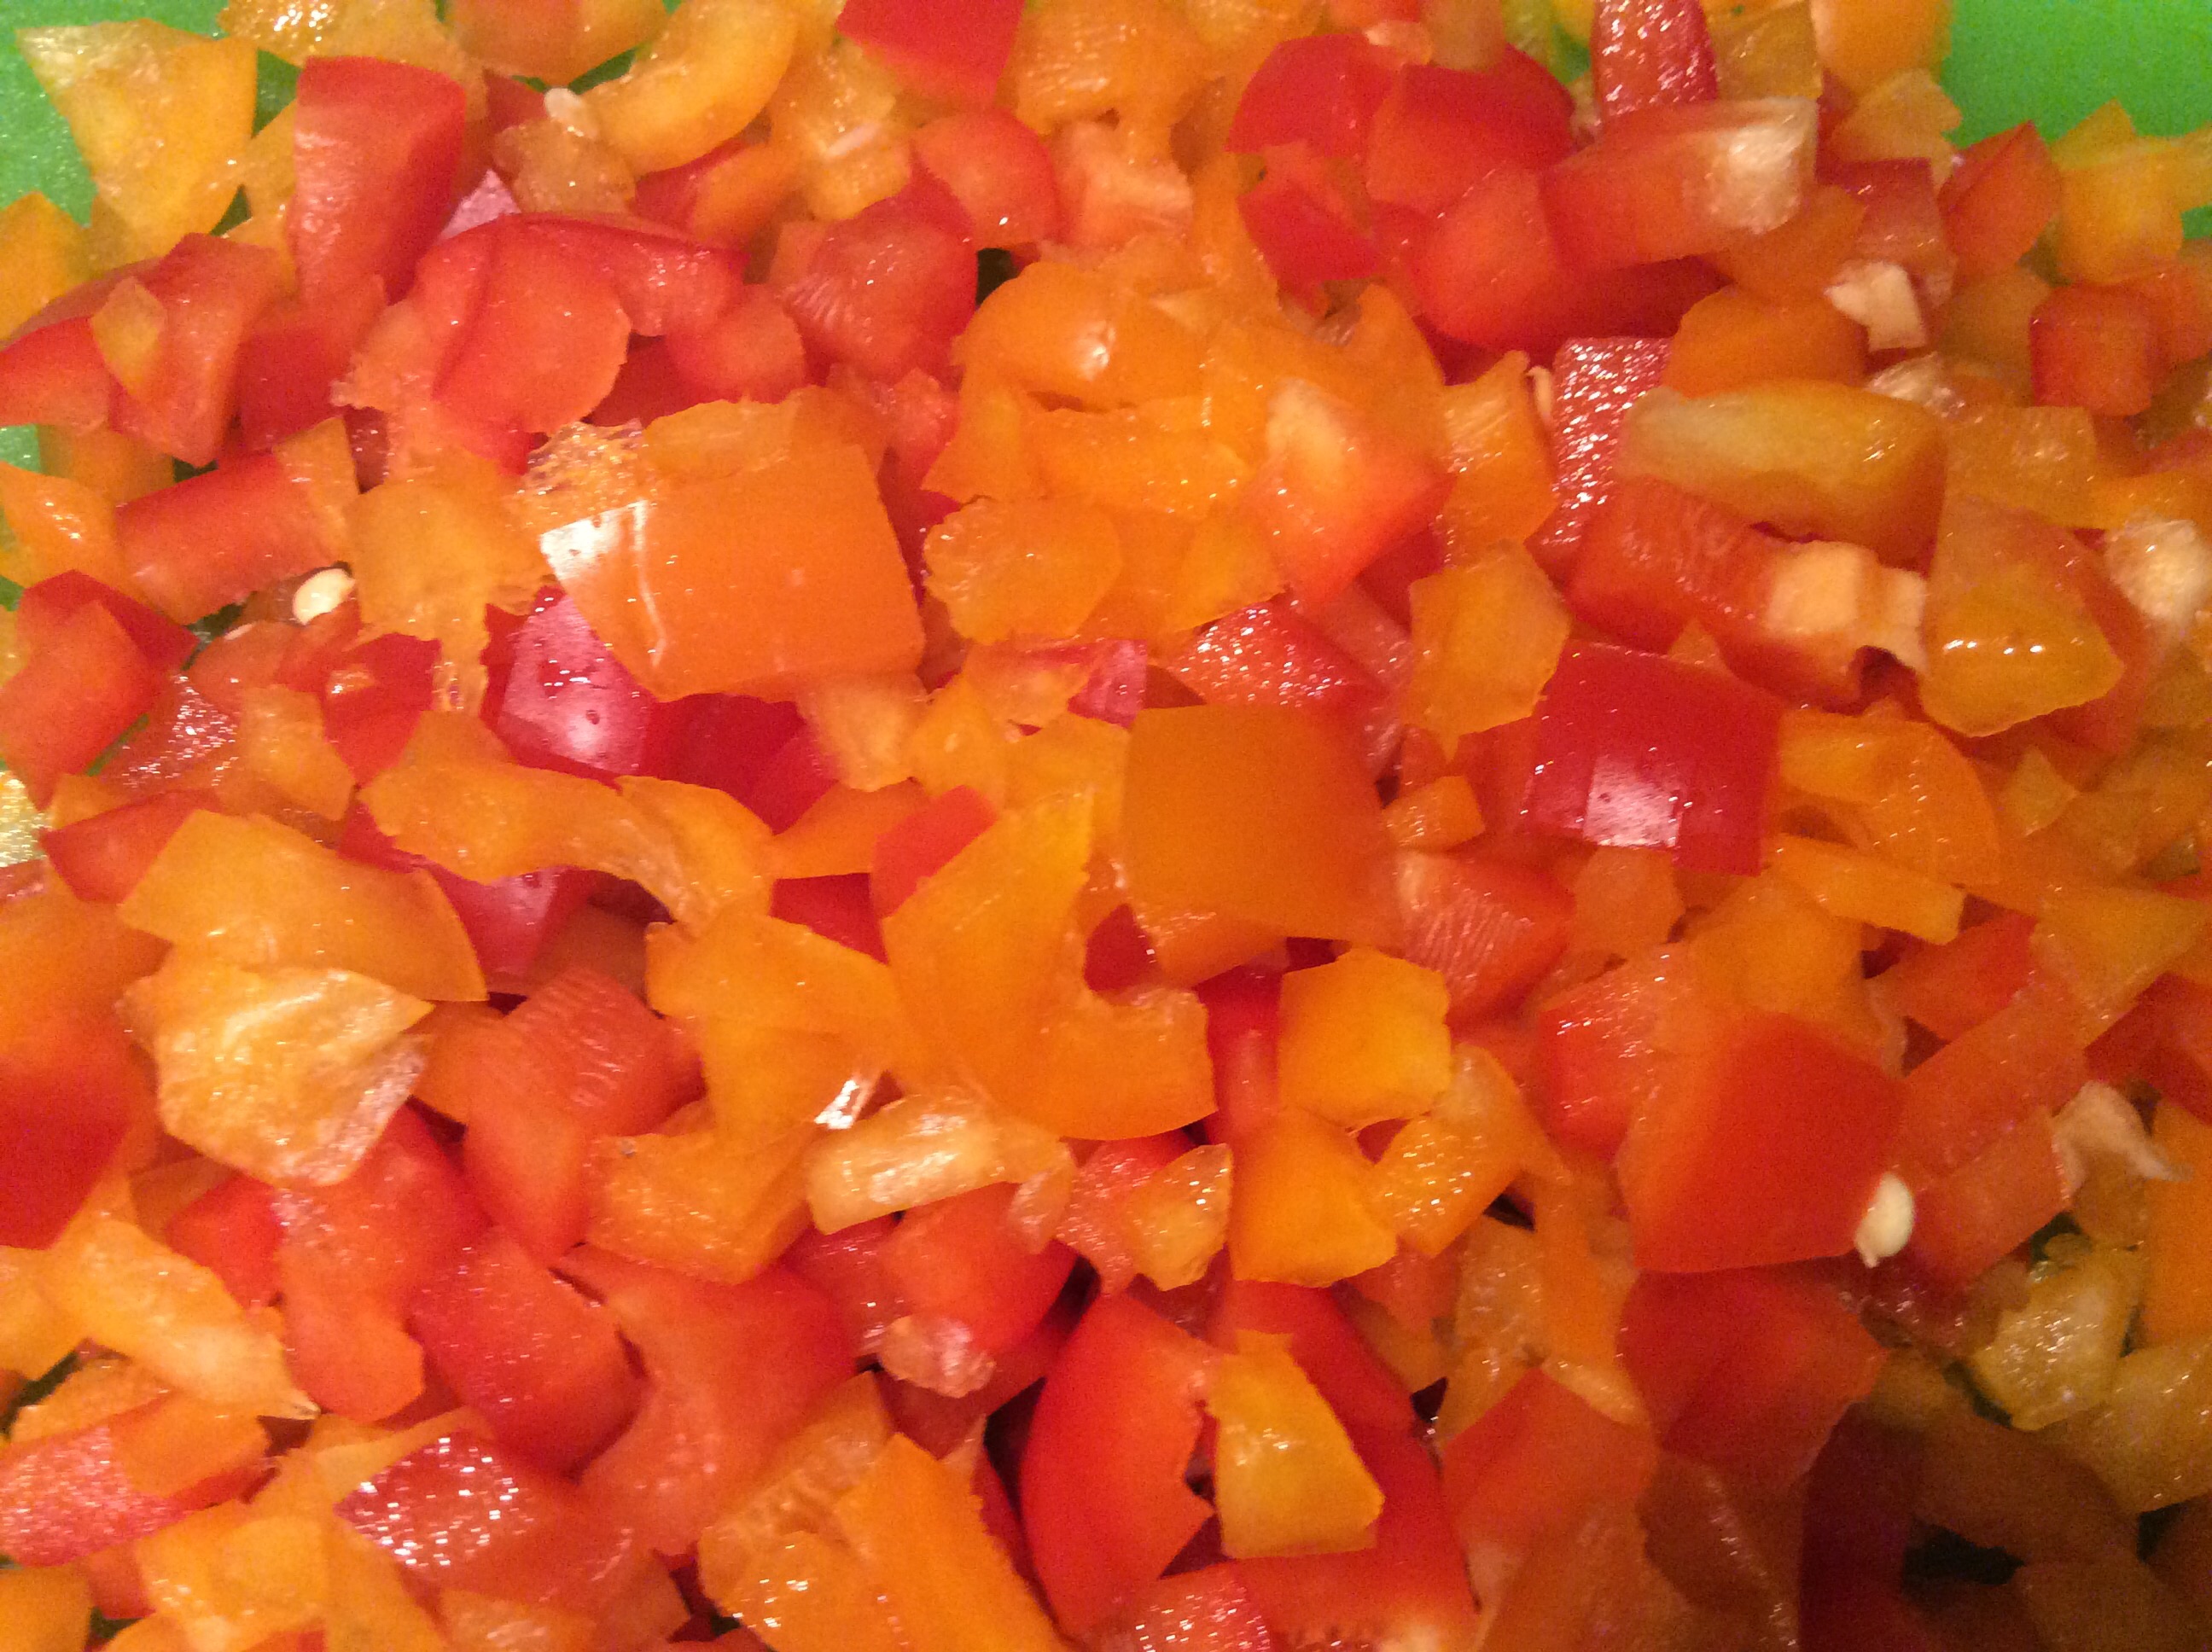
To skillet, add reserved chopped pepper tops, onion, cumin, coriander, salt and chile powder. Sauté, stirring often, until softened, about 4 minutes. (Note: I sauted mine for about 8 minutes because I like them a little more softened). Add garlic and sauté for 1 more minute.
Chopped Peppers are going into the skillet along with the onion, coriander, salt, chili powder, and garlic
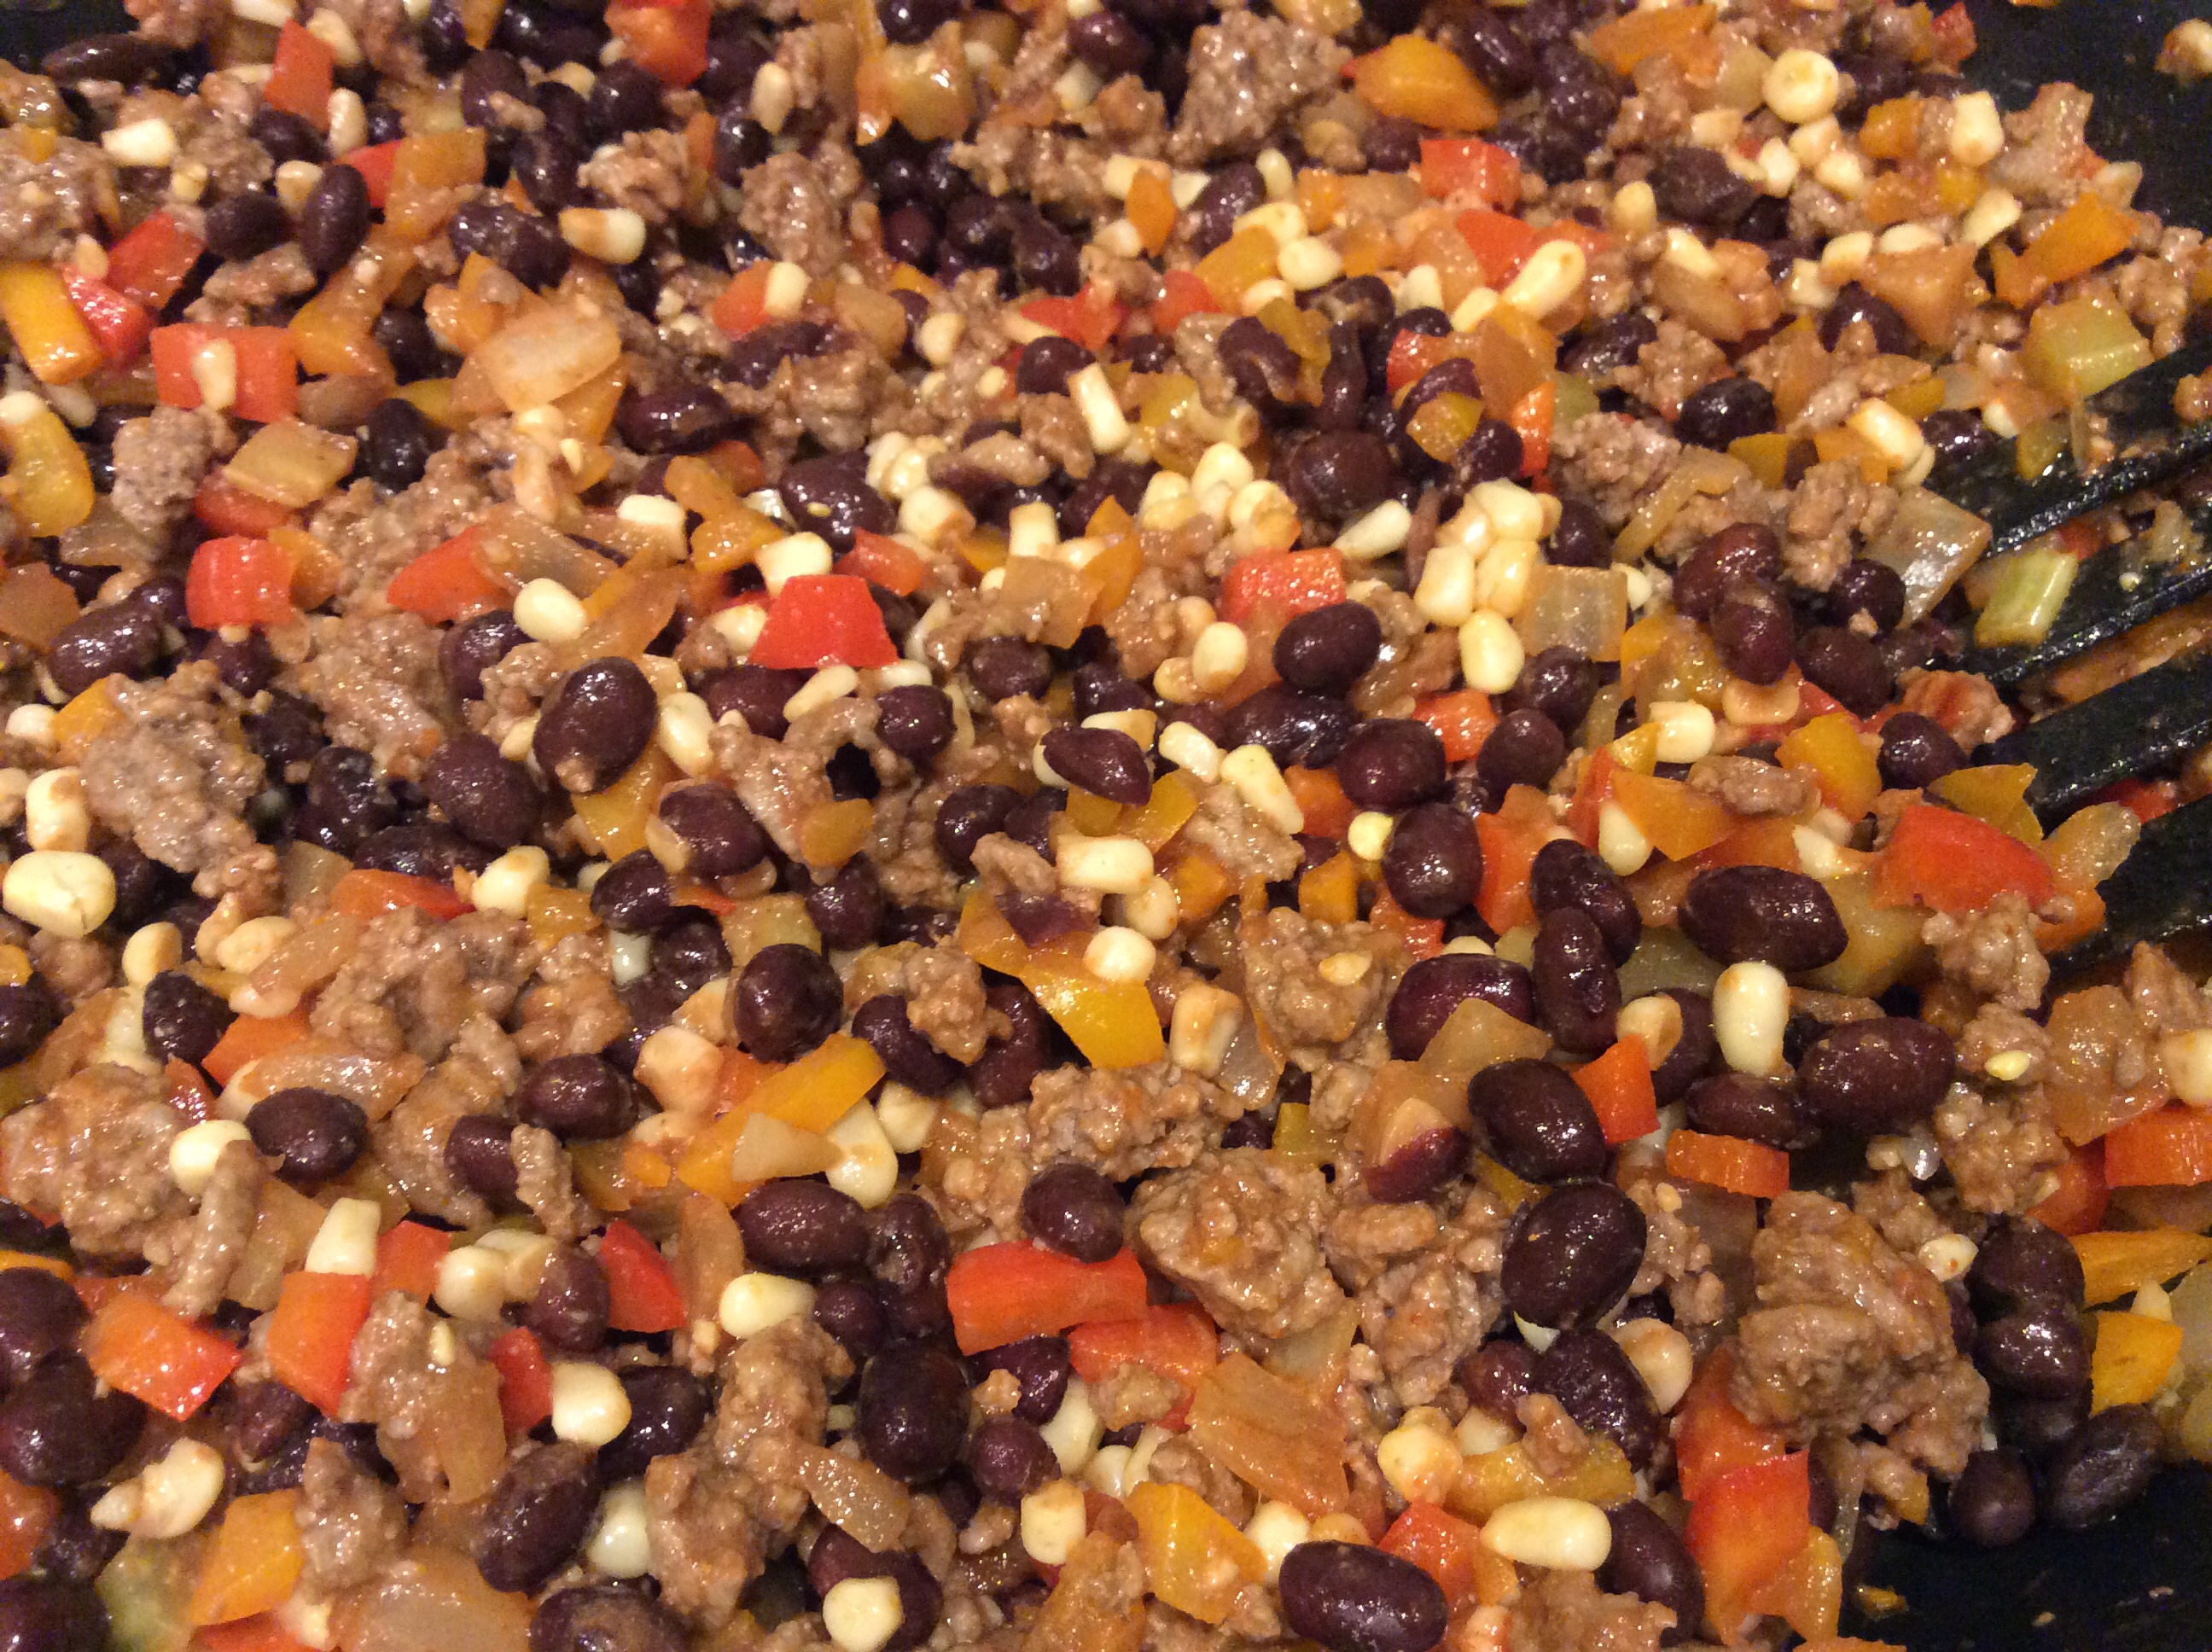
Stir in beans, corn, tomato paste, lime juice and beef. Reduce heat to medium-low and cook, stirring, for 5 to 6 more minutes. (Note: I prefer the flavors to meld just a little longer so I chose to let this simmer on the stove for about 30 minutes on low.)
The ground beef along with the remaining ingredients are added to the pan
Brush bottom of 8-inch square baking dish with remaining 1/2 tsp oil. Stand peppers cavity side up in dish. Spoon beef mixture into peppers, packing tightly.
Peppers ready to go in the oven
Cover with foil and bake until peppers are tender and filling is heated through, about 35 minutes.
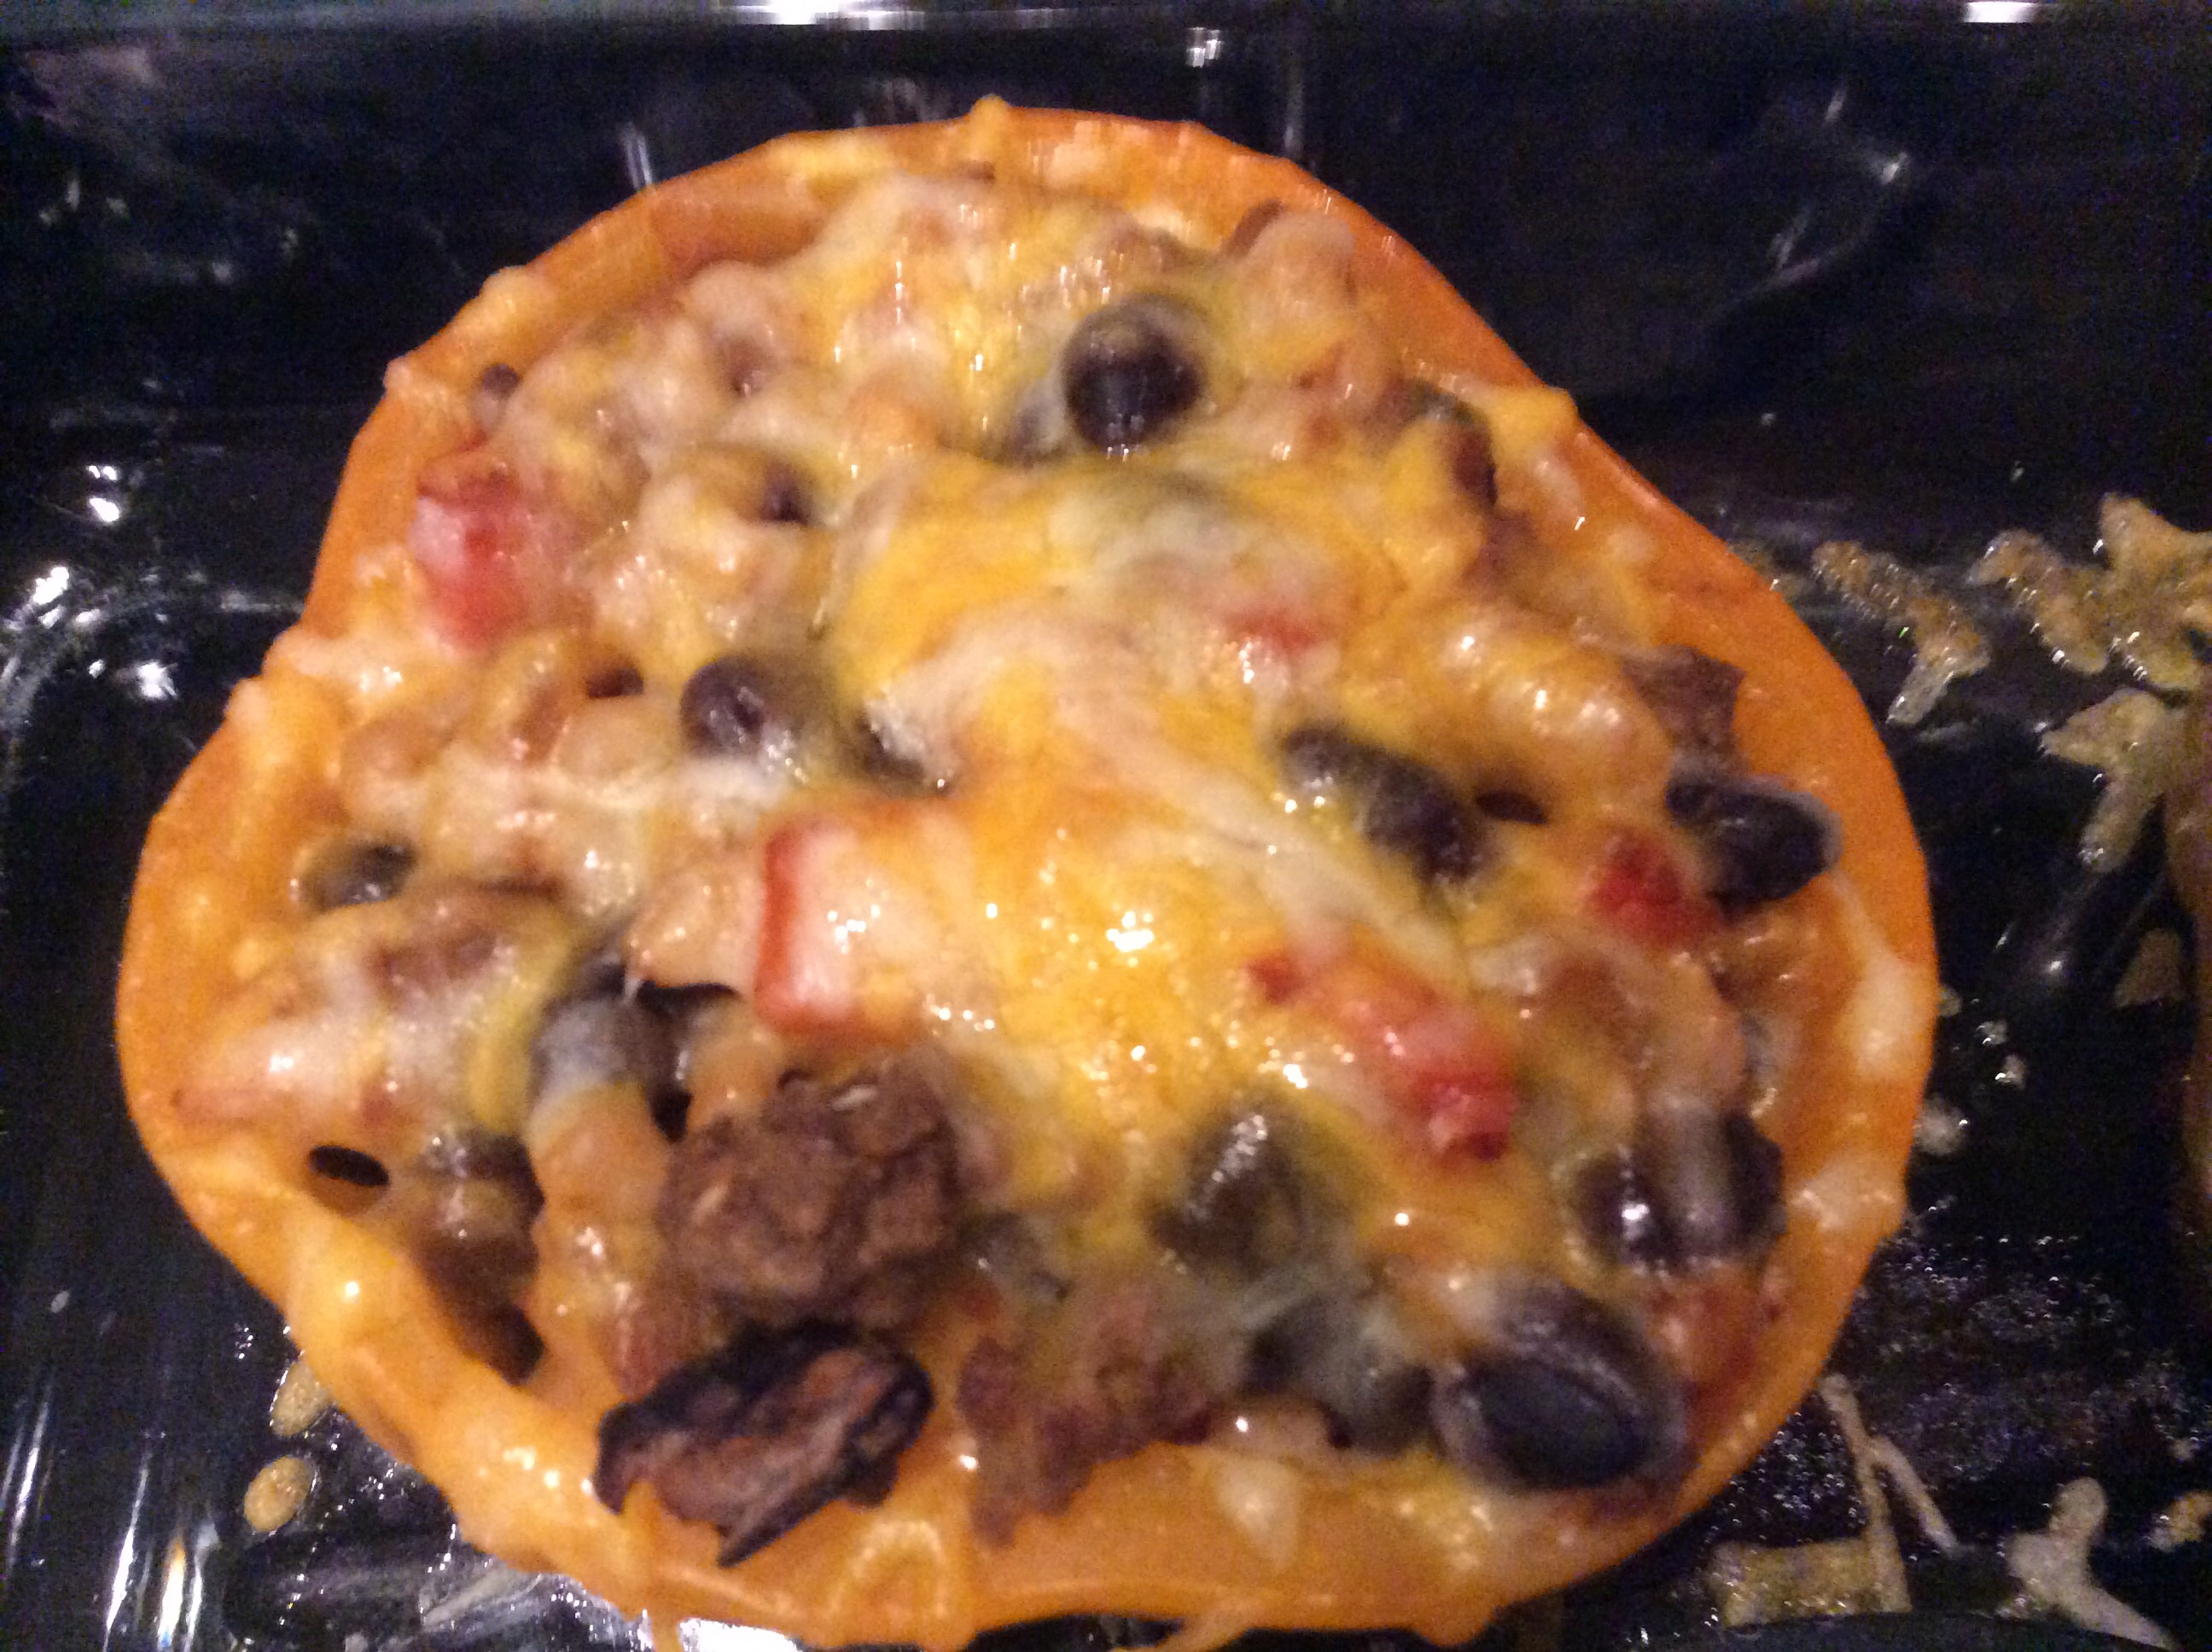
If desired, uncover the peppers and drizzle the cheese on top of each one and pop back into the oven until cheese is melted (just a couple of minutes).
One Perfect Pepper!
Garnish with cilantro (if using).
I served my peppers with a side of Scallion Brown Rice…it was a perfect compliment!
Nutrients per serving (1 stuffed bell pepper): Calories: 237, Total Fat: 8 g, Sat. Fat: 2 g, Monounsaturated Fat: 2 g, Polyunsaturated Fat: 3 g, Carbs: 17 g, Fiber: 3.5 g, Sugars: 4 g, Protein: 26 g, Sodium: 482 mg, Cholesterol: 62 mg (If you are adding the cheese, add 20 calories and 1 gram of fat to the total calories and fat per serving)
Bottom Line:
If you are looking for a healthy Mexican dish, that fills you up, tastes great, and leaves you satisfied, this is it! Even better, I had some of the mixture left over and the next day I put it into a whole wheat tortilla for a satisfying lunch! Please try this in your kitchen and you won’t be disappointed! Happy New Year!
Every year right around Thanksgiving, I get the crud and last year it was the worst ever! The first “bout” came a week before Thanksgiving and by the day after had worsened into a sinus infection. About the time, I started feeling better, I started the whole process again truly not feeling better until mid-January. This year, I was determined that it wasn’t going to get me but I just didn’t know how until I saw a post on Facebook by “Heal Thy Self” called Fire Cider. Could this be my answer?
Fire Cider by Mountain Rose as seen on Facebook by “Heal Thy Self“
Now the process was quite lengthy in that it would take at least two weeks to make but the theory was quite simple. After the two week “prep period”, you take one tablespoon per day for prevention and if you feel something coming on, you bump it up to 4 tablespoons a day. Easy Peasy!
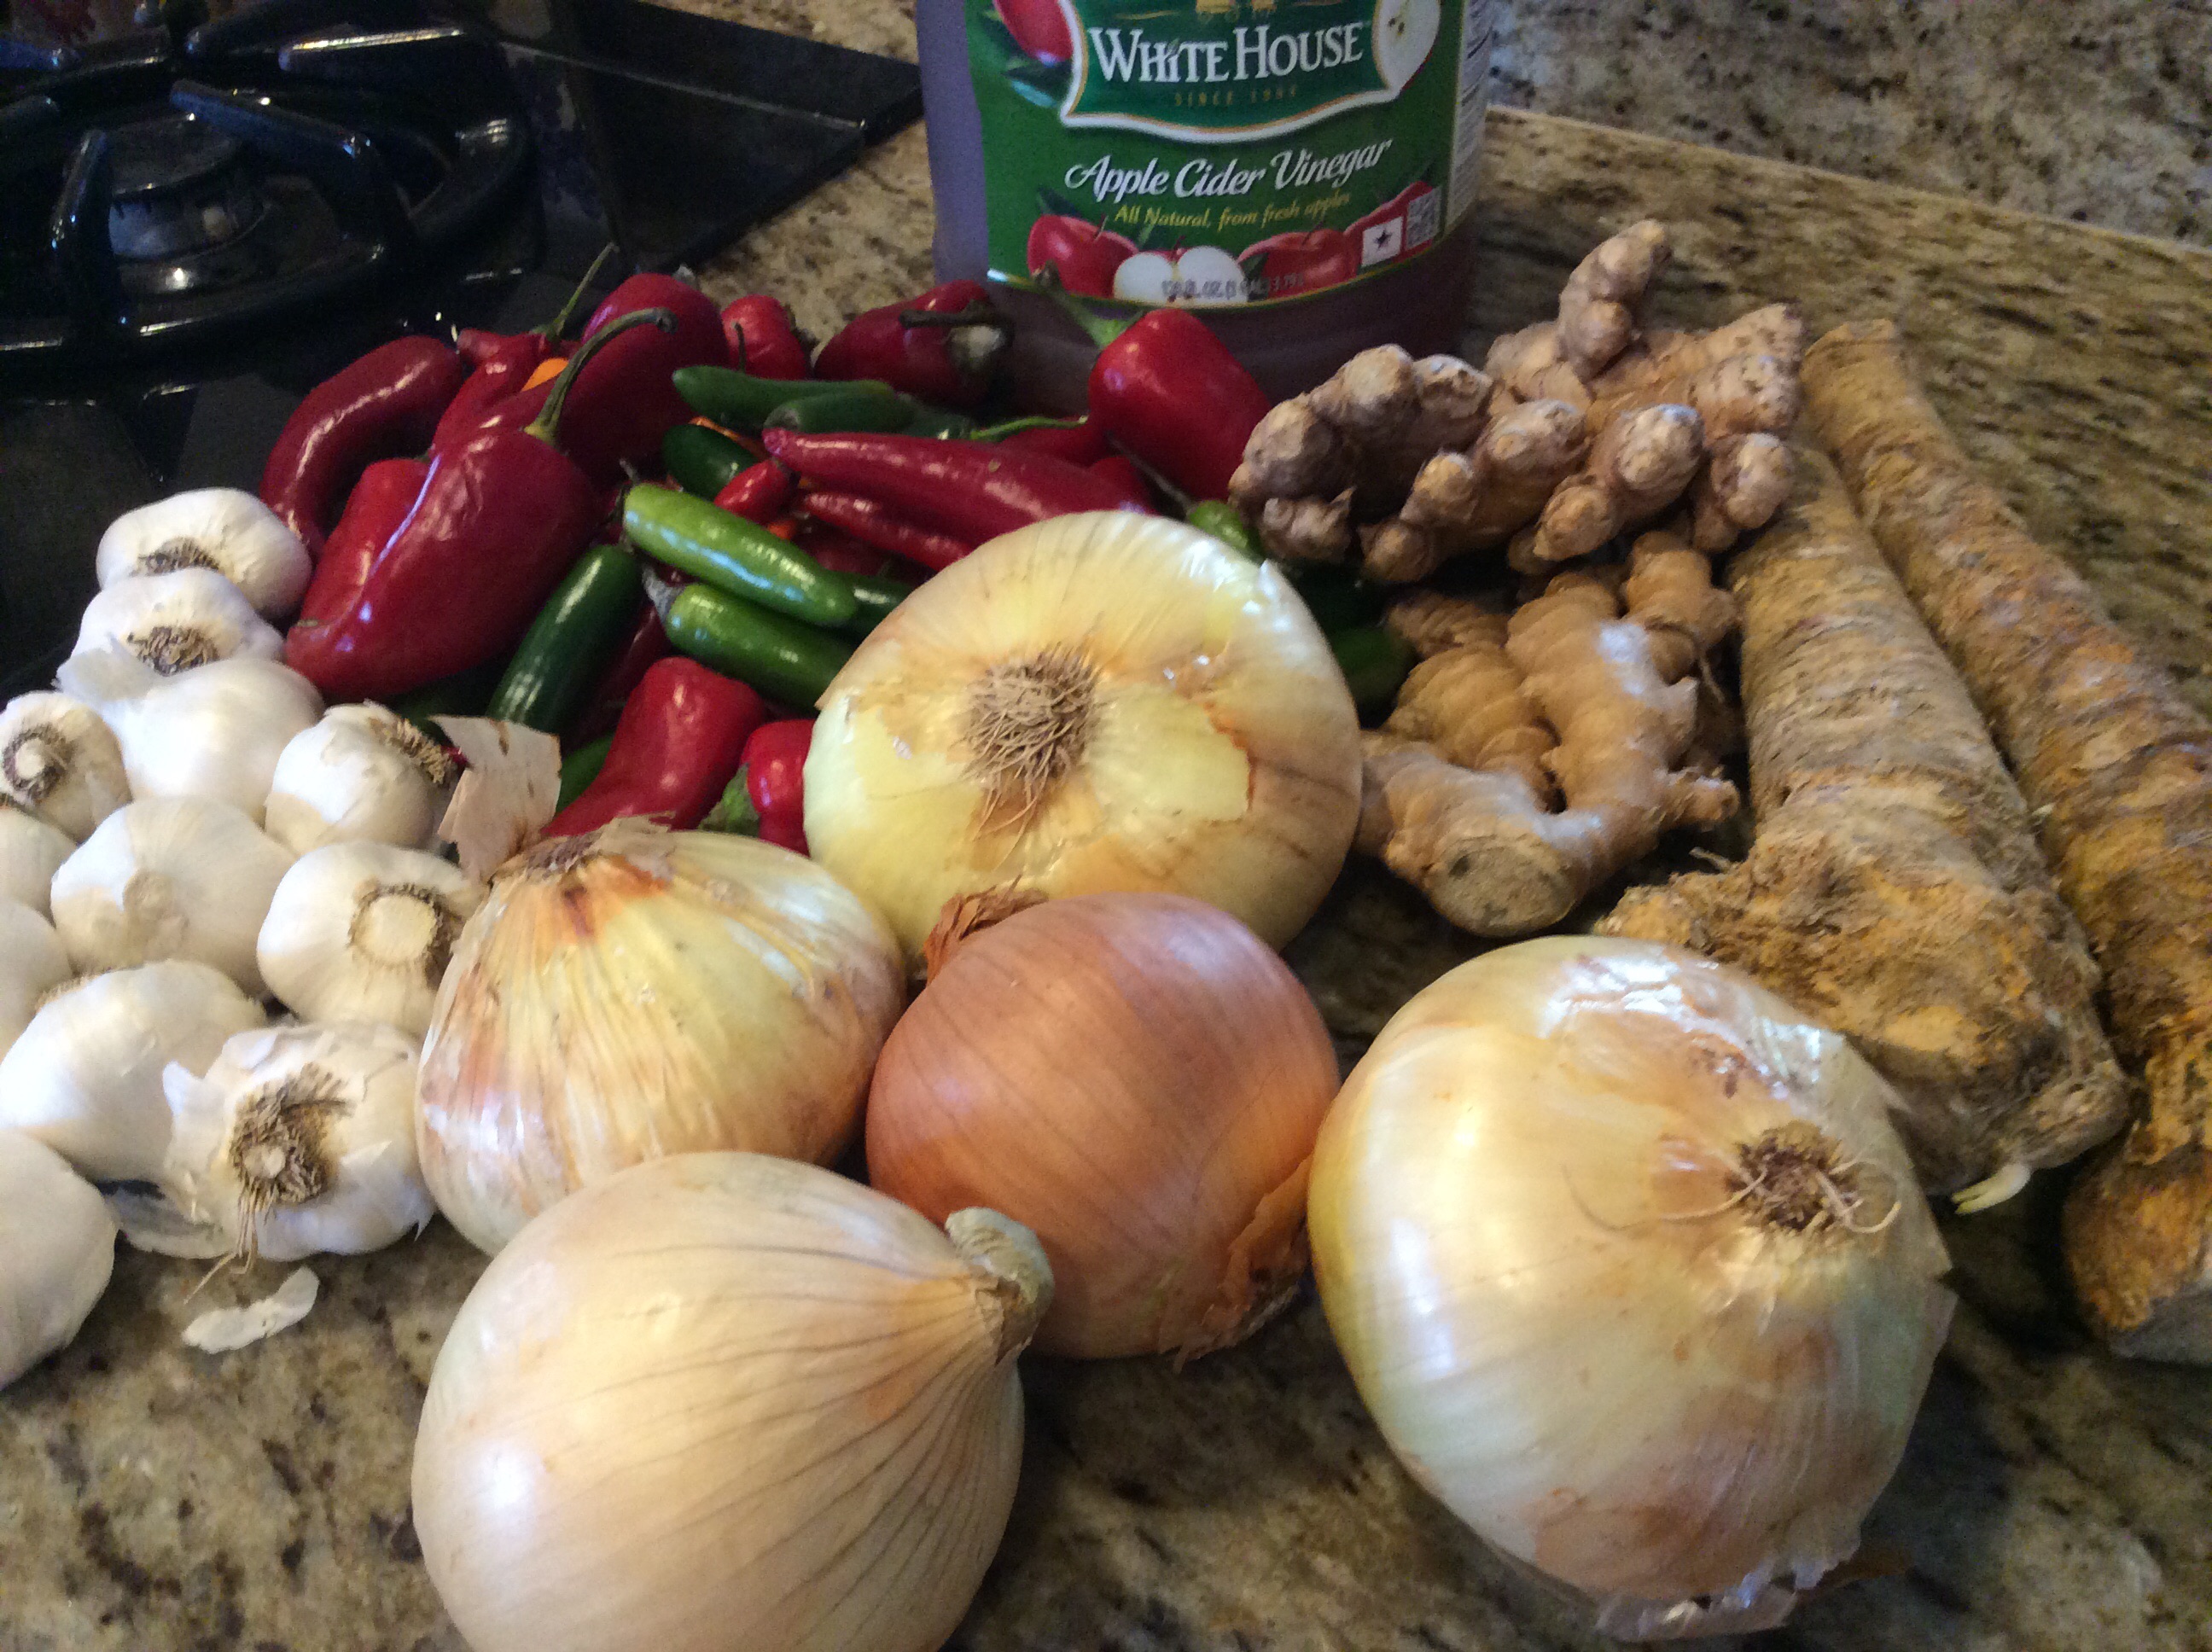
The ingredients are one that we all are familiar with:
garlic (natural antibacterial, antiviral, antifungal, antimicrobial, and great for upper respiratory issues)
onions (natural antioxidant, natural anti-inflammatory, natural antiviral, helpful in releasing toxins, lowers cholesterol and aids in healing colds, flus, allergies)
ginger (naturally antimicrobial, boots the immune system, great for upset tummies, chills, cold/fevers)
horseradish (natural antibacterial, natural antibiotic, has warming properties, stimulates the immune system, antiparasitic, expectorant)
hot peppers (warming properties, helps boost the immune system, natural decongestant, natural pain reliever)
apple cider vinegar (natural antiseptic and antifungal, very healing)
locally made honey (natural antibacterial and anti-inflammatory, cough suppressant, relieves local allergies)
thyme and parsely bundles (you can use any kind of herbs for extra flavor)
Ingredients gathered
Supposedly, it helps to cure ailments such as:
Colds & Flus
Fever
Ear Infections
Strep Throat
“This tonic is extremely powerful because all of the ingredients are fresh. It’s power should not be underestimated. This formula is a modern day plague tonic. It is said that when added to an in incurable routine, it could cure the most chronic conditions and stubborn diseases. It stimulates maximum blood circulation, while putting the best detoxifying herbs into the blood. This formula is not just for the sniffles; it has helped to turn around the deadliest diseases.”….Sam Biser, from “The Last Chance Health Report” as seen on heal-thyself-ning.com.
Worth trying!
So here is my version of Frankie’s Fire Cider:
Frankie’s Fire Cider
(Note: I made a big one gallon container so I would have plenty to give to my family; however, if you just want to do a quart, I have posted those quantities as well.)
Ingredients
(for bulk amount)
1 part fresh garlic, peeled and chopped
1 part fresh onion, chopped
1 part fresh ginger root, chopped (I don’t even peel it!)
1 part horseradish, peeled and chopped
1 part fresh hot peppers, including seeds (find the hottest you can…I use a mixture of cayenne, jalapenos, habaneros, and serranos)
thyme and parsley bundles (if desired…you can omit or use any herbs your like)
1 part apple cider vinegar (preferable raw, unfiltered)
local honey, several tablespoons to taste
(for one quart only)
1 whole bulb of fresh garlic, peeled and chopped
1 whole fresh onion, chopped
1 4-5 inch piece of fresh ginger root, chopped (I don’t even peel it!)
1 4-4 inch piece horseradish, peeled and chopped
4 fresh hot peppers, including seeds (find the hottest you can…I use a mixture of cayenne, jalapenos, habaneros, and serranos)
thyme and parsley bundles (if desired…you can omit or you any herbs you like)
1 quart apple cider vinegar (preferable raw, unfiltered)
1 tablespoon of local honey, several tablespoons to taste
Directions
Grate your garlic, ginger, horseradish, and peppers seperately in a food processor and assemble your time bundle.
My ingredients are ready
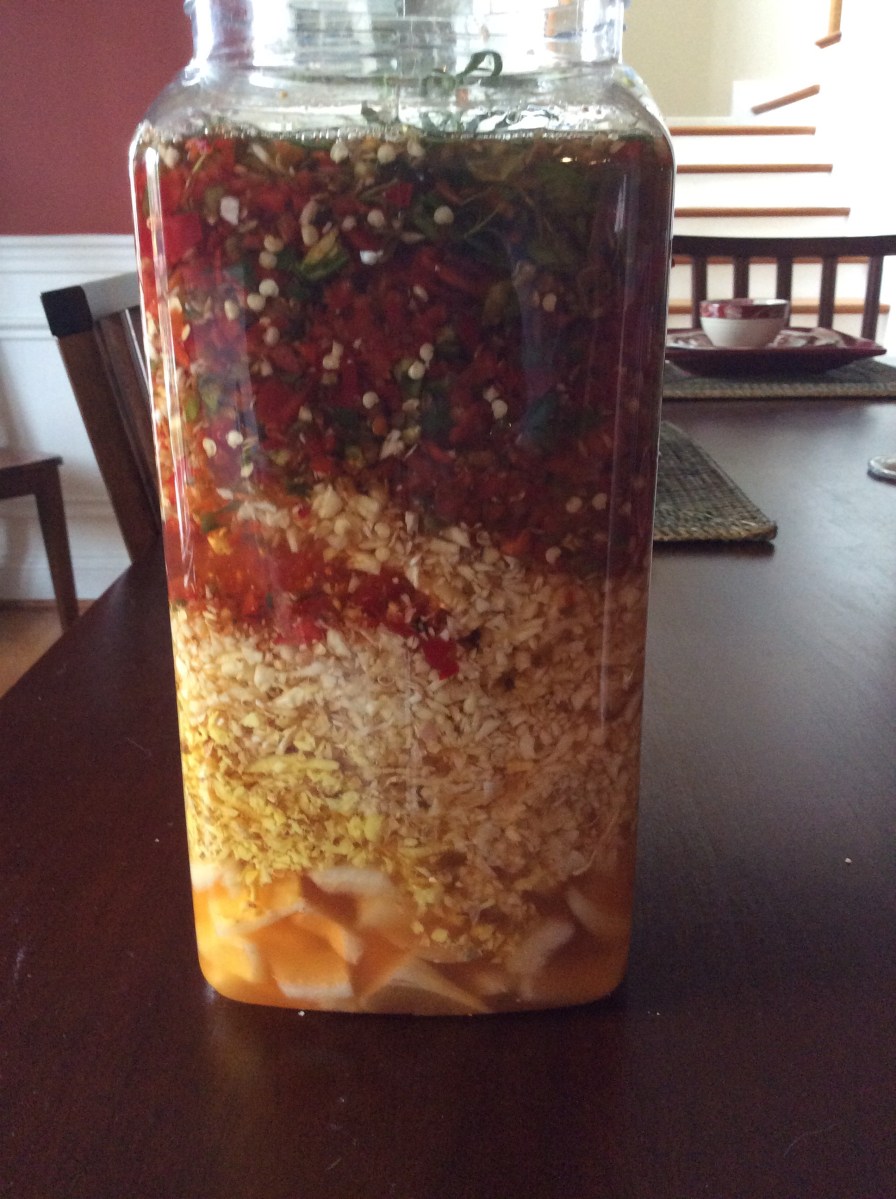
Layer each ingredient into your container on top of each other starting with the onion, then the ginger, the garlic, the horseradish, the peppers, and finally your herb bundles. By doing it this way, it helps you to see if you are getting equal parts.
Ingredients layered into to ensure equal parts
Next, add your vinegar and fill to the top.
Vinegar added
Mix well.
Mixture is ready to go into a dark spot for at least 2 weeks
Put your lid on and place in a dark place for at least 2 weeks. You must stir it once a day so make sure it is somewhere nearby so you will remember!
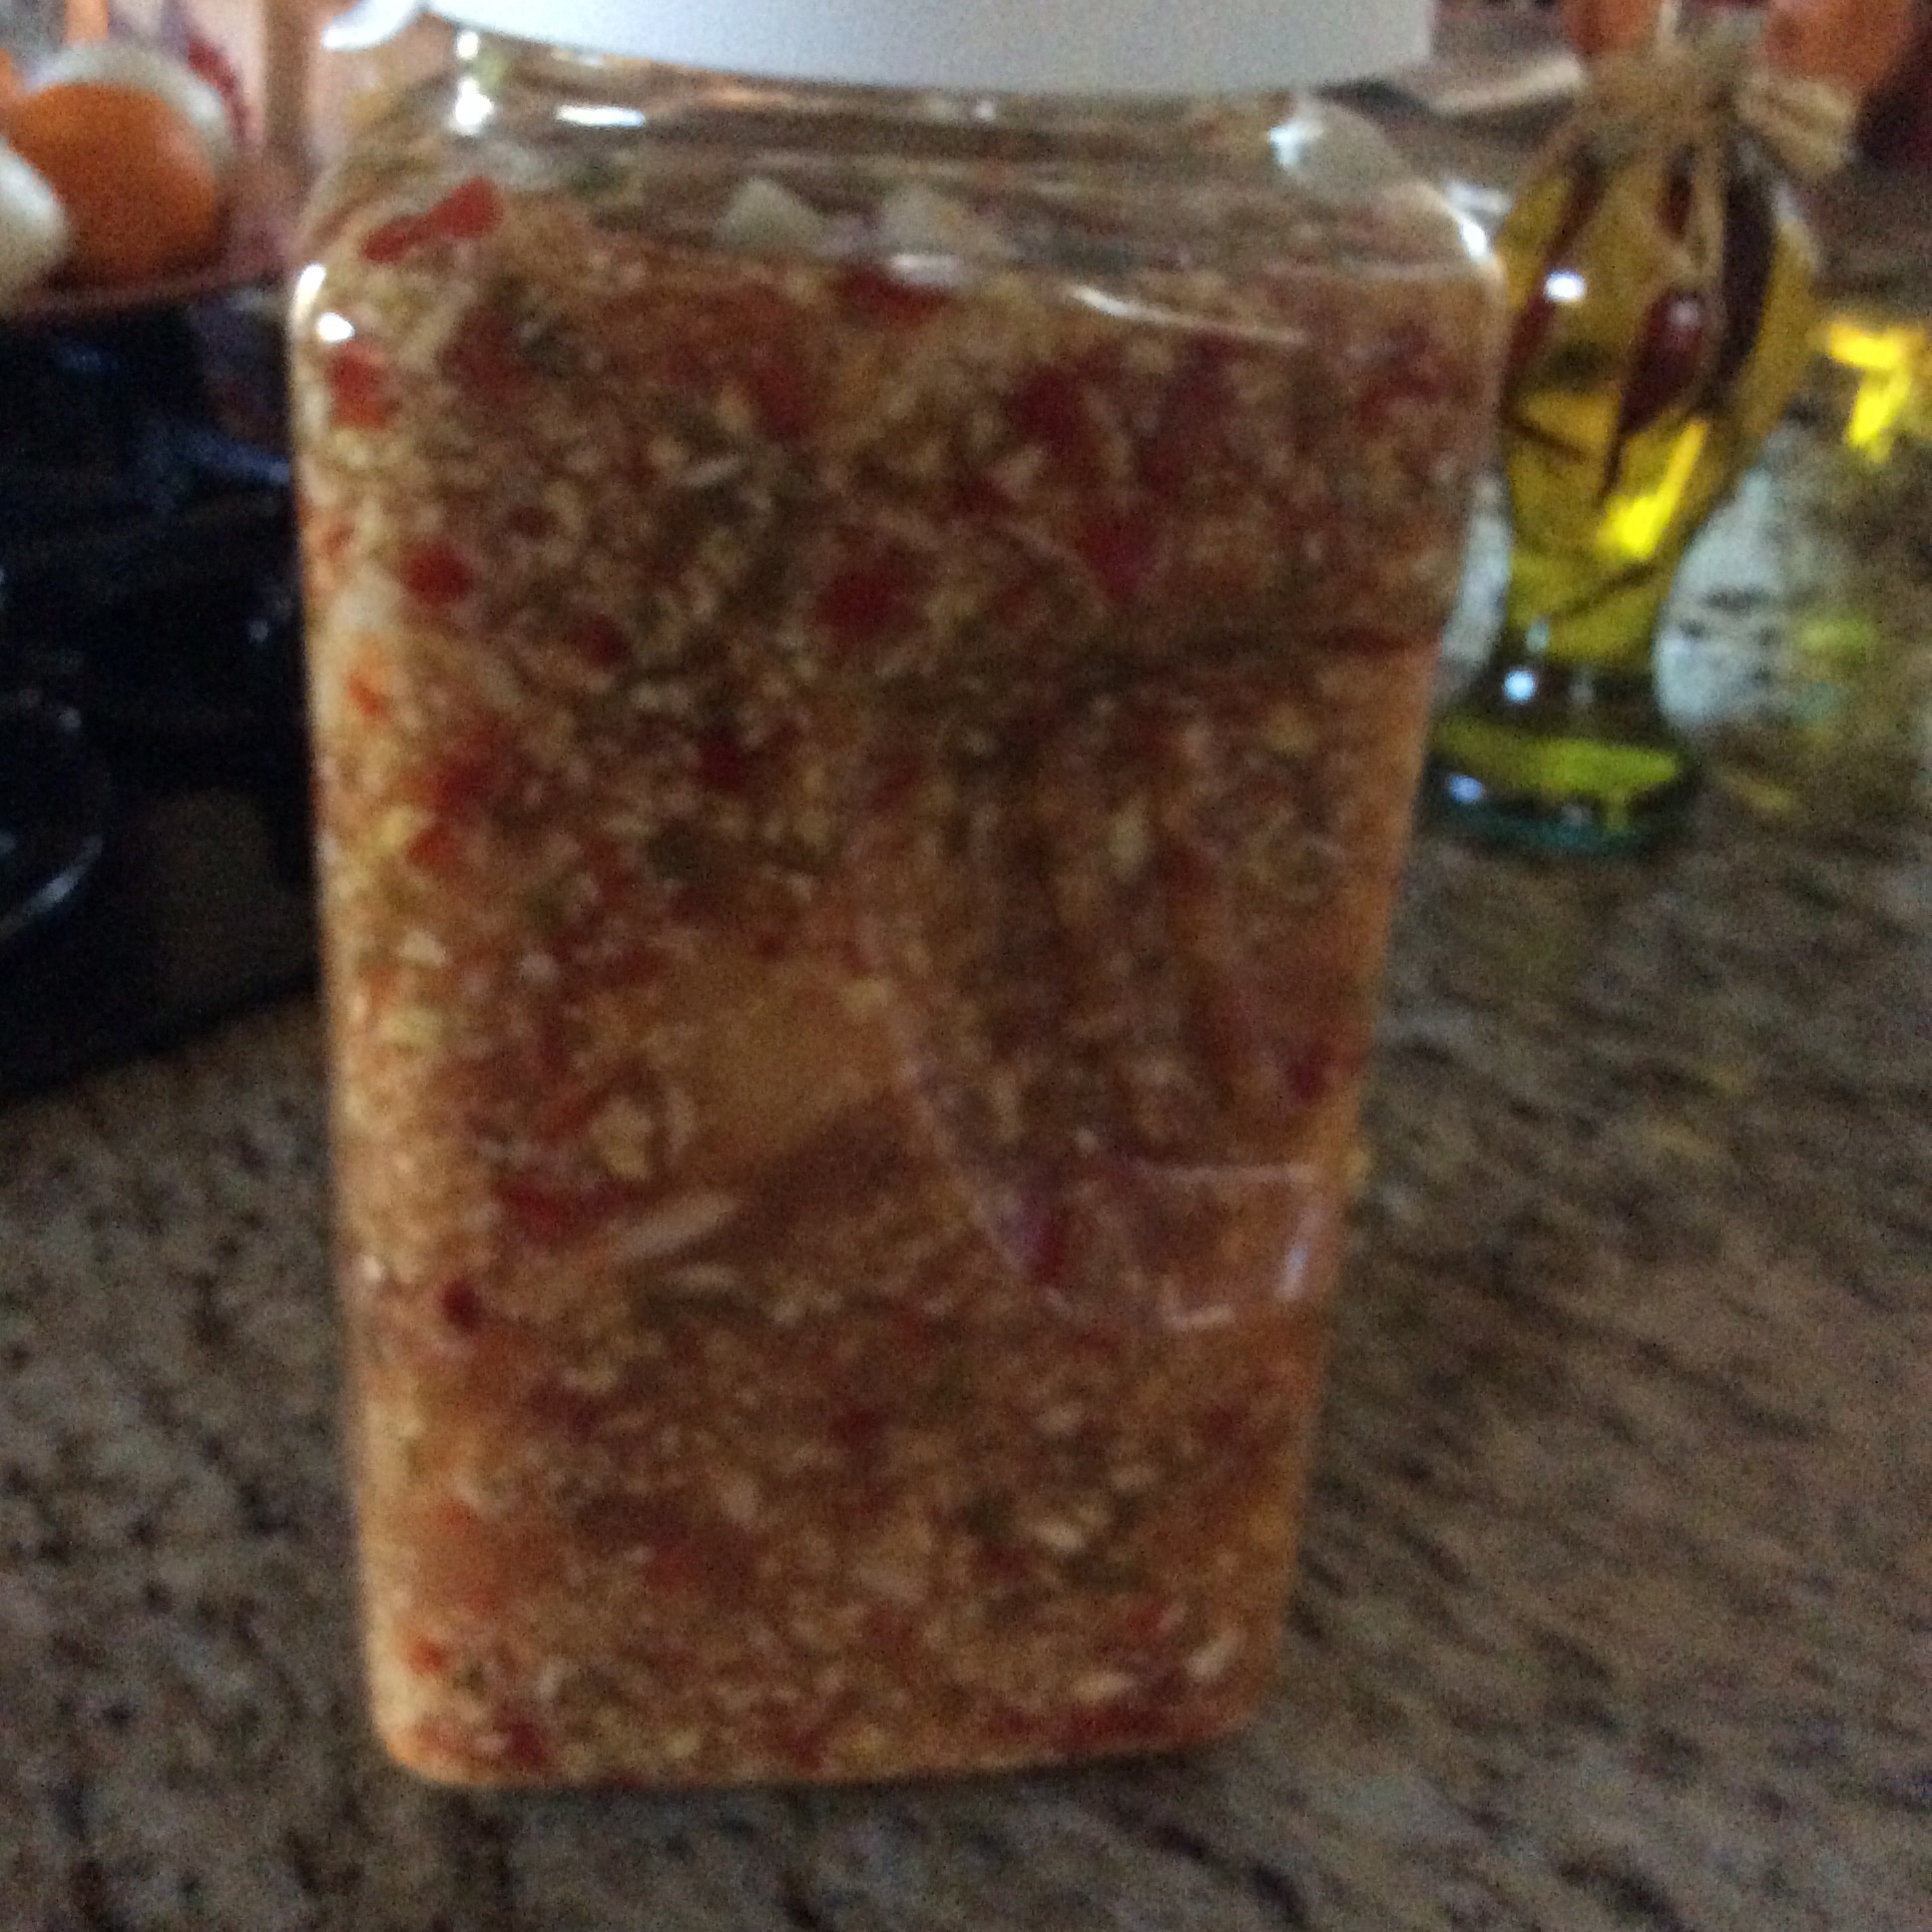
After two, weeks strain the vegetables, reserving the liquid. (Note: You could use the vegetables in some kind of chow chow but I just discarded mine.)
Whisk in your honey….I usually do about 3 tablespoons…don’t do less than 2 but you can definitely do more, depending on how sweet you want it to taste.
Whisking in the honey
Now, you are ready to start using it! Take one tablespoon a day for prevention and about 4 if you feel something coming on or are sick. I like to keep mine in the fridge but you don’t have to…It is vinegar; it won’t go bad!
How do you take it? Well, that depends on how brave you are :-)! Initially, I would add a tablespoon into some broth or a cup of v-8 juice. I also love to mix it in with oil and vinegar dressing and serve it over a salad for lunch. Oh, and in a bloody mary….well, yum! It adds the perfect “zing”!
But, two weeks ago my daughter took it straight and she loved how she felt the burn going down so now I pretty much do that to! By the way, she was really sick and did this for two days and was back to normal, raring to go!
Bottom Line:
I have been using it now for about 3 weeks and have felt great. I got through Thanksgiving with no sign of illness….amazing! (first time in over 3 years!) However, earlier last week, I got busy and forgot to take my daily dosage and on Saturday morning, I woke up with a little cold……sigh! So here was the true test: would this fire cider help my illness? I was about to see….
Saturday, I upped my dosage to 4 tablespoons and went to bed early. On Sunday, while I still had some congestion and a little cough, I felt pretty good….almost like you got to skip the middle of the cold and are at the end and feeling better. I had a full day of watching my Tennessee Vols Basketball team take down #14 Butler at Thompson-Boling Arena and then later went to a Mexican restaurant and had margherita’s with my family! Today, as I write this, I am sipping on a cup of heated v-8 juice with a tablespoon of my tonic added in…delicious! I am not totally back up to speed but feeling pretty good and will continue with my 4 doses until I am back to 100%!
Give it a try for this winter’s cold and flu season and see if it either prevents or lessens the length of your sickness this year. Keep me posted on your results!