Cooking is much like art.  The plate is your canvas, the food ingredients are your colors, and your herbs, spices, and other types of flavors are your tools.  Creating a new recipe can be lots of work or it can be easy as the one I am sharing with you today…My “Tipsy” Pasta!

"Tipsy" Pasta
“Tipsy” Pasta

“Tipsy” Pasta was created by using ingredients I already had on hand and didn’t want them to go to waste.  I needed a side dish to go with the Eggplant Parmesan recipe I posted yesterday, so I just got creative!

If you are wondering how this recipe got its name, it’s pretty obvious!  Yes, it has wine in the pasta sauce but there is another side story.  The Belmont race was coming on while I was preparing this and I had placed a little bet with friends on which horse would win.  Guess what?!  My pick, Tonalist, won the race!  I was so excited! So while enjoying creating a new recipe, preparing it on the stove and sipping  my Chardonnay out of my favorite glass (A glass with my children’s nickname for me, “Bones”), I might have gotten a little tipsy :-)!

My "Bones" glass of wine given to my by son, Jarrod
My “Bones” glass of wine given to me by son, Jarrod

This recipe comes together so quickly as a Light Meatless Main Dish or as I used, I side dish as I used it.  You can easily switch up some of the ingredients.  For example, substituting a jalapeno for the poblano…anything goes!

“Tipsy” Pasta

My chosen ingredients

Ingredients

  • 2 Tbsp Olive Oil
  • 2 Shallots, Sliced Thinly in Rings
  • 2 Tbsp Fresh Garlic, Chopped
  • 2 Tbsp Poblano, Chopped
  • 1/4 cup White Wine
  • 2 15oz cans of Fire Roasted Tomatoes
  • 1 small can of sliced Black Olives
  • 1/2 cup Fresh Basil, chopped
  • 2 Tbsp capers
  • 2-3 Tbsp of water reserved from pasta
  • Pasta, Spaghetti or Linguine  (I used Gluten-Free in this recipe to test the texture..you couldn’t tell the difference)

Directions

Heat the Olive Oil in a large skillet (I used Le Crueset’s Paella Pan..It just needs to be large enough to add the pasta into the sauce later).  Add the shallots, garlic, and poblanos to the pan and saute on low heat about 8-10 minutes until softened.

Ingredients going into the pan


Add in the wine and deglaze pan for 2 minutes.

Deglazing with wine
Deglazing with wine

Add remaining ingredients (except for pasta water) and simmer on the stove while preparing pasta as directed on the box.  (Note:  I prefer to break my pasta in half for this recipe so it collects the sauce a little better.)

All ingredients are in!

When the pasta is ready, take tongs and pull pasta from water and put directly into sauce stirring well.  Add the pasta water to loosen sauce if necessary.
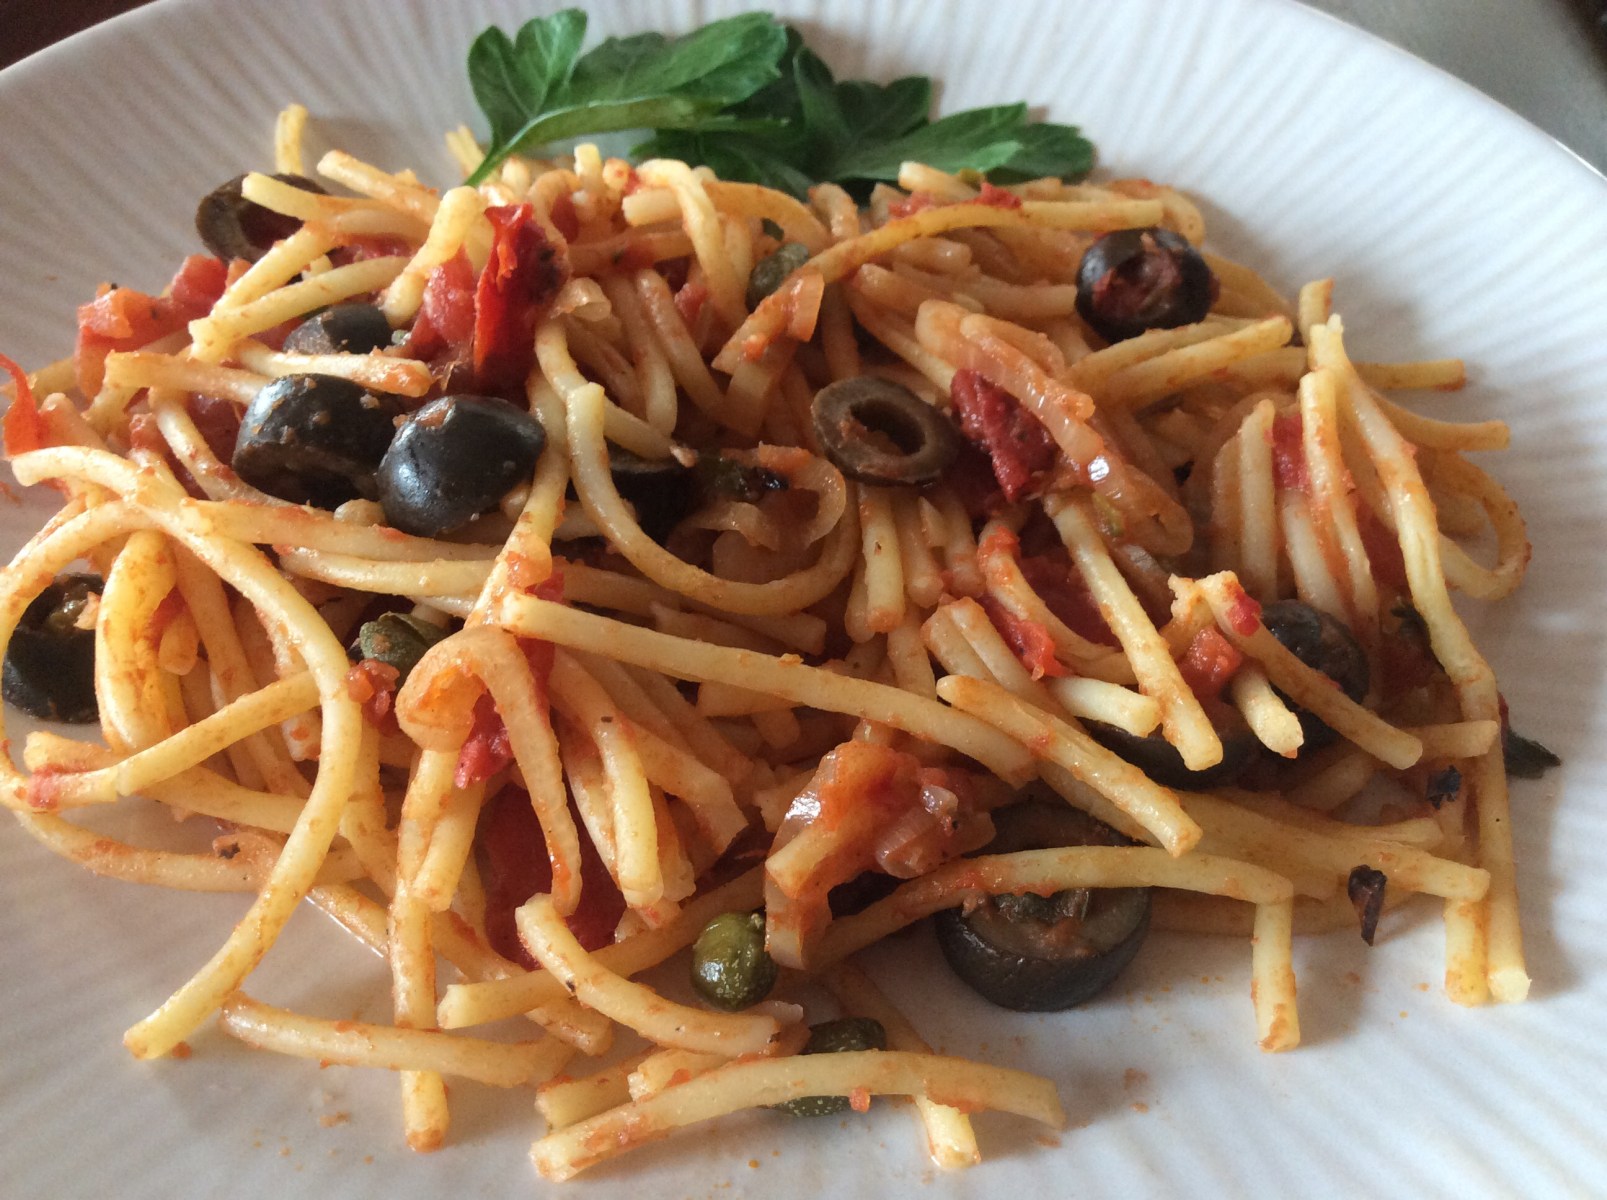
Stir pasta into the sauce and mix well

Ready to Serve!

The pasta dish used as a side with Eggplant Parmesan
or used as the Main Dish

Bottom Line:  The tang and spiciness of this recipe was divine!  It truly was perfect and I wouldn’t change anything about it.  I am almost ashamed to admit this but this is so good, I ate it COLD the next day for lunch!  It truly is that awesome and soooo easy to make.  Give it a try in your kitchen and let me know what you think!  My name is Frankie and I hope you “Keep on Cooking”!

Summertime brings all kinds of new opportunities for cooking…All the fresh vegetables and herbs with their bright colors creating such savory flavors!  It truly is my favorite time of the year to be a personal chef and I couldn’t wait to have my first taste of one of my favorite seasonal vegetables..Eggplant!  On a recent episode of Giada At Home on The Food Network Challenge, I watched as she created mini eggplant parmesans that looked so crisp and tasty; I knew I had to try it!


Giada's Mini Eggplant Parmesan
Giada’s Mini Eggplant Parmesan


My first hurdle was the inability to find mini eggplants without going to several different stores so I decided that they would just be regular sized but individual Eggplant Parms!  I used one large Eggplant and it was enough to feed 4 people as a main dish course.  (I was interested in bringing her appetizer as my star main dish on the plate.)  In her recipe, she called for store bought marinara sauce and I am quite certain that her preference would have been her own brand but I couldn’t find that either, so Emeril Legasse won that race with his delicious sauce.  I was tempted to use my own sauce that I canned over the summer but I wanted a little different taste and it was a nice change.  This is my version of the recipe using it as a main dish instead of appetizers.  There were very little changes necessary…a great recipe!

Eggplant Parmesan

Ingredients
Sauce:
2 tablespoons canola oil (Giada used olive oil but it gets a much more crisp texture with Canola but totally up to you!)
1 large clove garlic, peeled and smashed
1 shallot, chopped
1/4 teaspoon kosher salt
1 cup jarred tomato-basil sauce, such as Giada De Laurentiis for Target (or Emeril…ha, ha)
1/4 cup finely chopped fresh basil
1 teaspoon dried oregano
1/8 teaspoon dried crushed red pepper flakes
1/4 teaspoon balsamic vinegar
Eggplant:
1 cups all-purpose flour
1/4 teaspoon kosher salt
1/4 teaspoon freshly ground black pepper
1 cup panko breadcrumbs
2 large egg whites
1 large Japanese eggplant, sliced into 1/4-inch-thick slices
2/3 cup olive oil
1/2 cup (packed) coarsely grated whole-milk mozzarella
1/2 cup finely grated Parmesan
Fresh basil leaves, chopped, to garnish
Directions
Since Eggplants has so much moisture in it, I always follow this little trick.  It wasn’t included in Giada’s recipe but I knew I would achieve crisper Eggplant if I added this small step. Wash and towel dry the eggplant. Slice the eggplant horizontally about 1/4-inch thick. Place the slices in a large colander, sprinkle with salt and set aside to rest about 30 minutes. Drain and rinse the eggplant and dry on towels.  Make your sauce while the Eggplant is drying out.

Eggplant drying out on paper towels

For the sauce:

Ingredients for the Sauce

Heat the oil in a heavy medium saucepan over medium. Add the garlic, shallots and salt. Stir until fragrant, about 2 minutes.

Love the smell of fresh garlic and shallots cooking!

Add the tomato sauce, basil, oregano and crushed red pepper. Simmer the sauce until the flavors blend and the sauce thickens, stirring often, about 5 minutes. Mix in the vinegar.

All ingredients are in and on a low simmer

For the eggplant: Mix the flour, salt and pepper in a shallow bowl. Place the panko breadcrumbs in another shallow bowl. Whisk the egg whites in a medium bowl until frothy.

The dippers..
The dippers..
My dipping station to frying pan ready to go!


Dip each eggplant slice in the flour mixture, then into the beaten egg whites, and then into the panko breadcrumbs to coat completely.


Dip the eggplant in the flour, then the egg whites, and finally the panko!

Heat the oil in a heavy medium skillet over medium-high heat until hot (the surface will appear to be shimmering), 2 to 3 minutes. Add half of the eggplant slices.Cook until deep golden brown, 1 to 2 minutes per side.

Frying nicely!
Frying nicely!

Transfer the eggplant to a paper-towel-lined plate. Fry the remaining eggplant. (Can be made 1 hour ahead. Let stand at room temperature.)

Ready for the toppings

Preheat a broiler. Toss the mozzarella and Parmesan in a small bowl until well blended. Spread 1 generous teaspoon of the sauce over each eggplant slice. Top with a rounded teaspoon of the cheese mixture; spread out to cover and press lightly to adhere. Top with chopped basil.  Transfer the eggplant slices to a rimmed baking sheet.

Ready to go in the oven!

Broil until the cheese has melted, 1 to 2 minutes.  Let stand 2 to 3 minutes before serving.

Cook’s Note: For a smoother consistency, the sauce can be pureed in a blender or food processor.

My version of Eggplant Parmesan with a side of pasta

Bottom Line:

This is a perfect recipe!  I can see how it would be lovely as an appetizer because you can make them ahead and pop them into the oven at the last minute.  I actually made them before watching the Belmont Horse Race yesterday and dinner was a snap after I did my celebratory dance (my horse won ;-)!  They were so perfectly crisp and I am thinking they may reheat nicely on rack in the oven to put on meatball sandwiches?? That would be an awesome twist…Hmmm maybe that blog will be later this week!

I served them along side a pasta dish that I literally created at the spur of the moment so I will share that with you soon.  It was delightful!  Until then, let me know how this works in your kitchen and Keep On Cooking!

Read more at: http://www.foodnetwork.com/recipes/giada-de-laurentiis/mini-eggplant-parmesan-recipe.html?oc=linkback

 I love shrimp!  It can be prepared in so many different ways and is especially fun to eat in these warm summer months!  I went looking for a light but tasty shrimp dish with a Cajun twist and I came upon an old favorite chef of mine, Martha Stewart.  Let’s face it, she was the pioneer when it came to cooking shows and was on before the thought of the Food Network was even conceived!  She isn’t everyone’s favorite person but when it comes to cooking, she usually gets it right.

Her recipe for New Orleans Style Shrimp and Rice had all my favorite ingredients.  Obviously, Shrimp and Rice, but also onions, garlic, peppers, tomatoes, and hot sauce….those ingredients always make my mouth water!  Not only that, but the recipe seemed quick and easy which is perfect after an action-packed day.  I pretty much followed her recipe as it was besides substituting one of the green peppers for an orange one to add more color and of course, I upped the hot sauce!  The spicier the better in my book!  I also cooked my peppers and onions a few minutes before making the butter/flour mixture and then added them back in after.  The recipe below is how I prepared it but I have included a link to the original recipe at the bottom of the page.

Martha Stewart's New Orleans Style Shrimp
Martha Stewart’s New Orleans Style Shrimp


 Ingredients

My ingredients ready to go!
  • 8 tablespoons (1 stick) unsalted butter
  • 1 tablespoon plus 1 teaspoon all-purpose flour
  • 1 tbsp olive oil
  • 2 green bell peppers, cut lengthwise into 1/4-inch-thick slices (I prefer to swap one green for red, yellow, or orange)
  • 1 large onion, halved lengthwise and cut into 1/4-inch-thick slices
  • 2 celery stalks, cut into 1/2-inch-thick pieces
  • 6 canned whole plum tomatoes (from one 28-ounce can), crushed
  • 14 1/2 oz low-sodium chicken broth
  • 2 teaspoons chopped fresh flat-leaf parsley, plus more for garnish
  • 1 1/2 teaspoons Cajun seasoning
  • 1/2 teaspoon paprika
  • 1/2 teaspoon coarse salt
  • 1/2 teaspoon hot sauce, such as Tabasco, or to taste (Feel free to take this up a notch!)
  • 1 pound large shrimp (21 to 30), peeled and deveined
  • 2 cups cooked white rice, for serving

  Directions

Pour one tablespoon of butter in a large pan or dutch oven and heat.  Add onions and celery, and saute for 2-3 minutes. 

Celery and Onions going in first

Add in bell peppers and saute an additional 2-3 minutes. 

The rest of the veggies going in

Remove vegetable mixture from pan; set aside.

Melt butter over medium heat. Add flour, and stir until light brown, 3 to 4 minutes.

Flour Butter mixture coming to a light brown color

Add vegetable mixture back to the ban with the flour/butter mixture and cook, stirring occasionally, until softened, about 7 minutes.

Veggies going back into the pan with flour/butter mixture
They are ready to add the rest of the ingredients...still have a crunch but cooked down some
They are ready to add the rest of the ingredients…still have a crunch but cooked down some

Add tomatoes, broth, parsley, spices, salt, and hot sauce.

Added the remaining ingredients (except the rice)

Bring to a boil; reduce heat, and simmer until vegetables are soft and mixture is slightly thickened, about 30 minutes. (Note: if you aren’t in a hurry, turn off the stove and let the mixture sit an additional 30 minutes on no heat to meld the flavors together, then just reheat when ready to add shrimp). 

Starting to thicken nicely!

Stir in shrimp, and cook until pink and cooked through, 3 to 5 minutes. 

Shrimp going in!
Shrimp going in!

Sprinkle shrimp with parsley, and serve over rice. 

My version served over rice and a with a crusty french roll to sop up all those extra juices!

Bottom Line:  This recipe is not only delicious but comes together so easily and is a true crowd pleaser if you want to double it for a large family gathering!  Jeff and I both loved it and it was even great the next day for a nice lunch for me 🙂  Please try this one and let me know how it works out in your kitchen!  Until next time….Keep on Cooking!

Link to Martha’s original recipe:  http://www.marthastewart.com/319031/new-orleans-style-shrimp-and-rice


Our house we rented in Troncones, Mexico

So, I’ve been slightly distracted by the excitement of our upcoming trip to Mexico so I haven’t been blogging much but I will be back soon!  We leave tomorrow and will be back the first weekend of June and I will have plenty to share!  Until then, look at my view for the next week and Keep On Cooking!

Who doesn’t love a good chili dog?  It would be hard to improve on it, so why try?  Until, you are like me and surfing “Pinterest” and see an inspiration:  Chili Dog Casserole!  I was so excited about the idea that I posted it on my personal facebook page about my upcoming recipe test.  It sparked A LOT of interest!  However, after further perusing the recipe I had found, I was disappointed to find that it has tortillas in it?  No hotdog buns?  This  was a problem so I went on a search to find the perfect recipe for what could be my new favorite indulgement!

Obviously, the internet was my best bet and after looking at several recipes, I found one that looked close to what I expected to include in a good chili dog casserole.  It came from Food.com and I will include the link to the original recipe at the bottom of the page.

As usual, I had to make changes!  For example, some of the reviews suggested toasting the buns so it wouldn’t get soggy so I thought that was a great idea.  But my biggest change came in the quantity of the hot dogs (I wanted more) and how they were prepared.  I thought sauteing them with some onion would be much tastier than putting them in raw and I think I was right on that one!  (Note:  I did also half the recipe and it still made enough for 6  portions)  So here is my final recipe with all my “tweaks”.

Chili Cheese Dog Casserole
Chili Cheese Dog Casserole-Serves 4-6

Ingredients

5 hot dog buns
6 hot dogs
1 (15 ounce) can chili
1/2 cup chopped onion
2 tablespoons prepared mustard
2 cups shredded cheddar cheese
Directions
Assemble ingredients and preheat oven to 350.
Everything I need for a Chili Dheese Dog Casserole!
Everything I need for a Chili Cheese Dog Casserole!

Lightly grease a 9×13 inch baking dish.  Cut hot dogs into bite size pieces.

Saute 1/2 cup onion in 1 tablespoon of Olive Oil for about 5 minutes.  Add hot dogs and saute until nicely browned.

Tear up the hot dog buns and arrange the pieces in the bottom of the dish evenly.  (Note:  I toasted my buns first based on reviews but I don’t think I will next time….I like a little bit of soggy bun 🙂

Layer the hot dog pieces over the buns.

Pour the chili (stir the chili well first) over the hot dogs, , then spread the mustard over the chili.

All we need now is the cheese!

Top off with the cheese.

Bake in the preheated oven for 30 minutes

In the oven, topped with cheese...I can see the potential already!
In the oven, topped with cheese…I can see the potential already!

Serve with your favorites sides and Bon Appetit!

Served it alongside some boiled potatoes and tomatoes (Hey, I was trying to be a little healthy :-)
Served it alongside some boiled potatoes and tomatoes (Hey, I was trying to be a little healthy 🙂

Bottom Line:

This was a nice twist on an old favorite and I will probably make it again sometime.  Again, it is hard to improve on a good old-fashioned chili dog but this was a close runner up and I think this would be an awesome tailgate or Super Bowl recipe!  My husband, the meat lover, of course loved it.  It isn’t gourmet, it isn’t healthy, but it sure was fun to eat!  Change things around by adding your other favorite toppings like relish or kraut and make this dish your own!  Let me know how it works in your kitchen and Keep On Cooking!

Read more: <a href=”http://www.food.com/recipe/chili-dog-casserole-43068?oc=linkback”>http://www.food.com/recipe/chili-dog-casserole-43068?oc=linkback</a&gt;


Every now and then you find the need to use up some extra ingredients you have on hand in the kitchen.  I happen to have extra eggs, onions, some bell peppers, cheese….sounds like  a breakfast casserole to me!  Even better….for dinner!

Sausage and Vegetable Breakfast Casserole

This recipe comes so easily together and is always a crowd-pleaser.  Many times I make it into two smaller casserole dishes and give one away to friends or family.  Other times, I double it and cut it into tiny squares for a great brunch tailgate recipe…It goes fast!

Another great benefit to this recipe is that it reheats beautifully to have for lunch the next day and it is so versatile that you can use any kind of vegetables you have on hand.  You could even substitute the sausage for turkey sausage or ham.  Mix up the types of cheeses you use…..so many possibilities!

Note:  In the recipe, I saw 1-2 cups of the veggies and don’t specify.  This is because if you prefer more egg and cheese, you should use less veggies.   It is just your taste preference.  You can’t go wrong!

Ingredients

  • 1 lb. sausage (I use Jimmy Dean’s Hot sausage)
  • 1-2 cups of diced onion
  • 1-2 cups of diced red, yellow, green, or orange bell peppers (I like a mix but use what you have on hand)
  • 1-2 cups of mushrooms, chopped
  • 8 eggs
  • 1/2 cup milk
  • Hot Sauce, to taste ( I use several tablespoons…ha, ha)
  • Salt and Pepper, to taste
  • 1 tablespoon of Onion Powder
  • 3 cups of shredded cheese (I usually use cheddar but will also do a mix if I have different kinds)

Directions

Saute the sausage until thoroughly cooked in a large skillet. 

Sausage Browing
Sausage Browing

Drain, then add the onion to the pan that still has some of the remaining sausage fat and saute until the onions are tender, usually about 5 minutes. 

Onions added into pan with sausage fat

Add the diced peppers and mushrooms to the pan and saute about 10 additional minutes on medium low heat. 

Onions, Mushrooms, and Peppers all in the pan together

Add the sausage into the pan, season with salt and pepper and let the flavors meld on low for about 5 minutes.

IMG_0567

8 Beautiful Farm Eggs
8 Beautiful Farm Eggs from Decatur, TN

Crack your eggs and mix in 1/2 cup milk and onion powder.   Whisk well.

Whisked Eggs with Milk

Add hot sauce and cheese; stir until well blended.

Hot Sauce and Cheese going into egg mixture

In a large bowl, combine the sausage/veggies mixture and the egg mixture together and mix well.

All ingredients have finally met :-)
All ingredients have finally met 🙂

Pour into a greased 8 x 10 casserole, (I just spray it with Pam), and pour mixture in. 

Ready to go in the oven

Bake at 350 degrees for 50-55 minutes until set and warm in the center.

Sausage and Vegetable Breakfast Casserole

Dinner is served!!

Served along side some fried potatoes with onion and red pepper, and some good slice tomatoes

Bottom Line:  This is very tasty and easy to make for a large group or just the family for a hassle-free weeknight dinner.  I love recipes that you can play with the ingredients so I can wait to see what you add to yours and how it turns out.  Hint:  For Heat Seekers, like myself, hot pepper sauteed in the veggie mixture are a nice addition!  Enjoy and Keep On Cooking!


Last week, I didn’t have high reviews for one of Ree Drummond’s…aka “The Pioneer Woman” recipes (Cajun Chicken Pasta…yuck).  However, this week she redeemed herself with of all things….A Chicken Breast!  Although they are usually healthy, cheap and very versatile to work with in the kitchen, they can also be bland, dry, and a little BORING!  Ree’s “Tequila Lime Chicken” changes those notions and you are left with a wonderful tasty dinner…Fiesta Style!

Tequila Lime Chicken by The Pioneer Woman

This recipe came at the perfect time because I had leftover Black Beans and Mexican Rice from my Black Bean Spinach Burrito Wraps from the other day and in the same episode that she prepared the “Tequila Lime Chicken”, she also prepared a Mexican Rice Casserole and Refried Black Beans.  So, I took my leftovers and adapted them to her new versions and ended up with two tasty sides.  In the future, I will definitely make these two meals back to back to utilize all the leftovers on hand!

Here is a link to the whole episode with all 3 recipes:  http://www.foodnetwork.com/shows/the-pioneer-woman/300-series/frontier-fiesta.html

Ingredients
4 limes
1 cup tequila
1/4 cup olive oil
2 teaspoons kosher salt
5 cloves garlic
1 jalapeno, sliced
1/2 bunch chopped fresh cilantro
12 boneless, skinless chicken breasts
2 cups grated Monterey JackOptional Condiments:  Jalapenos, Salsa, Avocado, Sour Cream, etc…. 
Directions
Your ingredients...I didn't realize I used a top shelf tequila until Jeff scolded me..ha, ha!
Your ingredients…I didn’t realize I used a top shelf tequila until Jeff scolded me..ha, ha!

Slice open the limes and squeeze the juice into a food processor or blender. Add the tequila, olive oil, salt, garlic, jalapenos and cilantro.

Ingredients in the blender

Blend the mixture until totally combined.

The marinade is ready

Add the chicken to a large plastic bag and pour in the lime-tequila mixture. Seal the bag and marinate in the fridge for several hours or overnight.

Chicken and Marinade in the bag to marry all the flavors in the refrigerator for several hours

Remove the chicken from the bag and grill it over medium-high heat. We also grilled some Jalapenos to put on top our chicken…a yummy addition and highly suggested!

Chicken and Jalapenos on the grill and browning nicely!

Rotate the chicken 45-degrees on both sides to create nice grill marks, and continue grilling until the chicken is cooked through, 4 to 5 minutes per side.

Our jalapenos going on top of the chicken

Place the Monterey Jack over the top of the sliced chicken breasts so it melts and add your preferred condiments to complete your chicken!

I added cheese and salsa to my dish served alongside Mexican Rice Casserole and Refried Black Beans
Jeff topped his with cheese, salsa, and then some of my creamy lime sauce leftover from the Burrito Wraps...we really used the leftovers quite nicely!
Jeff topped his with cheese, salsa, and then some of my creamy lime sauce leftover from the Burrito Wraps…we really used the leftovers quite efficiently!

Bottom Line:

This is a tasty way to serve chicken breasts!  The key is really letting the marinade soak in for at least 3-4 hours but I would definitely go longer if you have time…even overnight!  The tequila breaks down the chicken to create a really moist flavor and I loved the addition of our grilled jalapenos on top…HEAT!  Try this easy recipe for you family and let me know what you think and….KEEP ON COOKING!

Read more at: http://www.foodnetwork.com/recipes/ree-drummond/tequila-lime-chicken-recipe.html?oc=linkback

So Easy! So Simple!  Just slice up some Strawberries and Watermelon, chop up some Basil, mix them together, and top with a nice drizzle of Balsamic Glaze!  This is the perfect light side dish that pairs very well with your favorite fish entree…or serve it as a light dessert.  Yummy!


Strawberry Watermelon Salad


  • 6 cups baby spinach, loosely packed
  • 1 (15 ounce) can black beans, rinsed and drained
  • 1-1/2 cups cooked brown rice or Mexican Rice, (recipe for Mexican Rice recipe)
  • 1/2 cups chopped romaine heart lettuce
  • 1/2 cup grated cheddar cheese, reduced-fat
  • 1/2 cup salsa (recipe), optional Pico de Gallo
  • 6 tablespoons Greek yogurt, fat-free
  • Kosher or sea salt to taste
  • 6 (8″ whole grain) wraps or tortillas

Read more at http://skinnyms.com/spinach-bean-burrito-wrap/#FlsiwfWmsrg8pjG8.99

Cinco De Mayo…another reason for food lovers to eat a little too much and possibly, drink too much!  In order to lighten up the celebration just a bit, I am sharing a recipe from one of my favorite websites that features great healthy recipes….SkinnyMs.com.  Her recipe “Black Bean and Spinach Burrito Wrap was just what I was looking for to put a little bit of “healthy” into a normally calorie-heavy holiday!

Bean and Spinach Burrito Wraps by SkinnyMs.com


My version is slightly different in that I omitted the lettuce (it didn’t seem necessary with the spinach) and I substituted my recipe for Creamy Lime Sauce instead of using plain Greek yogurt.  I also used regular cheddar cheese because I’m not a big fan of how lower fat cheeses melt.  Her recipe for Skinny Mexican Rice is amazing and I have included the link for you…Add some sirracha for some much needed heat!

Skinny Mexican Rice by SkinnyMs.com
I’m cooking Skinny Mexican Rice by SkinnyMs.com

Ingredients:

Directions:

To warm tortillas, preheat oven to 300 degrees.  Stack tortillas, wrap in foil, and warm in oven for 15 minutes.

In a large skillet, heat olive oil.  Add black beans and spinach.  (I add the spinach gradually so it wilts and you can fit more into the pan.)  Heat until spinach is wilted and black beans are warmed through, approximately 3-5 minutes.

Spinach going in with the black beans

Evenly distribute spinach and bean mixture in the middle of the wraps (leaving about 2″ on one end for folding), add 1/4 cup rice to each wrap, then cheese, salsa, and a tablespoon of Creamy Lime Sauce. 

I really think the Creamy Lime Sauce makes this recipe

Fold wraps over and under on the ends.

Folding and taking a picture at the same time can be a little tricky!

I ended up doing a large casserole dish of 6 wraps and a smaller one of 3 since I was also cooking for my client.  I also popped these babies in a 300 degree oven just so the cheese would get melted nicely. This turned out to be a difference maker!

6 of them in an 8 x 12 casserole dish


Served them with a side of Corn on the Cob with Cilantro Butter...Yum!
Served them with a side of Corn on the Cob with Cilantro Butter…Yum!

Bottom Line:  Not only did Jeff and I eat this up, but my client’s family did as well and are already requesting it again soon!  It is even great the next day and is a perfect suggestion for a Meatless Main Dish!  Keep On Cooking!

For her original recipe, check out this link:  http://skinnyms.com/spinach-bean-burrito-wrap/

Strawberries…a sweet and juicy burst of delight!  Recently, Jeff brought home way too many for us to eat from one of his sweet employees at the plant.  They are always sending him home with fresh farm eggs, strawberries, blackberries (my favorite), but sometimes there is just too much for the two of us and I have to figure out what to do with them all!

I was in the mood to celebrate my blog hitting 2500 followers so I decided what better way to treat my self along with Amelia and Walker than a good strawberry ice!

I went on an internet search to come up with a recipe that I already had all the ingredients for and saw Food Network Magazine’s recipe.  I was fired up!  One of my favorite childhood memories was waiting for the Icee Truck to come through the neighborhood with the crazy music playing and I couldn’t wait for Amelia and Walker to taste this icy treat!

Strawberry Italian Ice from the Food Network Magazine


Ingredients
3 cups halved strawberries or chopped pineapple (I used all strawberries)
2 tablespoons sugar (I ended up using 3 tablespoons because my strawberries weren’t as sweet this time)
2 tablespoons honey
1 tablespoon fresh lemon juice
Directions
My Ingredients
My Ingredients

Blend the fruit, sugar, honey and lemon juice with 2 cups ice in a food processor or blender until chunky.

Ingredients in the blender and ready to go!
Add another 1 cup ice and blend until completely smooth.Pour the mixture into a shallow baking dish and freeze 30 minutes.

Liquified and into the dish it goes...ready for the freezer
Liquified and into the dish it goes…ready for the freezer

Scrape the ice with a fork until slushy, then freeze until firm, about 2 more hours.

She is ready!
She is ready!

Scoop into paper cups.  (I put the kids in children-friendly cups and had mine in a colorful wine glass).

Strawberry Italian Ice
Strawberry Italian Ice…My result!
Amelia
Amelia


Walker
Walker

As you can tell from their reactions, this was a hit!

Bottom Line:  This will take you back to red-lipped, head freezing childhood memories and I loved it! 

Read more at: http://www.foodnetwork.com/recipes/food-network-kitchens/italian-ice-recipe.html?oc=linkback